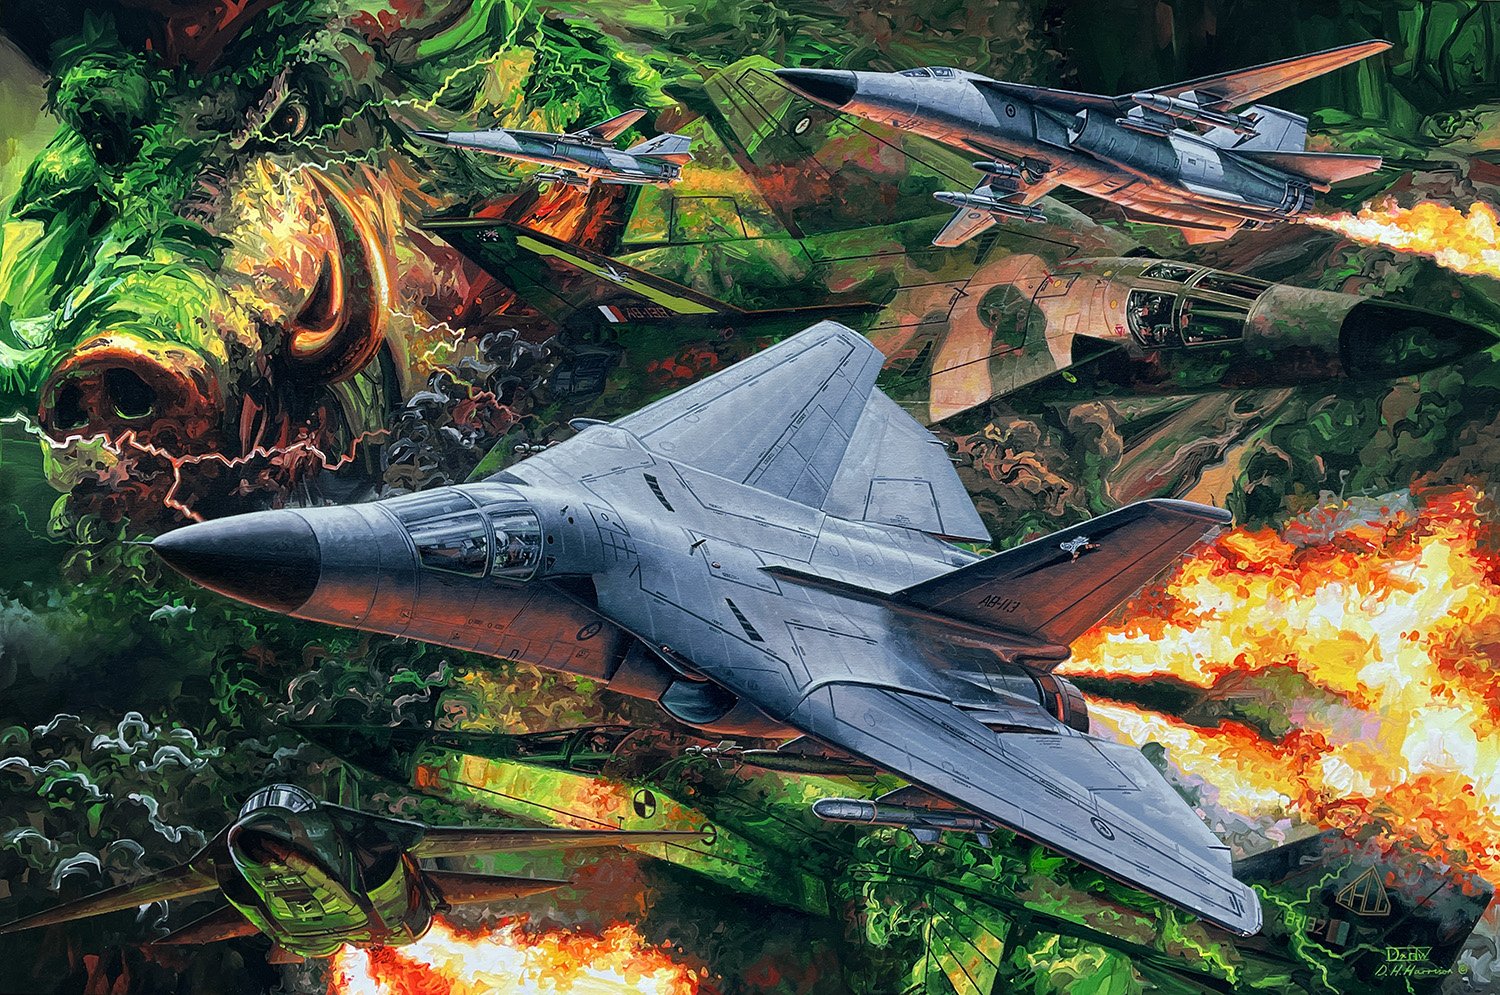
Fire and Fury: F-111 Pig
(H) 60cm x (W) 90cm
(H) 23.62” x (W) 35.43”
Acrylic on Canvas
Available as a Limited Edition Giclee print from the Store.
The General Dynamics F-111 was originally designed to meet a USN and USAF requirement for a long-range strike aircraft. Australia made the decision to procure the F-111C as replacement for the ageing Canberra bomber in 1963. However continued delays, development issues and increasing costs deferred RAAF delivery until 1973.
Despite these teething problems the F-111 remained the longest serving strike/bomber aircraft in Australian service with a final flight in December 2010 after nearly 37 years of duty. It was the first aircraft with variable geometry wing accepted into the RAAF. Flying at twice the speed of sound it was also the fastest. Australia was the only export customer of the aircraft, initially operating 24 of the F-111C version with longer wings. Four aircraft were modified with a reconnaissance pack and designated RF-111C while several ex-USAF airframes were later delivered as attrition replacements. A final supplemental acquisition of F-111G aircraft arrived in 1994.
82 WG including 1 and 6 SQNs at Amberley, Queensland remained operators of the F-111 throughout service with additional support from the Aircraft Research and Development Unit (ARDU). The RAAF’s F-111 fleet was never deployed operationally in a strike capacity although reconnaissance RF-111C variants did participate in missions over East Timor in 1999. Probably the greatest achievement, and lasting legacy of the F-111, was the status it held as a regional deterrent.
In US service the F-111 was called the Aardvark on account of a long nose and terrain following capabilities, in Australian service it was affectionately known as the ‘Pig’.
The F-111 had a special place in the hearts and minds of Australians. A popular spectacle at air shows and public events was the ‘dump and burn’ where fuel was jettisoned between the afterburners resulting in a large sheet of flame. A flypast few would forget!
Interested in a similar painting of a favourite aircraft, unit or squadron? Check out the commissioning information and get in touch.
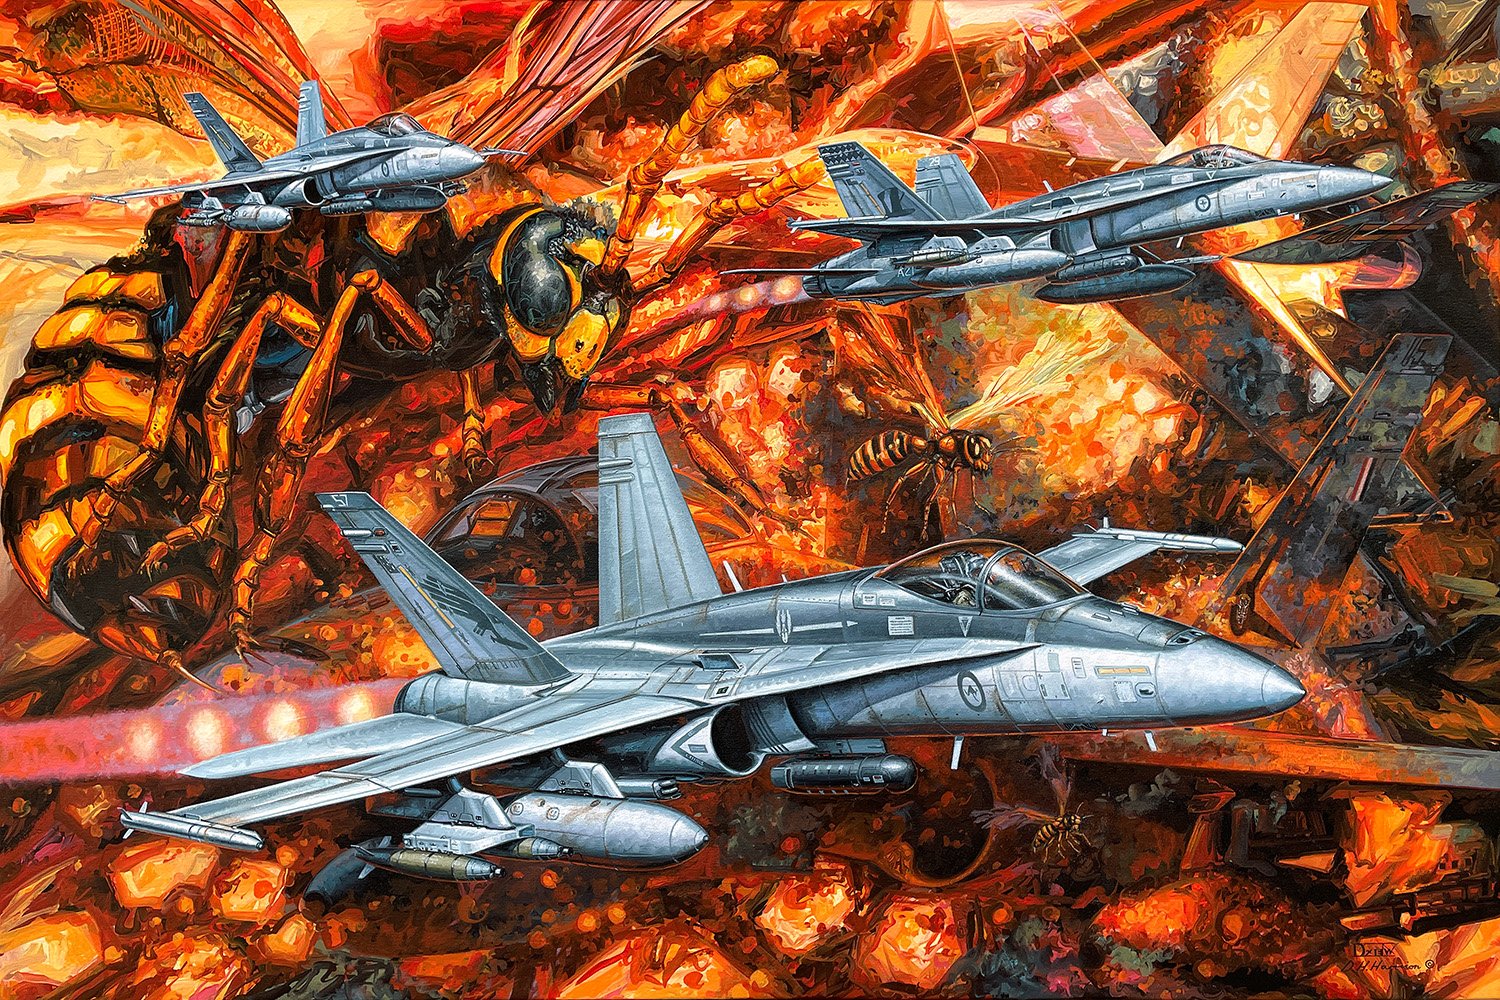
Sting in the Tail: F/A-18 Hornet
(H) 60cm x (W) 90cm
(H) 23.62” x (W) 35.43”
Acrylic on Canvas
Available as a Limited Edition Giclee print from the Store.
The McDonnell Douglas F/A-18A and B Hornet was introduced into RAAF service during 1985 to replace an ageing Mirage IIIO fleet. It became the backbone of Australia’s frontline fighter force while providing a very capable strike and ground attack capability. RAAF Williamtown in NSW became known as the Hornet’s Nest and home to 3 and 77 SQNs RAAF alongside 2 OCU for conversion training. 75 SQN RAAF operated their Hornet’s from Australia’s northern air base at Tindal, NT while the Research and Development Unit, ARDU, provided complex support from South Australia. During 35 years of service Australia’s F/A-18s underwent numerous upgrades and were involved in some of the RAAF’s most significant combat deployments since the Vietnam War including Diego Garcia, Operation Falconer and Operation Okra. The RAAF replaced long serving F-111s with Boeing F/A-18F Super Hornets and E/A-18G Growlers from 2010 and the original F/A-18s became known as the “Classic Hornet”. These were eventually superseded by the F-35 Lightning II in 2021. Sting in the Tail reflects the deadly fighting capabilities of the insect world’s Hornet and pays homage to a classic of modern aviation.
Interested in a similar painting of a favourite aircraft, unit or squadron? Check out the commissioning information and get in touch.

The Mighty Hunter: P-3 Orion
(H) 60cm x (W) 90cm
(H) 23.62” x (W) 35.43”
Acrylic on Canvas
Available as a Limited Edition Giclee print from the Store.
Original artwork available in Store.
Australia became an early export customer of the Lockheed P-3 Orion in the 1960s. The airframe was based on the company’s turboprop Electra and designed as a dedicated Anti Submarine Warfare (ASW) platform. 11 SQN RAAF began replacing the ageing Neptunes in 1968 with ten P-3B model aircraft including A9-291. In 1978 P-3C versions were acquired and these airframes were subsequently upgraded to AP-3C standard during the early 2000s. The frontline Orion fleet was operated by 10 and 11 SQNs from Edinburgh, South Australia under the control of 92 Wing RAAF, with 292 and 492 SQNs providing training and maintenance support. Phasing out began in 2019 although 10 SQN RAAF continued operating two aircraft converted to AP-3C (EW) standard following a change of role and shift to 42 Wing. “The Mighty Hunter” pays tribute to the Lockheed P-3 and legend of Orion, a great hunter from Greek and Roman mythology also immortalised in a celestial constellation of the same name. During 55 years of service the P-3B, P-3C, AP-3C, AP-3C (EW) and TAP-3B Orion evolved into a proven hunter and multi-task aircraft providing maritime operational support.
Interested in a similar painting of a favourite aircraft, unit or squadron? Check out the commissioning information and get in touch.

Fear the Wolf: EA-18G Growler
(H) 51cm x (W) 41cm
(H) 20” x (W) 16”
Acrylic on Canvas
Available as a Limited Edition Giclee print from the Store.
Original Canvas artwork available in the Store.
‘Fear the Wolf’ immortalises the Boeing EA-18G electronic attack aircraft and the role it has assumed in modern air combat. The hunting attributes reflect the aircraft’s adopted wolf motif and provided inspiration for the nickname Growler. The state-of-the-art combat jet is a dedicated electronic warfare platform which evolved as a distinct variant from the F/A-18F Super Hornet. It is a highly capable aircraft able to suppress and disable enemy air defences using sophisticated electronic equipment to jam, deceive, and disrupt hostile communication systems. Following initial purchase of Super Hornets, Australia later updated the contract to include the advanced Growler. 6 SQN form part of the RAAF’s air combat capability and operate twelve EA-18G out of Amberley Queensland. A46-301 is the RAAF’s first EA-18G and 100th Hornet airframe built for Australian service including previous ‘Classic’ and Super Hornet manufacturing. A46-305 is pictured in formation.
Interested in a similar painting for a favourite unit, squadron or aircraft? Check out the commissioning information and get in touch.
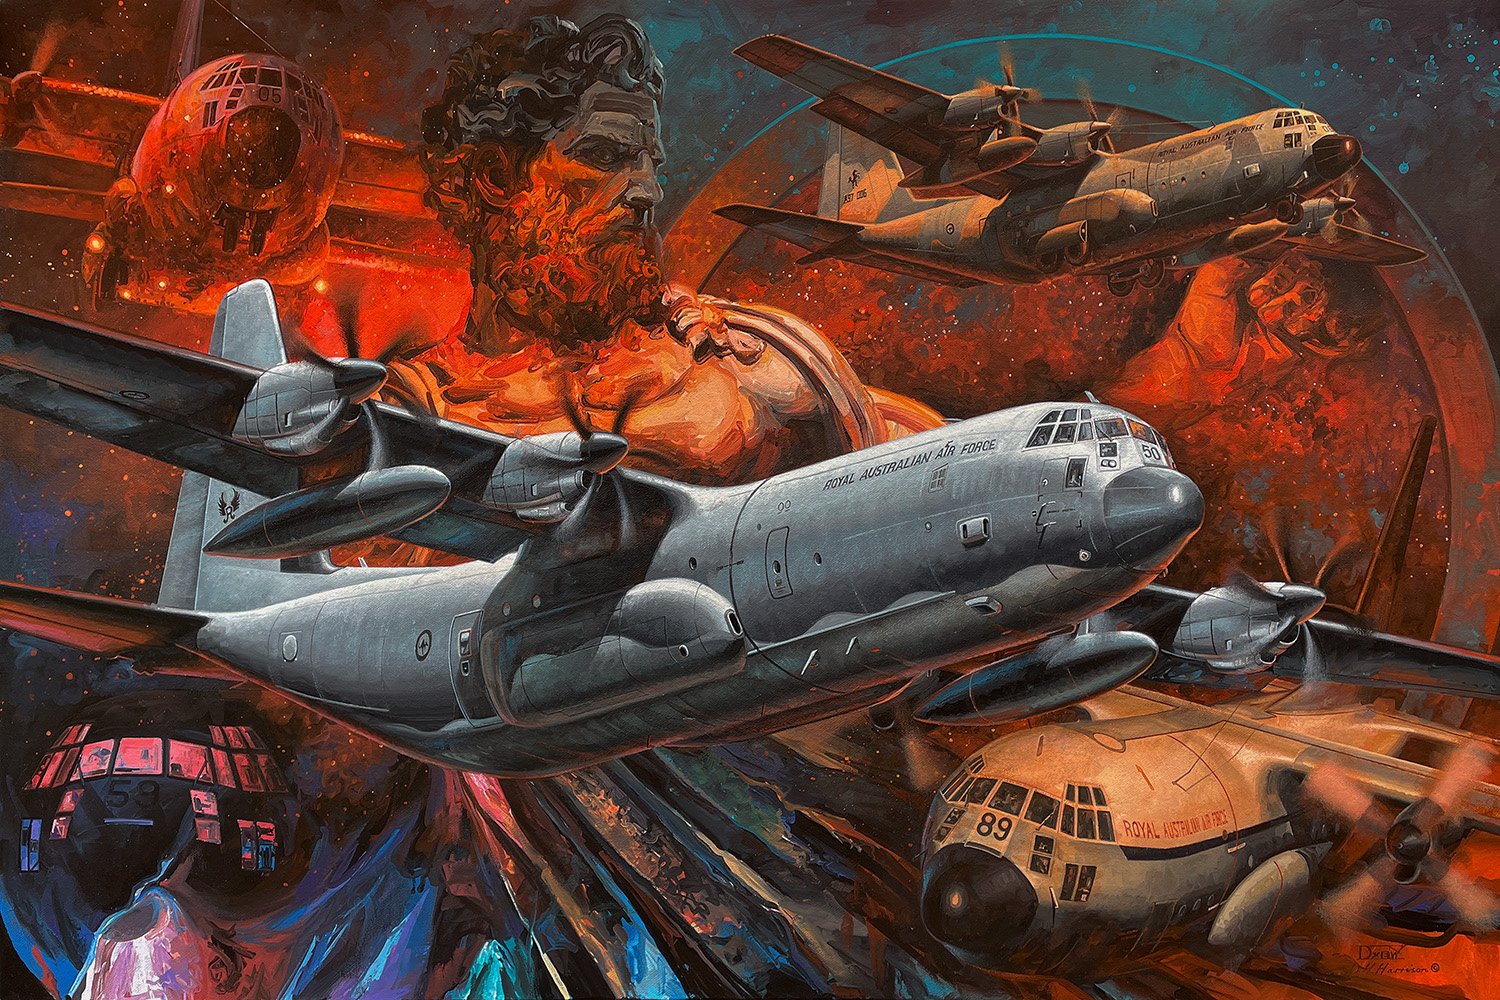
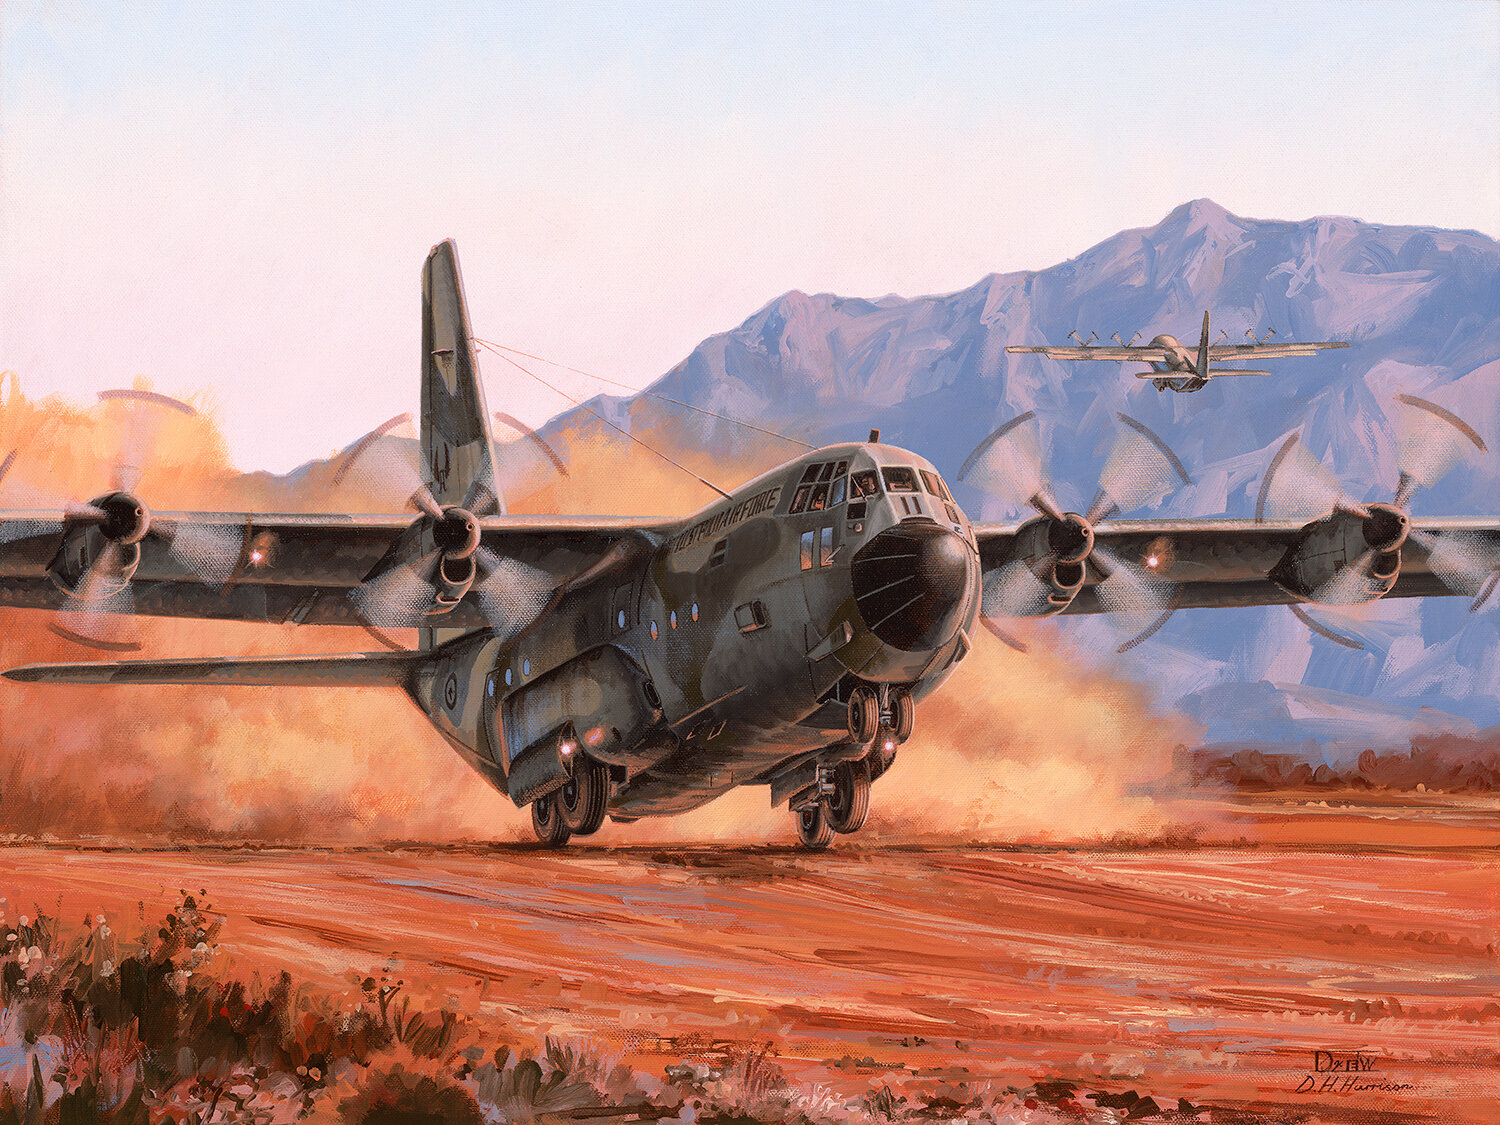
Wings of a Titan: C-130 Hercules
(H) 60cm x (W) 90cm
(H) 23.62” x (W) 35.43”
Acrylic on Canvas
Available as a Limited Edition Giclee print from the Store.
Original Canvas artwork available in the Store.
The ubiquitous Lockheed C-130 Hercules transport has been a durable workhorse since design in the 1950s. Australia was the first international Hercules customer in 1958 replacing the RAAF’s ageing C-47 Dakota fleet with twelve C-130A models. The transport has become an invaluable asset for military and relief operations in delivering troops, equipment, and humanitarian aid. Wings of a Titan includes the aircraft’s namesake, Hercules, god of strength from Greek and Roman mythology. The legendary figure is surrounded by all four C-130 variants operated by the RAAF in 65 years of operations from 1958 to 2023, and beyond.
C-130A, A97-205,
C-130E, A97-159 and A97-189,
C-130H, A97-006
C-130J-30, A97-450.
36 SQN RAAF and 37 SQN RAAF have been Australia’s primary frontline C-130 operators over the six decades with the latter assuming sole responsibility in 2006.
Interested in a similar painting for a favourite unit or squadron? Check out the commissioning information and get in touch.
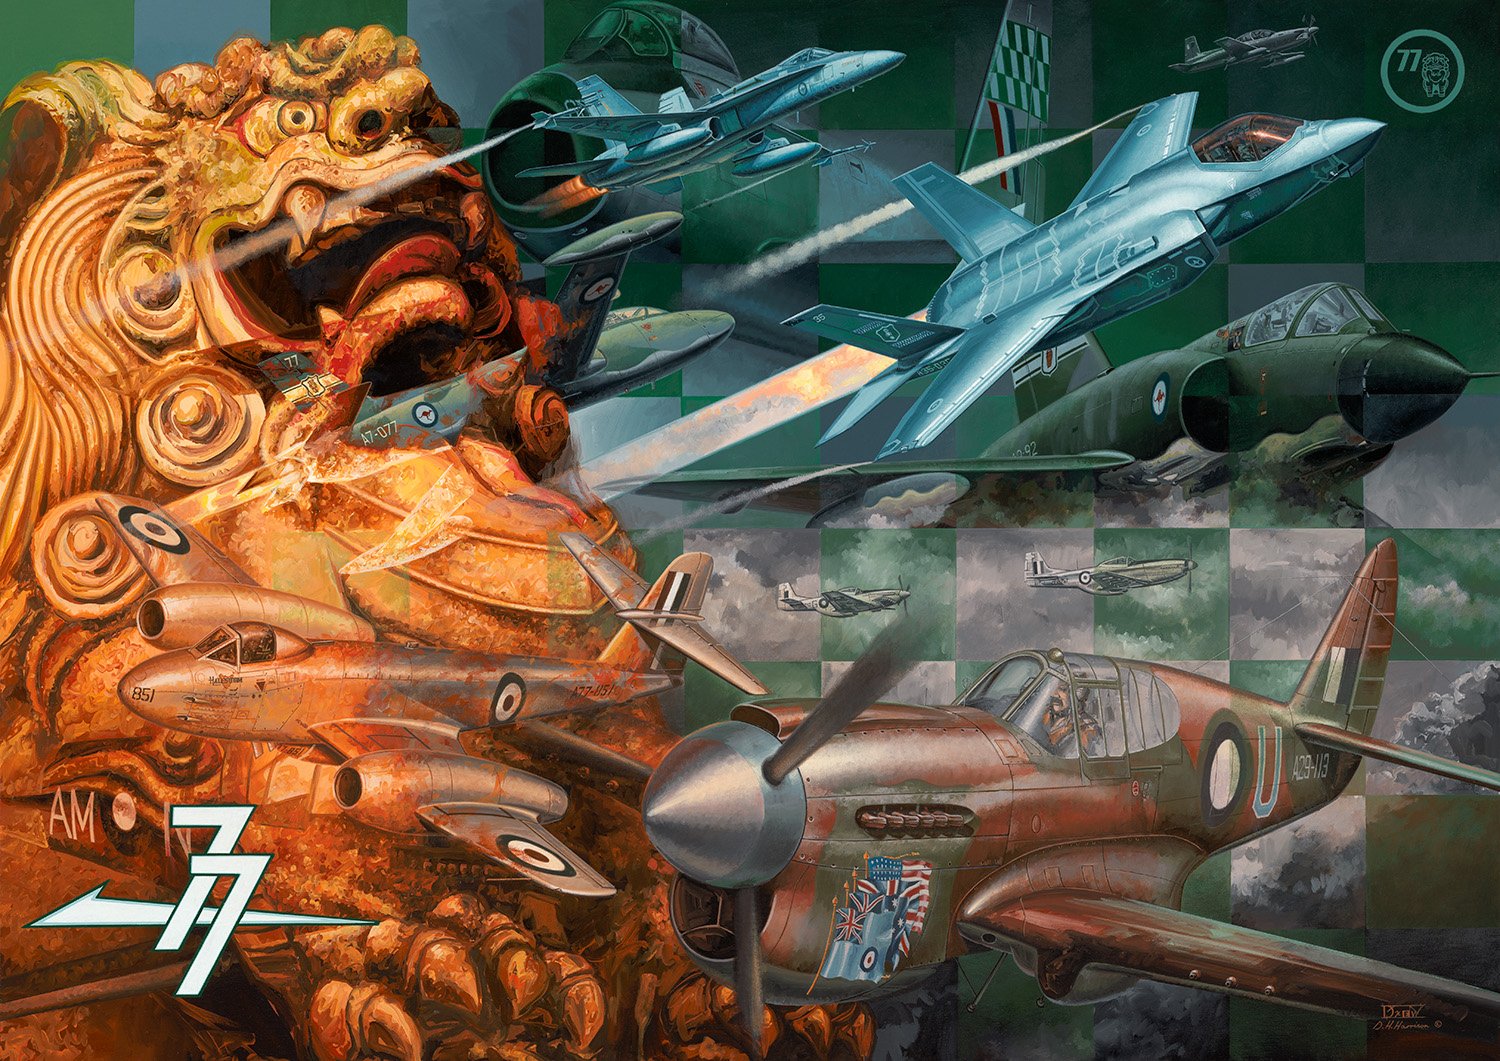
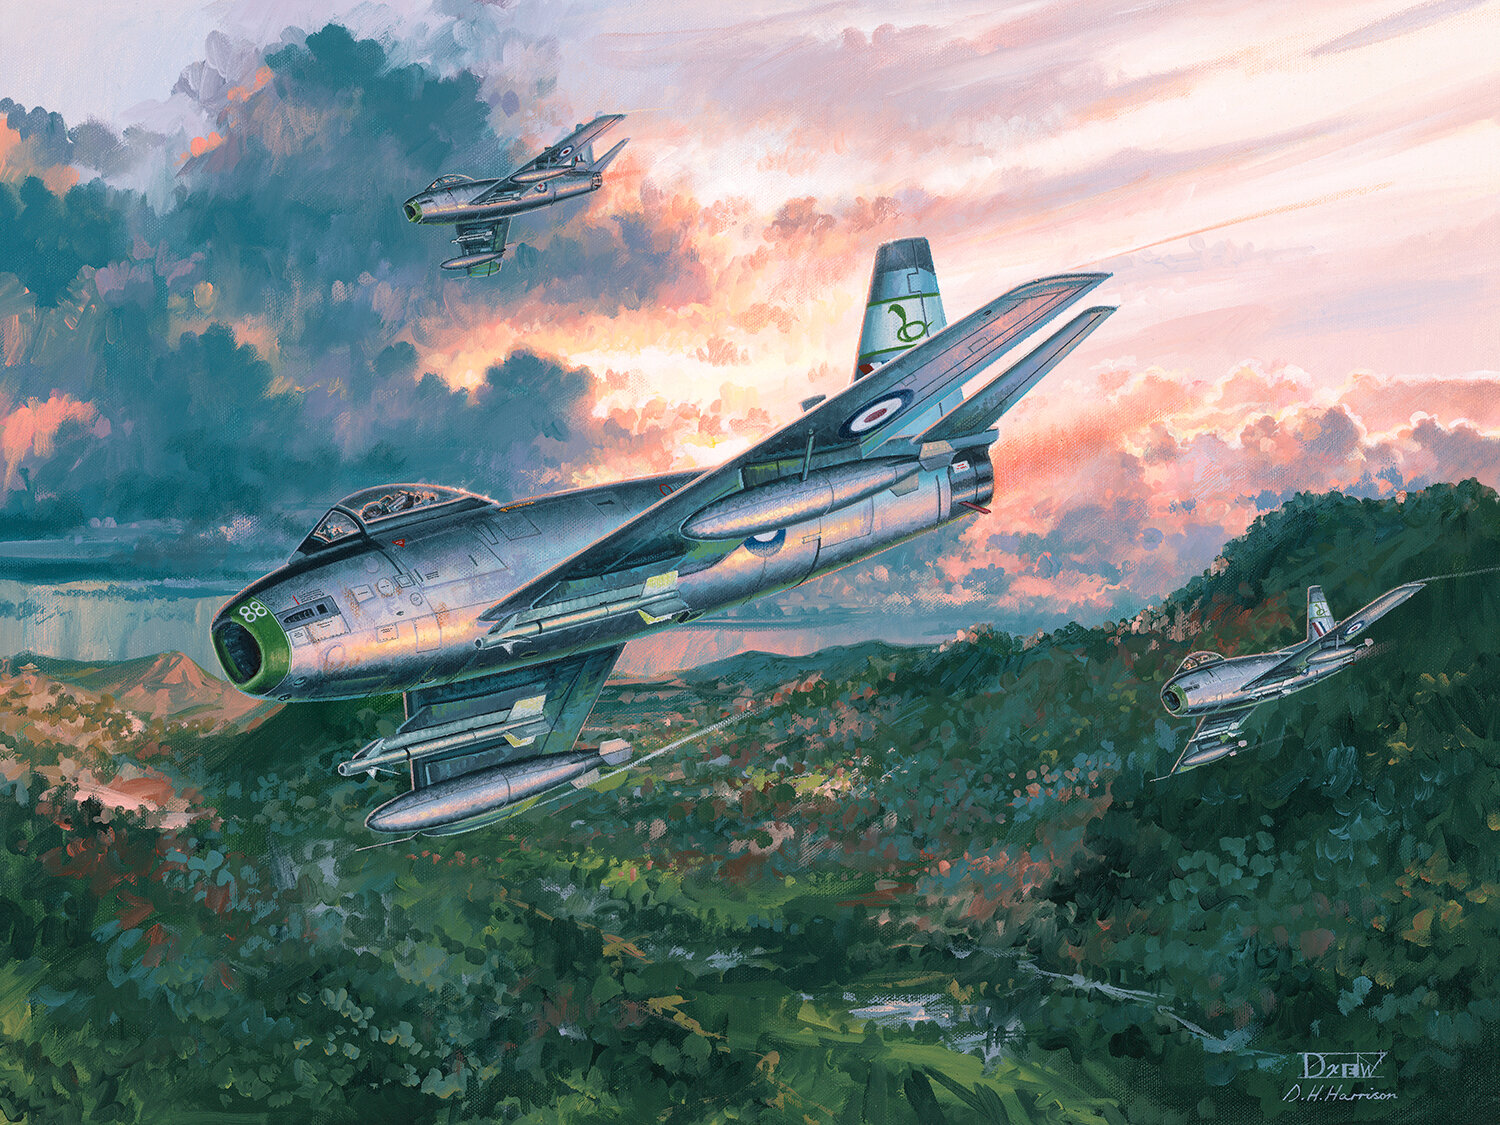
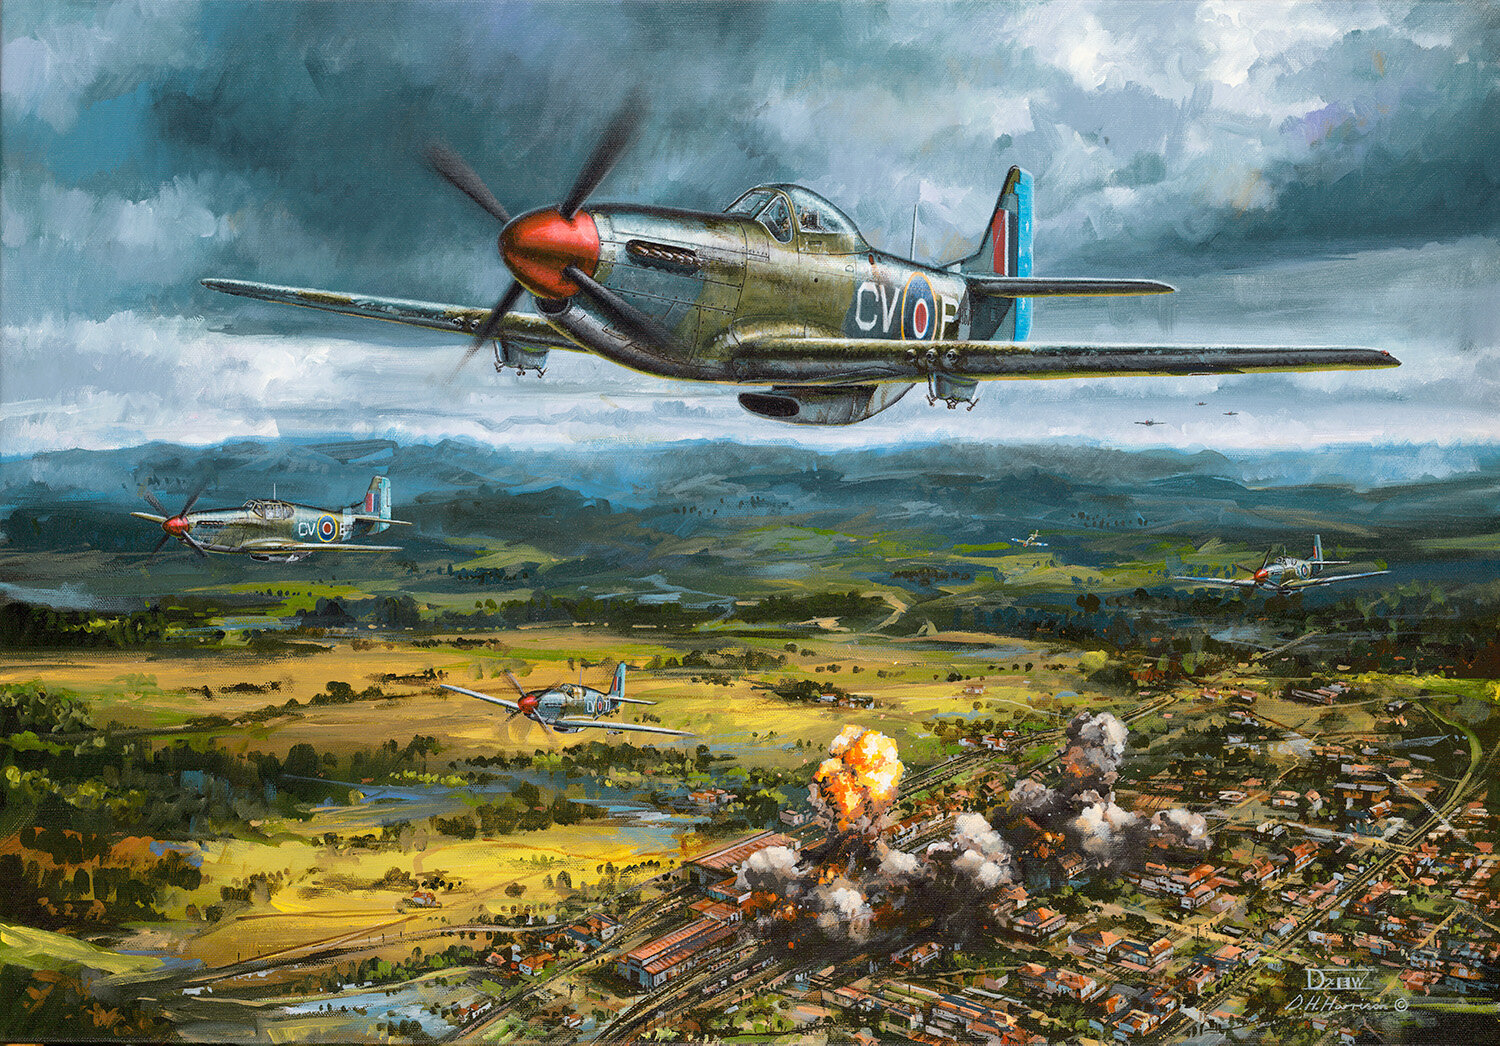
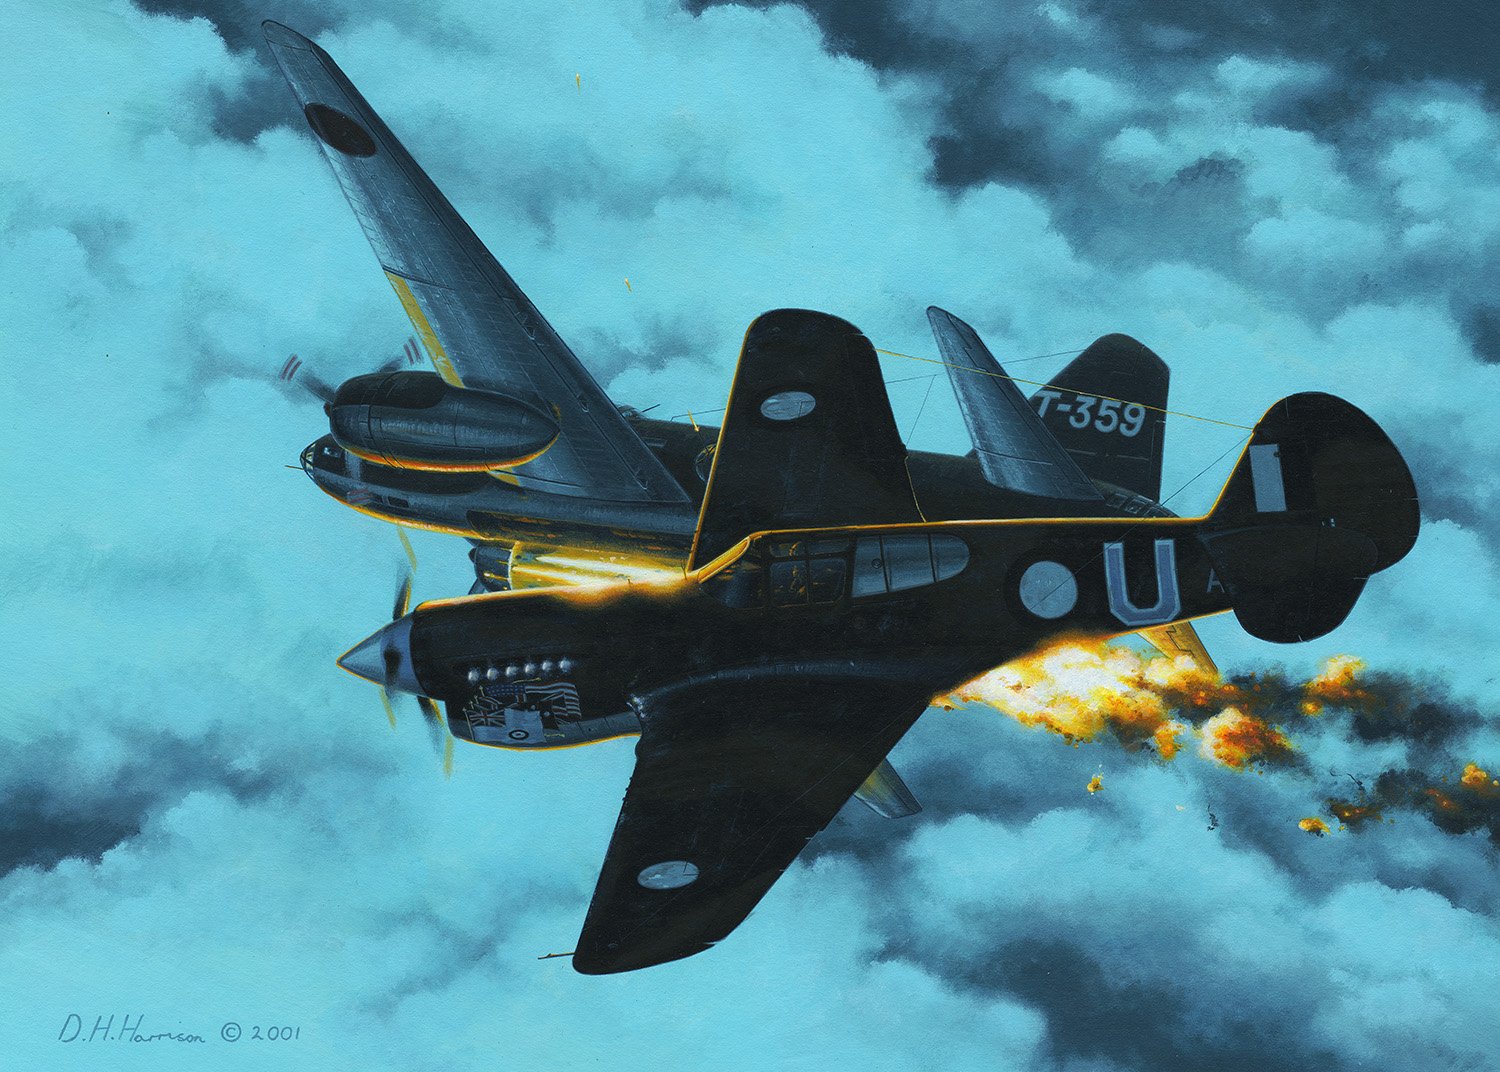
77 SQN RAAF: Swift to Destroy
(H) 85cm x (W) 120cm
(H) 33.46" x (W) 47.24"
Acrylic on Canvas
Available as a Limited Edition Giclee print from the Store.
Available as a Limited Edition puzzle from Puzzle Road.
CLICK HERE TO SHOP JIGSAW PUZZLE
77 SQN was one of three RAAF fighter squadrons formed during the desperate days of WWII. Under the charismatic leadership of S/Ldr ‘Dick’ Cresswell it was sent into action with P-40 Kittyhawks, firstly from Northern Australia and then across the South-West Pacific. The post-war period involved occupational duty in Japan flying P-51 Mustangs and by the early 1950s the pilots were in action over the Korean peninsula. 77 SQN also became the first RAAF unit to operate jet fighters in combat with the British designed Meteor. A Korean Temple Lion was adopted as their unit motif, which is affectionately known as the ’Grumpy Monkey’. Since the Korean War 77 SQN has been at the vanguard of Australia’s defence, actively engaged in the Malayan Emergency and more recently conflicts in Iraq and Afghanistan.
The title “Swift to Destroy” is derived from the 77 SQN motto and reflects the heritage and continued legacy of one of the RAAF’s premier fighter and attack squadrons. Standing proud in the background is the ‘Grumpy Monkey’ temple lion. This is formed on a green and white checkerboard pattern that was prominent on Meteor and Sabre aircraft during the 1950/60s. In the lower half is a legendary P-40 Kittyhawk flown by commander Cresswell when he brought down the unit’s first combat victory in 1942. Also included is Sgt Hale’s infamous ‘Halestorm’ Meteor in which he claimed the last air to air combat victories for 77 SQN and the RAAF. Incorporated throughout the design are other formidable aircraft the squadron has operated from Mirage, Macchi MB.326, Pilatus PC-9, F/A/18, up to the latest F-35 Lightning II.
Interested in a similar painting for a favourite unit or squadron? Check out the commissioning information and get in touch.
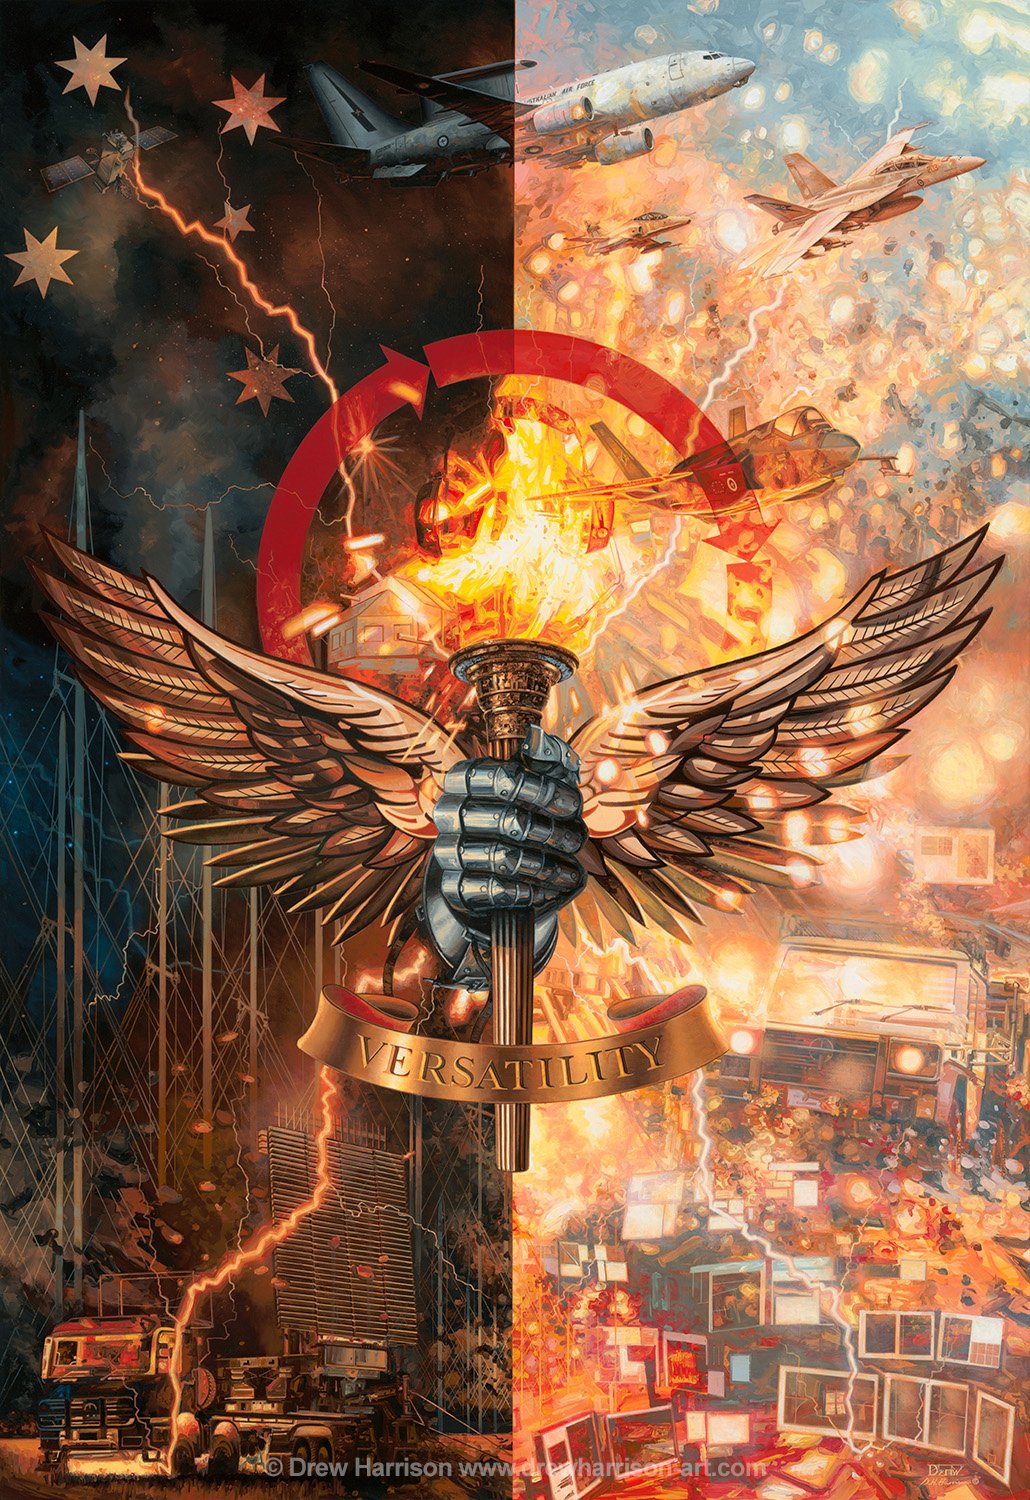
SACTU 25th Anniversary
(H) 145cm x (W) 100cm
(H) 57.08" x (W) 39.37"
Acrylic on Canvas
SOLD (Commission)
Commissioned especially by the RAAF’s Surveillance and Control Training Unit (SACTU) to commemorate 25 years since establishment. SACTU’s ongoing mission is to “Train Air and Space Power professionals ready to provide battle management capability for the Joint Force”. The artwork was unveiled at a special ceremony on 9th August 2024 at Newcastle NSW.
The hand painted artwork encompasses all aspects of the unit’s training in providing personnel for air, land and space systems. Central to this design is a derivation of SACTU’s official badge which incorporates many heraldic components such as the gauntlet representing strength, guidance and support; a torch of knowledge for training and phoenix wings symbolic of rise in importance. Circled above are arrow heads in a clockwise direction as representation of radar coverage and systems with a common objective. A split background highlights operations by day and night while four lightning bolts indicate electronic systems.
Background details include -
Left: TPS-77 Radar Installation, SBIRS GEO Satellite, JORN Radar Network, Surveillance telescope, Southern Cross.
Right: E-7A Wedgetail2 SQN RAAF, F-35A Lightning II 75 SQN RAAF, F/A-18F Super Hornet 1 SQN RAAF, Hawk 127 76 SQN RAAF, Mercedes G Wagon, remote Sensor Unit.
Interested in a similar painting for a favourite unit, squadron or aircraft? Check out the commissioning information and get in touch.
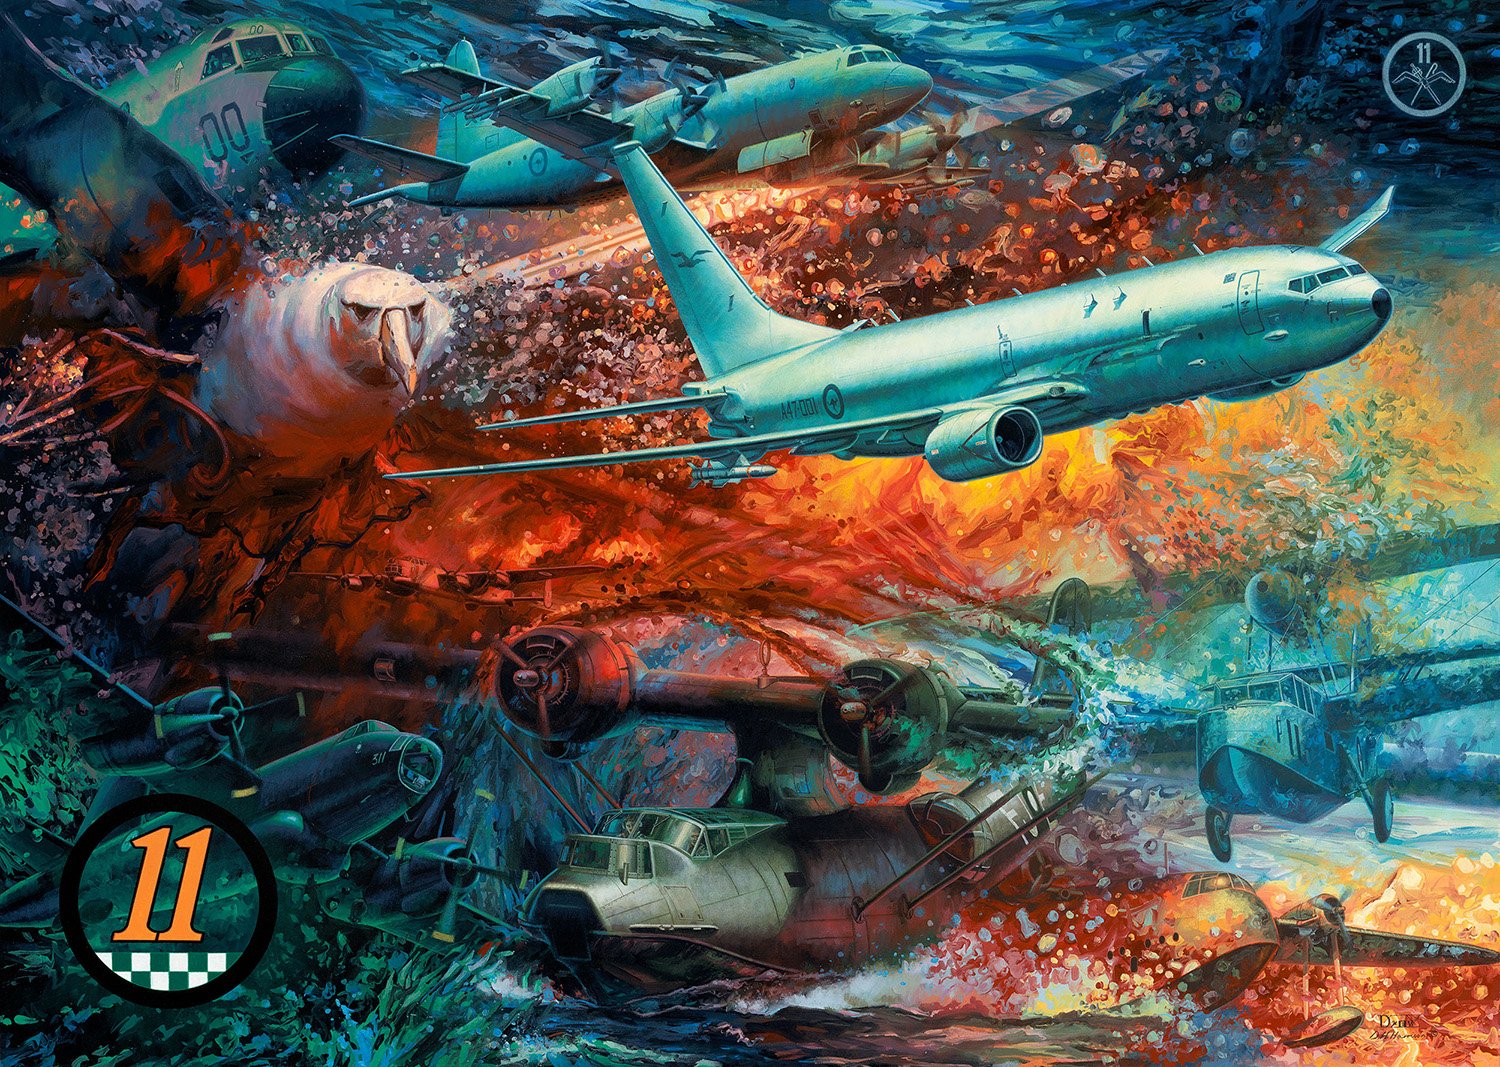
11 SQN RAAF: Shepherd or Destroy
(H) 85cm x (W) 120cm
(H) 33.46" x (W) 47.24"
Acrylic on Canvas
Available as a Limited Edition Giclee print from the Store.
Available as a Limited Edition puzzle from Puzzle Road.
CLICK HERE TO SHOP JIGSAW PUZZLE
11 SQN RAAF formed in 1939 and was soon employed monitoring shipping along Australia’s northern coastal frontier. With the outbreak of the Pacific War the unit expanded operations across neighbouring islands and re-equipped with the legendary PBY Catalina. Maritime patrol, surveillance and rescue operations were often flown under cover of darkness resulting in the airframes being painted black and earning the nickname ‘Black Cats’. 11 SQN continued in similar maritime roles after WWII with a long and proud record of patrolling Australian waters and extended operations through the Middle East.
The title “Shepherd or Destroy” is derived from the squadron motto and is a dynamic tribute to the heritage and continued legacy of 11 SQN RAAF. Featured prominently is the unit’s icon – the Albatross, flying in formation with long serving P-3 Orion and latest Boeing P-8 Poseidon replacement. In the lower half are legendary aircraft the squadron have operated during times of war and peace, from early days, with Supermarine Seagull and Short Empire flying boats, to the Lincoln, Neptune and ubiquitous Catalina. The nautical connection and link to ocean remains an underlying feature of the design with additional representations of a sword and shepherd’s crook from the unit badge.
Interested in a similar painting for a favourite unit or squadron? Check out the commissioning information and get in touch.
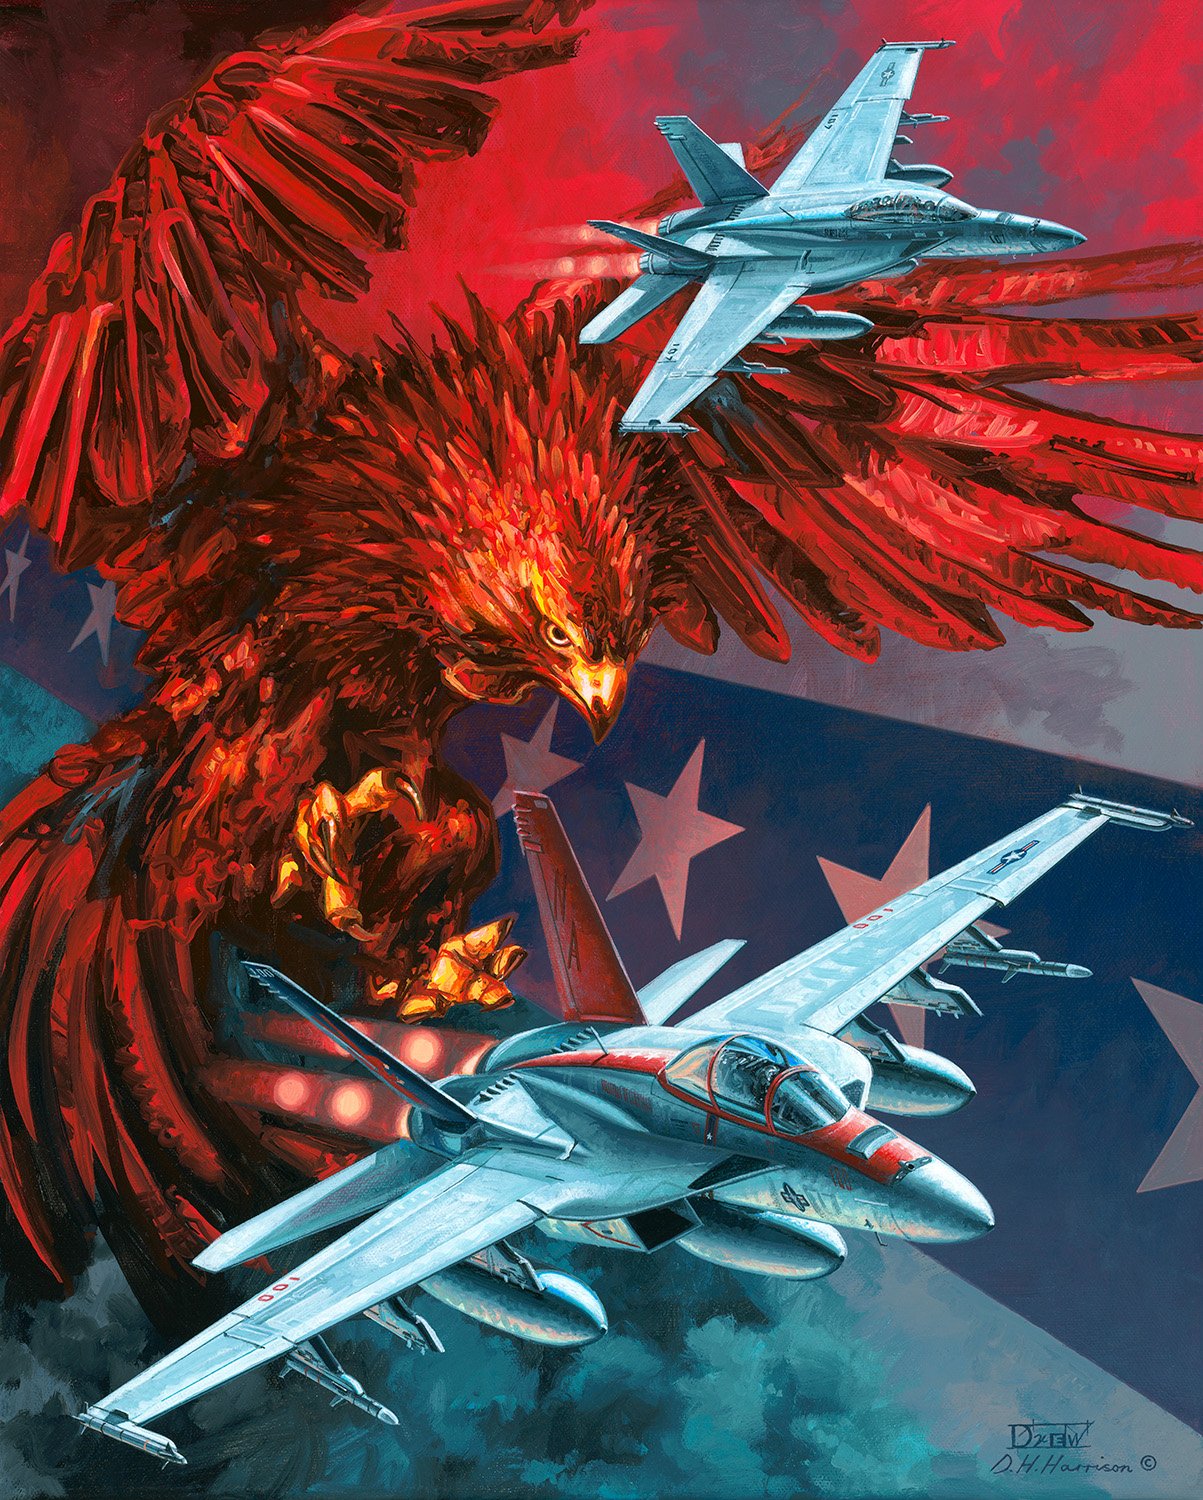
VFA-22 "Fighting Redcocks"
(H) 51cm x (W) 41cm
(H) 20” x (W) 16”
Acrylic on Canvas
Available as a Limited Edition Giclee print from the Store.
Original Canvas artwork available in the Store.
Strike Fighter Squadron 22, VFA-22 of the United States Navy, is also known as the “Fighting Redcocks” in honour of their Rhode Island Red Rooster mascot. The unit was originally commissioned as Fighter Squadron 63 in 1948. After redesignation as an Attack Squadron in 1956 it later changed to VA-22 in 1959. Since adoption as VFA-22 in 1990 the unit has operated the F/A-18 Hornet series of multi-role fighter and attack aircraft including the latest F model Super Hornet. Currently STRKFITRON 22 forms part of Carrier Wing 17 (CVW-17) stationed at NAS Lemoore and is attached to USS Nimitz.
Interested in a similar painting of a favourite unit, squadron or aircraft? Check out the commissioning information and get in touch.
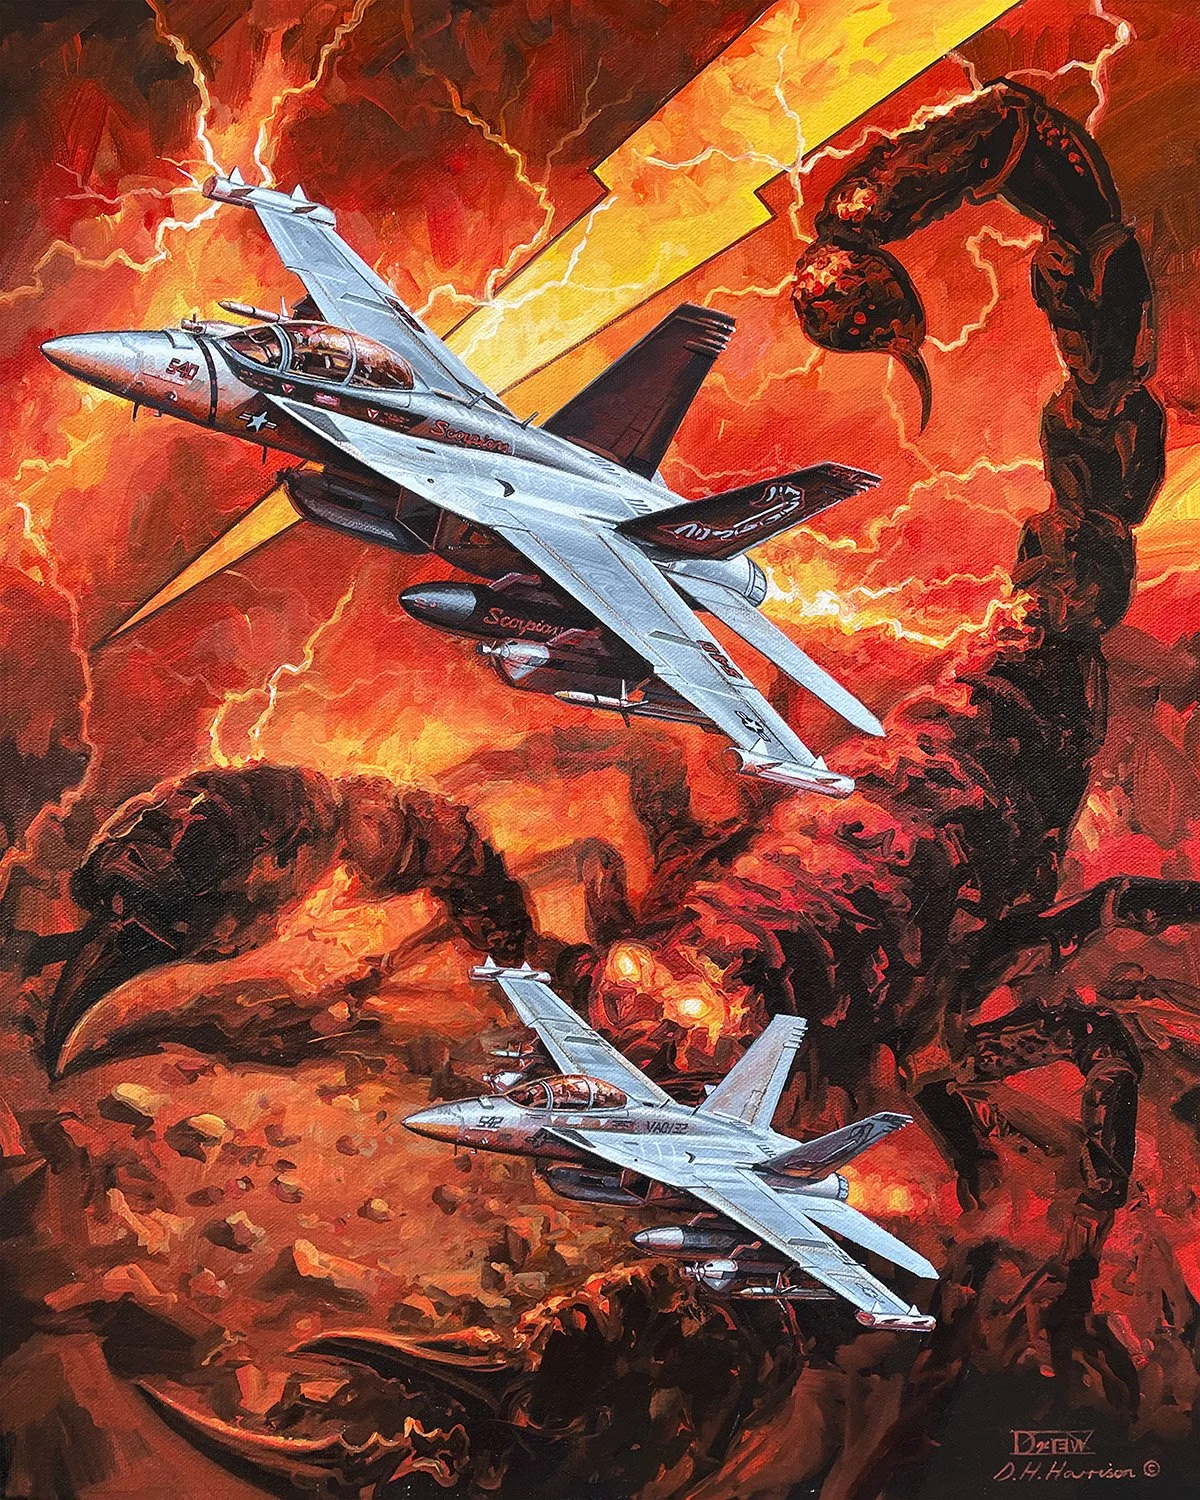
VAQ-132 "Scorpions"
(H) 51cm x (W) 41cm
(H) 20” x (W) 16”
Acrylic on Canvas
CURRENTLY AVAILABLE AS PRE-ORDER LIMITED EDITION PRINT.
Available as a Limited Edition Giclee print from the Store.
Original Canvas artwork available in the Store.
Electronic Attack Squadron 132, VAQ-132 is based at NAS Whidbey Island, Washington as part of Electronic Attack Wing US Pacific Fleet (VAQWINGPAC) of the United States Navy. The lineage of VAQ-132 began with establishment of VP-29 in 1952, followed by several redesignations and change of aircraft before transitioning to the Tactical Electronic Warfare role in 1968. It was the first squadron to the fly the EA-6B Prowler operationally and the first USN unit to adopt the EA-18G Growler in 2009. This is reflected in the unit motto “First to the Fleet, First to the Fight”. Since re-equipment it has been an Expeditionary Squadron based primarily at air bases providing support during operations over Iraq, Libya and participating in numerous global exercises. VAQ-132 is known as the “Scorpions”, with call sign “Scorps” and include the motif of a fierce stinging tail on their EA-18G Growlers.
See also VAQ-141 “Shadowhawks” of CVW-5
Interested in a similar painting of a favourite unit, squadron or aircraft? Check out the commissioning information and get in touch.
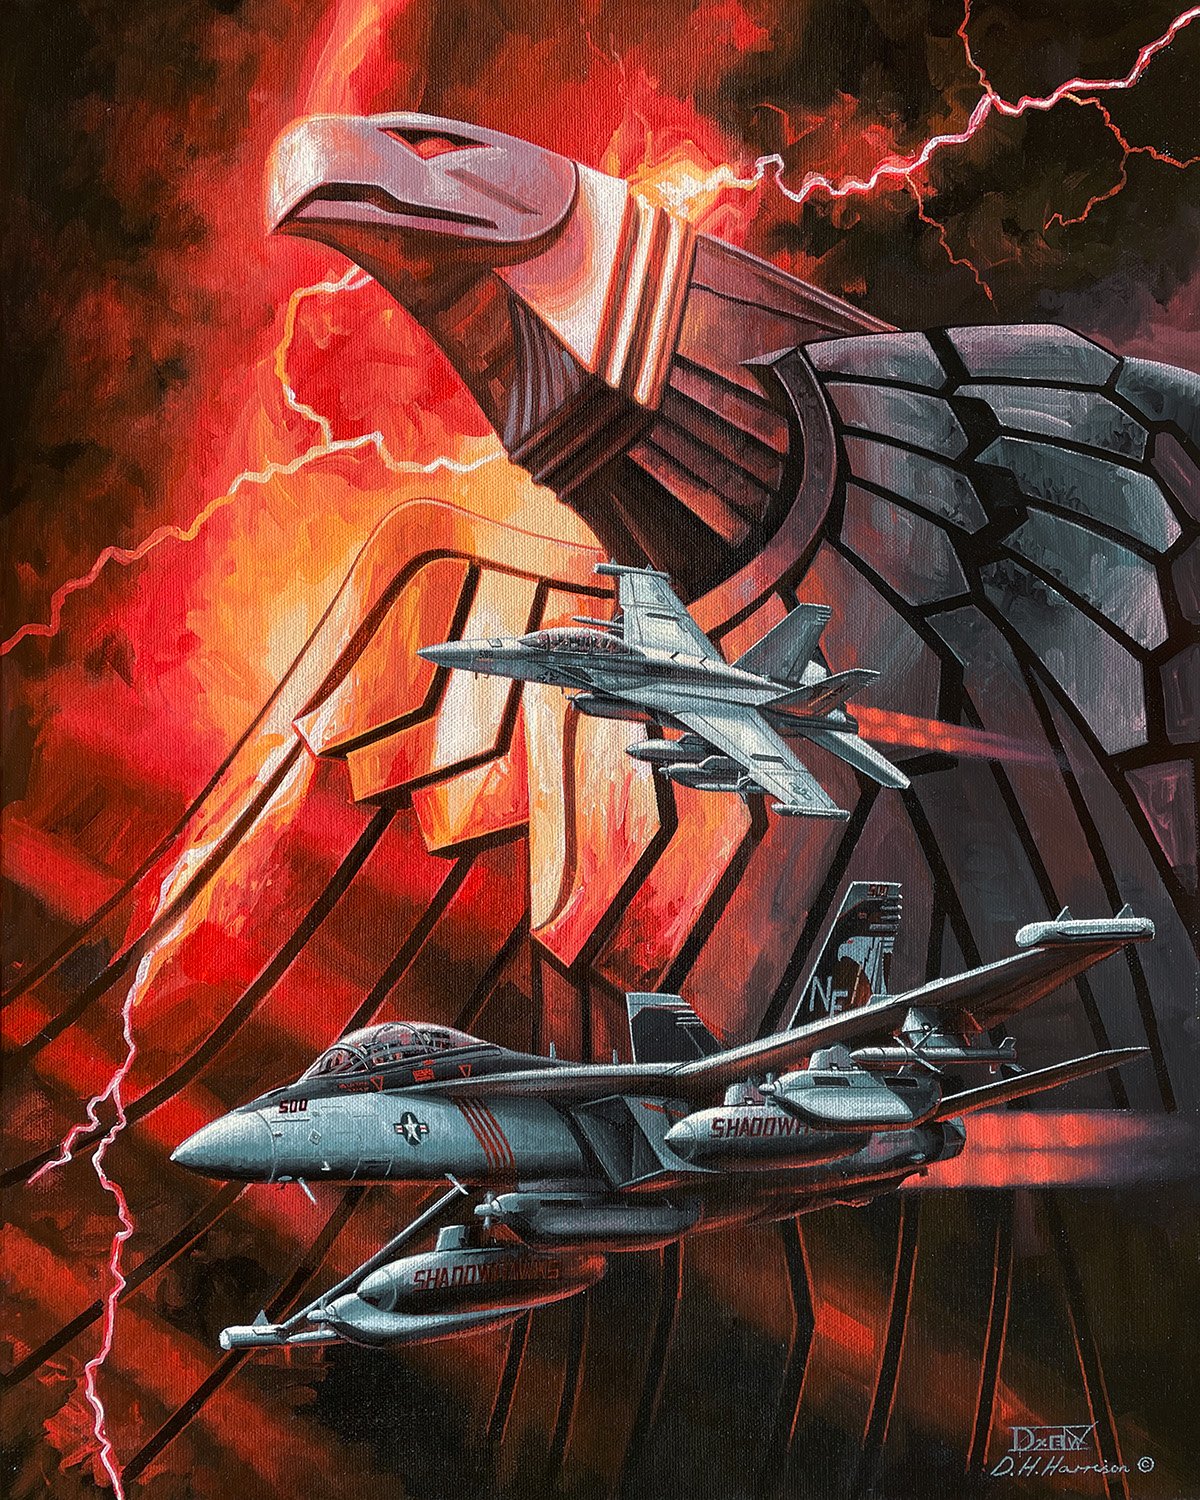
VAQ-141 "Shadowhawks"
(H) 51cm x (W) 41cm
(H) 20” x (W) 16”
Acrylic on Canvas
Currently accepting expressions of interest for a Limited Edition print release of this artwork on paper and/or metal – see similar VFA-22 product.
Please email via CONTACT PAGE to register your support.
Electronic Attack Squadron 141, VAQ-141 is based at MCAS Iwakuni Japan as part of Carrier Wing 5 (CVW-5), USS Ronald Reagan, of the United States Navy. It was formed in 1987 as an EA-6B Prowler squadron and deployed during the Gulf War, Balkans, Iraq and Afghanistan. VAQ-141 re-quipped with the EA-18G Growler in 2010 and was the first squadron to fly combat operations in this aircraft from sea. The electronic attack role of VAQRON 141 is also reflected in the unit insignia and name “Shadowhawks”.
See also VFA-27 “Royal Maces” of CVW-5
Interested in a similar painting of a favourite unit, squadron or aircraft? Check out the commissioning information and get in touch.
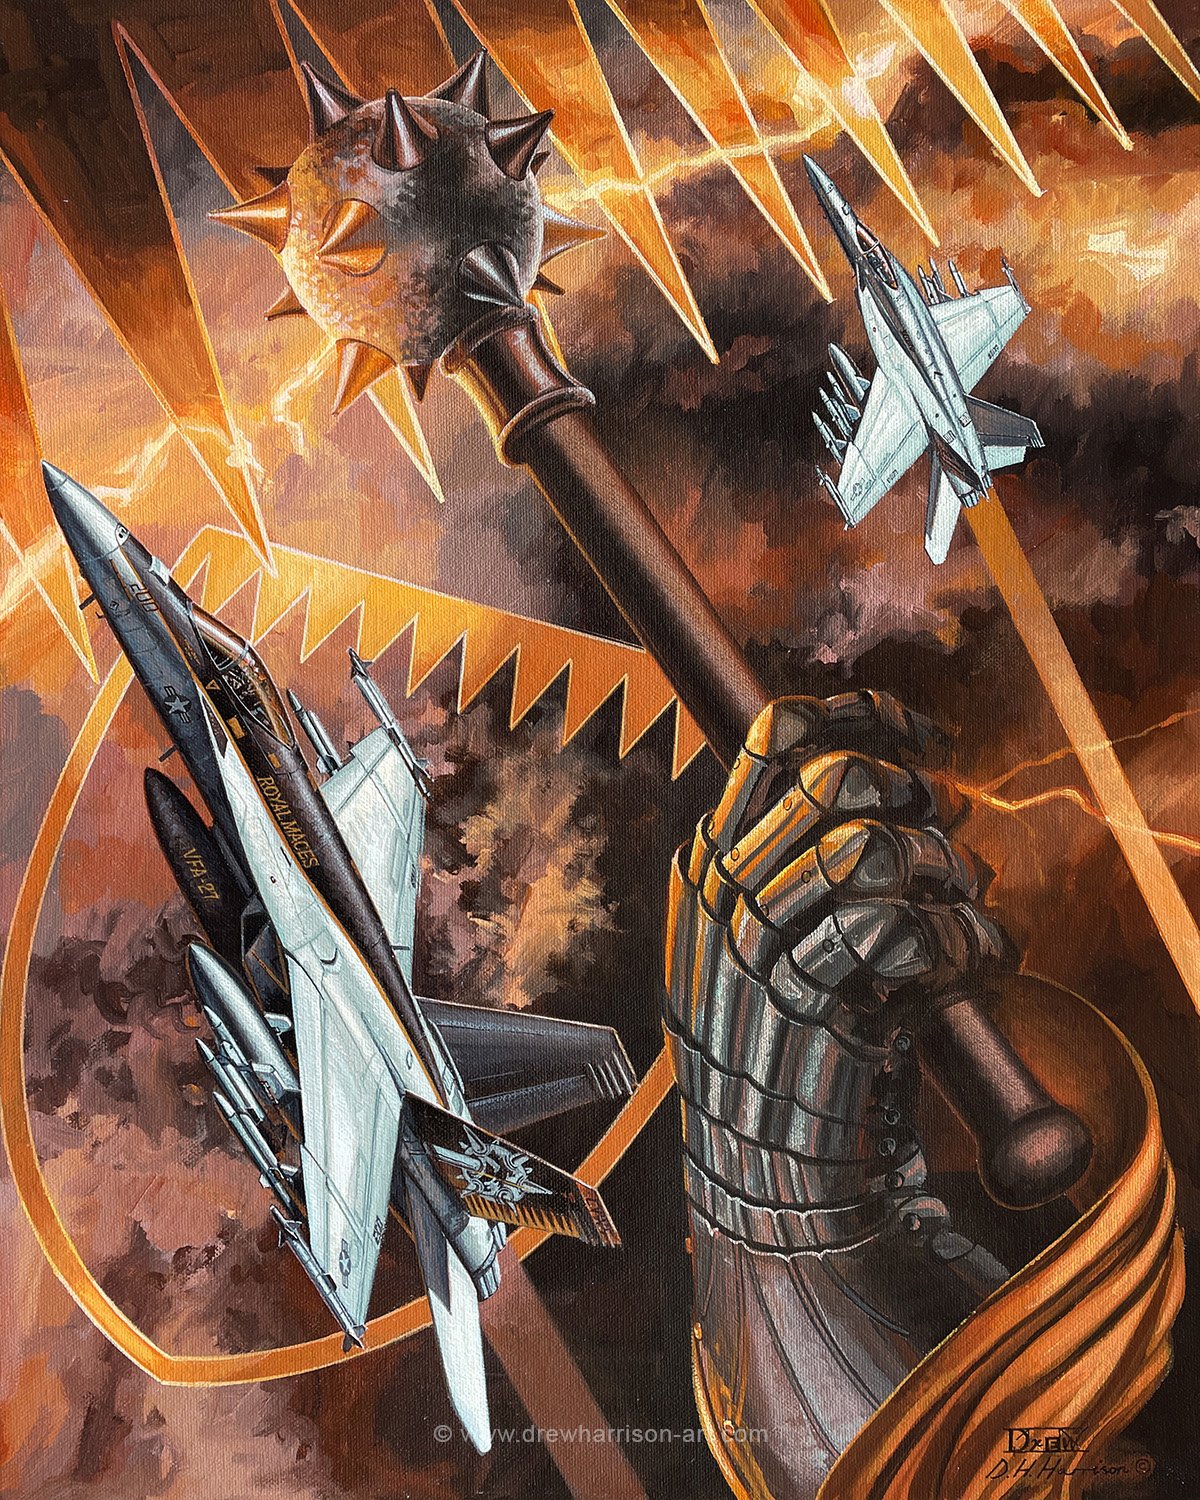
VFA-27 "Royal Maces"
(H) 51cm x (W) 41cm
(H) 20” x (W) 16”
Acrylic on Canvas
Currently accepting expressions of interest for a Limited Edition print release of this artwork on paper and/or metal – see similar VFA-22 product.
Please email via CONTACT PAGE to register your support.
VFA-27, “Royal Maces”, of the United States Navy was originally commissioned in 1968 as an attack squadron with designation VA-27 and flying A-7 Corsair II. The transition to a Strike Fighter Squadron occurred with arrival of F/A-18 Hornets in 1991. STRKFITRON 27 currently operates F/A-18E Super Hornets and is based at MCAS Iwakuni as part of CVW-5 and attached to the carrier USS Ronald Reagan.
See also VAQ-141 “Shadowhawks” of CVW-5
Interested in a similar painting of a favourite unit, squadron or aircraft? Check out the commissioning information and get in touch.
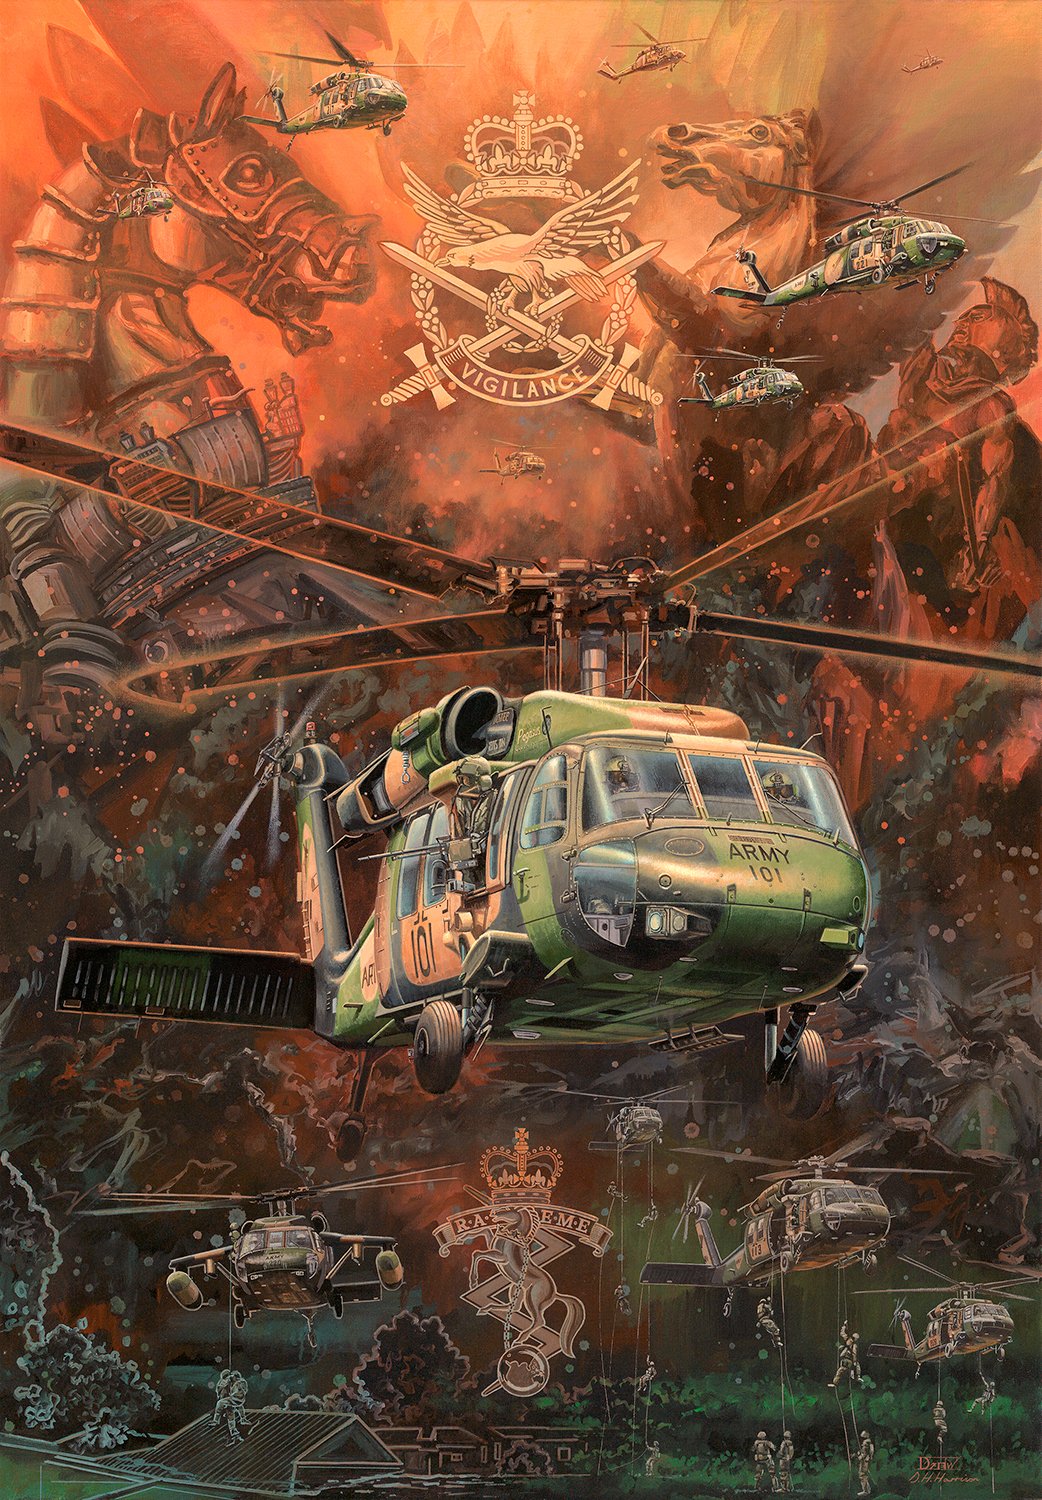
Black Hawk Sunset
(H) 100cm x (W) 70cm
(H) 39.37" x (W) 27.56"
Acrylic on Canvas
SOLD (Commission)
Available as part of The End of Service Collection as a Limited Edition Medallion, prints and other merchandise commemorating the S-70A-9 Black Hawk with Australian Army Aviation.
The Sikorsky S-70A-9 Black Hawk has been in Australian military service since 1987. Initially accepted into service by 9 Squadron, RAAF, they were subsequently transferred to the Australian Army Aviation Corps where they served with the 5th and 6th Aviation Regiments and the Army Aviation Training Centre, while continuing their service within the RAAF at ARDU. “Black Hawk Sunset” honours the iconic lineage and heraldry of these units and pays tribute to the legendary helicopter through times of conflict and peace. Also remembered are the flight and ground crews of the Australian Army Aviation Corps, and support personnel of Royal Australian Electrical and Mechanical Engineers who kept the airframes flying.
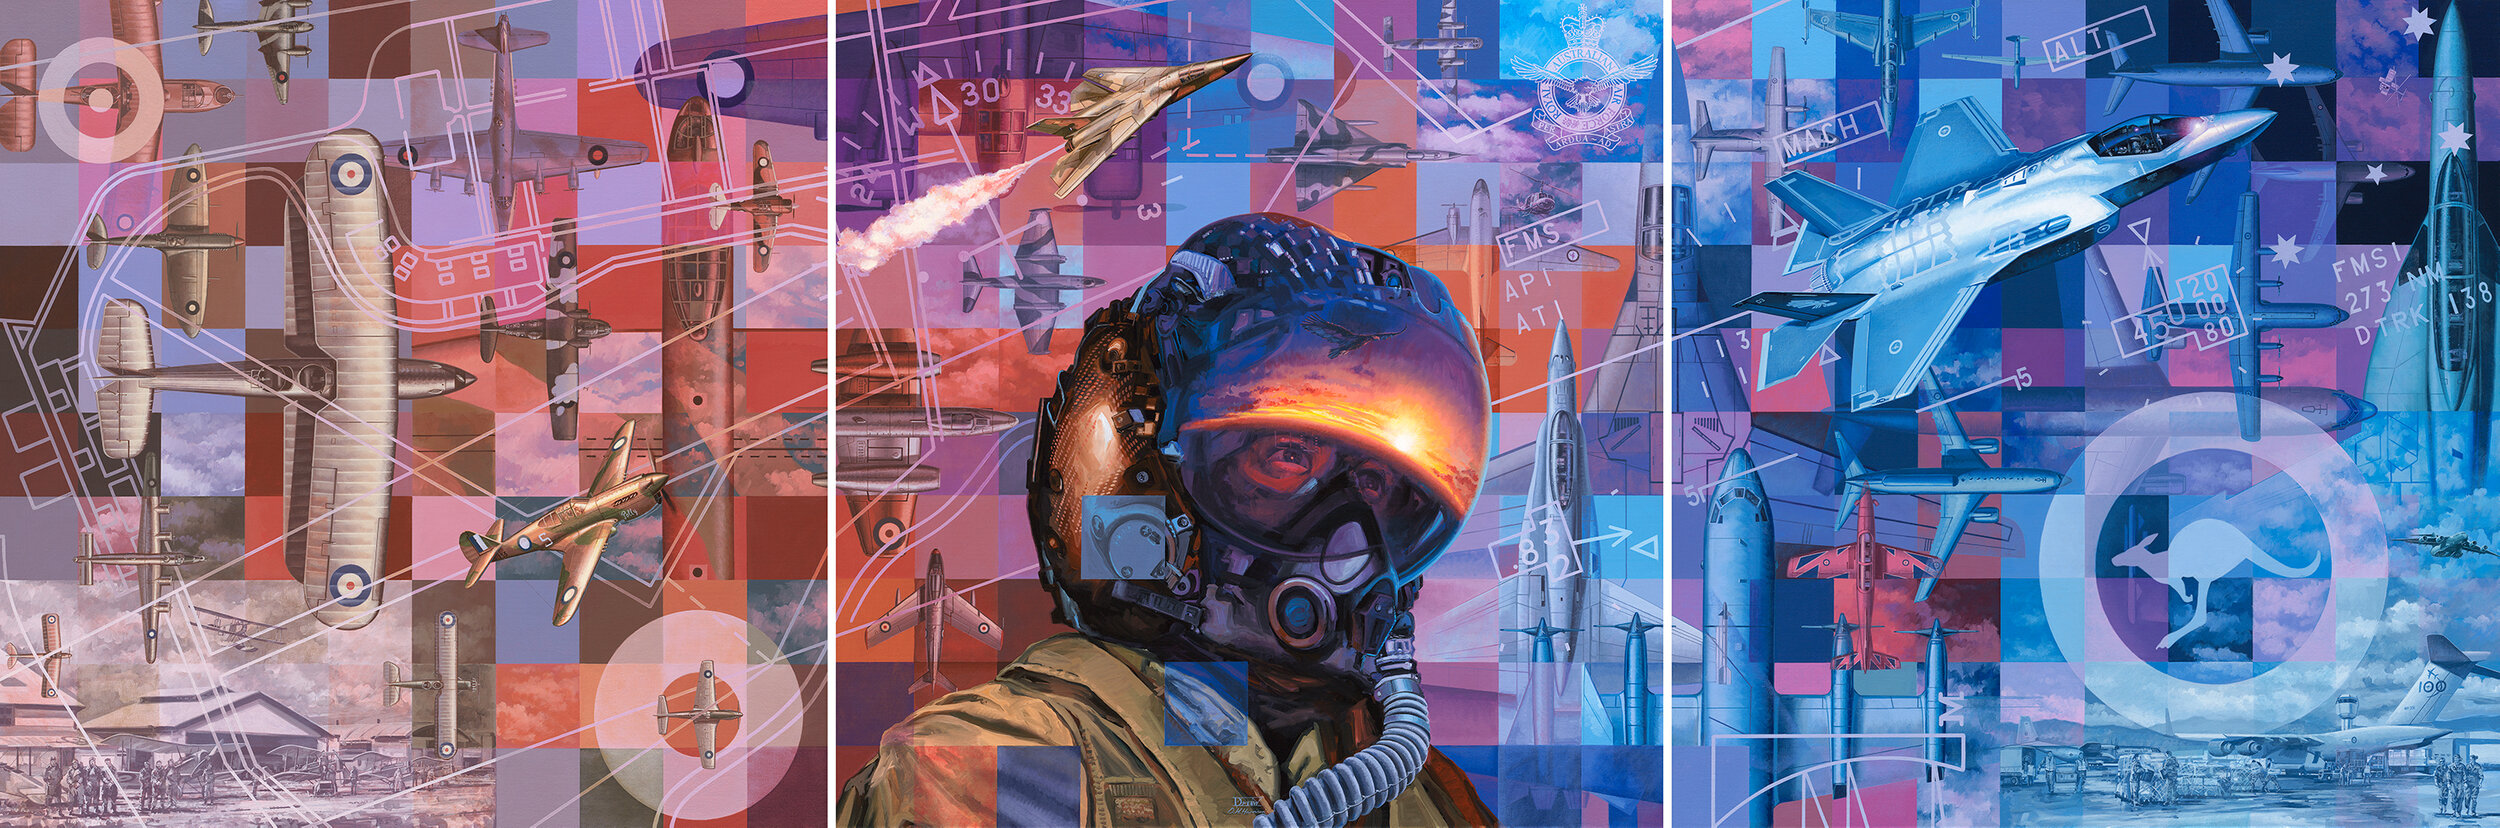
THEN, NOW, ALWAYS
(H) 100cm x (W) 300cm (3 panels)
(H) 39.37" x (W) 118.11"
Acrylic on Canvas
Commissioned for Air Force 2021 commemorating the Centenary of the Royal Australian Air Force.
Available in a range of quality products including medallions, coffee mugs and drink coolers from the Air Force Shop.
Limited Edition Giclee canvas prints in 3 different formats from the Air Force Shop (see below for details).
Then, Now, Always is a fusion of traditional Aviation Art with a modern Contemporary approach. It was a deliberate direction as way to encompass and share the Royal Australian Air Force’s rich heritage while celebrating 100 years of service. Split into a dynamic triptych it is a singular work comprising three distinct transitions beginning on the left with the Air Force’s origins at Point Cook, Victoria before moving into the present day and towards a future in the stars, as highlighted by the Southern Cross. There are over forty iconic aircraft spread across the composition encompassing the latest technology such as the Lockheed Martin F-35A and Boeing P-8 Poseidon to classic machines including Supermarine Spitfire, Consolidated B-24 Liberator and SE5a. Each aircraft symbolises a connection to the personal stories of those who have served. Also included in the narrative are many unique elements, from the historical progression of the roundel to the integration of technology and the service’s multi-role capabilities. Share a part of history and immerse yourself in the Royal Australian Air Force’s first 100 years.
Full Size (3x framed panels): Limited Edition 100 including inscription plate with metal disc from Hornet A21-001.
CLICK HERE TO SHOP EDITION 100 NOW
Large Size (framed): Limited Edition 250 including inscription plate with metal disc from Spitfire Mk.VIII of 452 Sqn RAAF.
CLICK HERE TO SHOP EDITION 250 LGE NOW
Medium Size (framed): Limited Edition 250 including inscription plate with metal disc from Spitfire Mk.VIII of 452 Sqn RAAF.
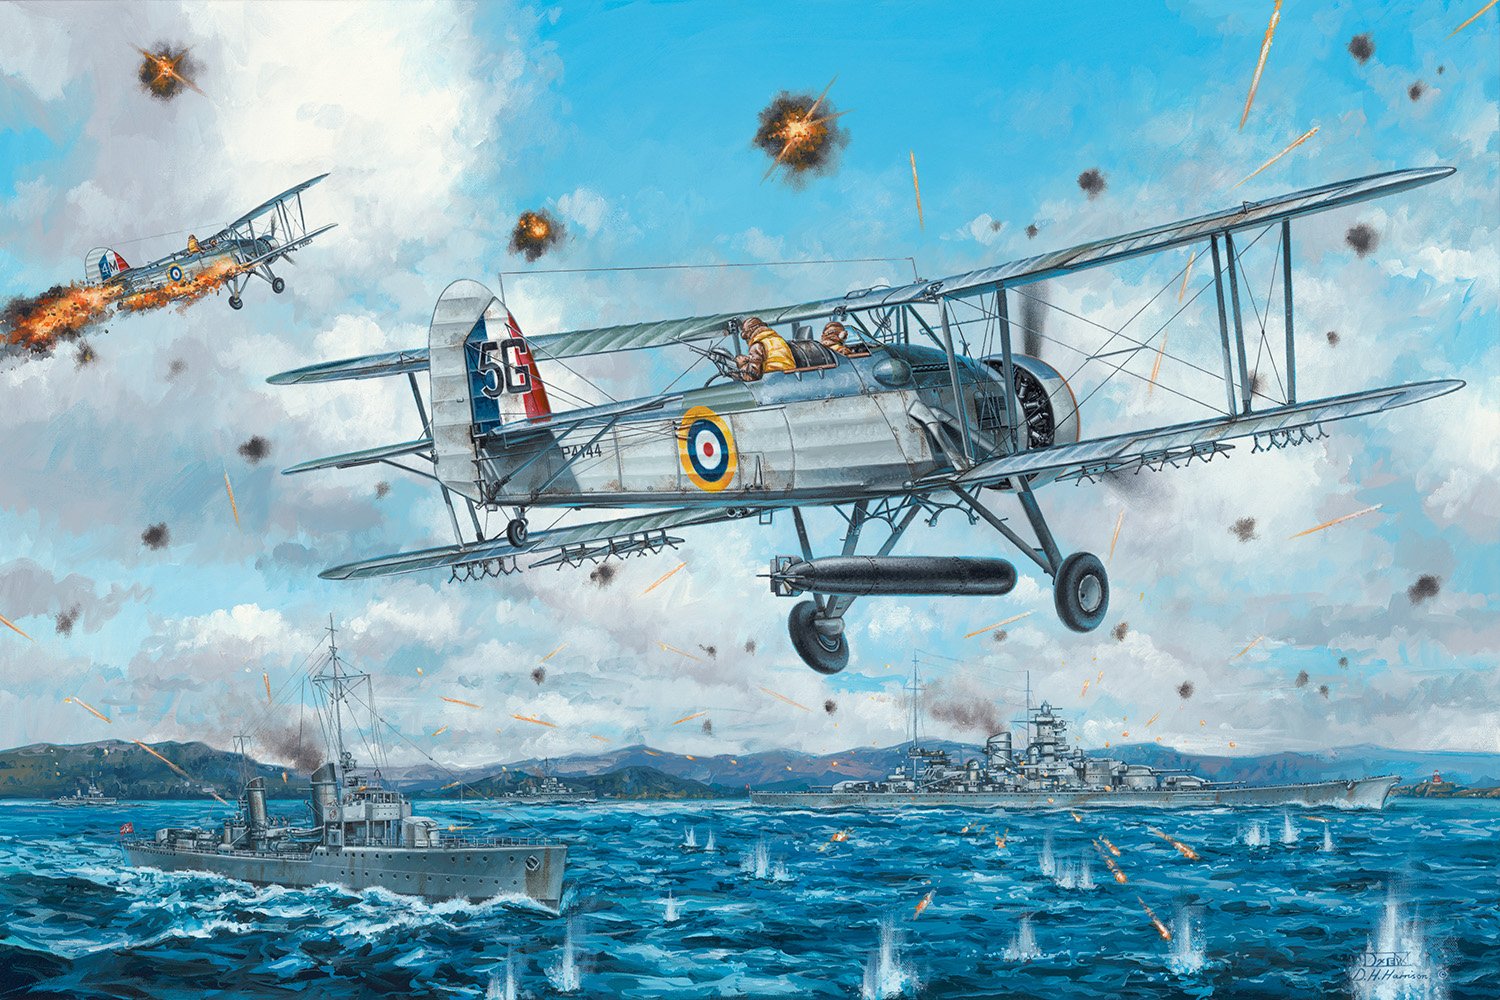
"A Gallant Failure" - Scharnhorst Strike 21st June 1940
(H) 61 cm x (W) 91.5cm
(H) 24" x (W) 36"
Acrylic on Canvas
SOLD (Commission)
Available as a Limited Edition Giclee print from the Store.
Commissioned as Cover Art for the the latest Avonmore Books release Admiral VAT Smith by Graeme Lunn. The book charts the extraordinary life of the father of Australia's Fleet Air Arm.
CLICK HERE FOR BOOK DETAILS (offsite link)
Included on the Naval Historical Society of Australia artist database.
CLICK HERE TO VIEW (offsite link)
In April 1940 the powerful German capital ships Scharnhorst and Gneisenau were committed to the invasion of Norway. On 13th June fighters from HMS Ark Royal attacked Scharnhorst in Trondheim Fjord and inflicted light damage. After minor repairs she sailed south with escorting vessels to Kiel on the 20th. The following day a reconnaissance report was received at the Royal Navy base Hatston, Orkney Islands indicating a German force was sailing south along the Norwegian coastline. Calculations indicated torpedo armed Swordfish aircraft could intercept the enemy while operating at an extreme range of 240 nautical miles. As the squadron’s Senior Observer, Australian Lt. Victor Alfred Trumper Smith (VAT Smith) was tasked to command and navigate six aircraft on the precision strike with Senior Pilot Lt. John Stenning piloting their Swordfish. In broad daylight, and with no escorting fighters, the slow and vulnerable biplanes of 821 and 823 SQNs located their prey near Utsira island, off the Norwegian coast. Facing well over one hundred guns the results were inevitable. Two 823 SQN crews were blown out of the sky and the remaining four aircraft were under pressure and, disappointingly, unable to secure any torpedo strikes. However, despite the result, VAT Smith survived and had commanded the first mass torpedo attack against a capital ship at sea, for which he was later Mentioned in Despatches. The mission was officially described as “This attack - the first of its type against a capital ship in history - can only be described as a gallant failure with an inadequate force.” Admiral Sir Victor Alfred Trumper Smith AC, KBE, CB, DSC is considered the father of RAN’s Fleet Air Arm and was instrumental in championing naval flying in Australia after WWII.
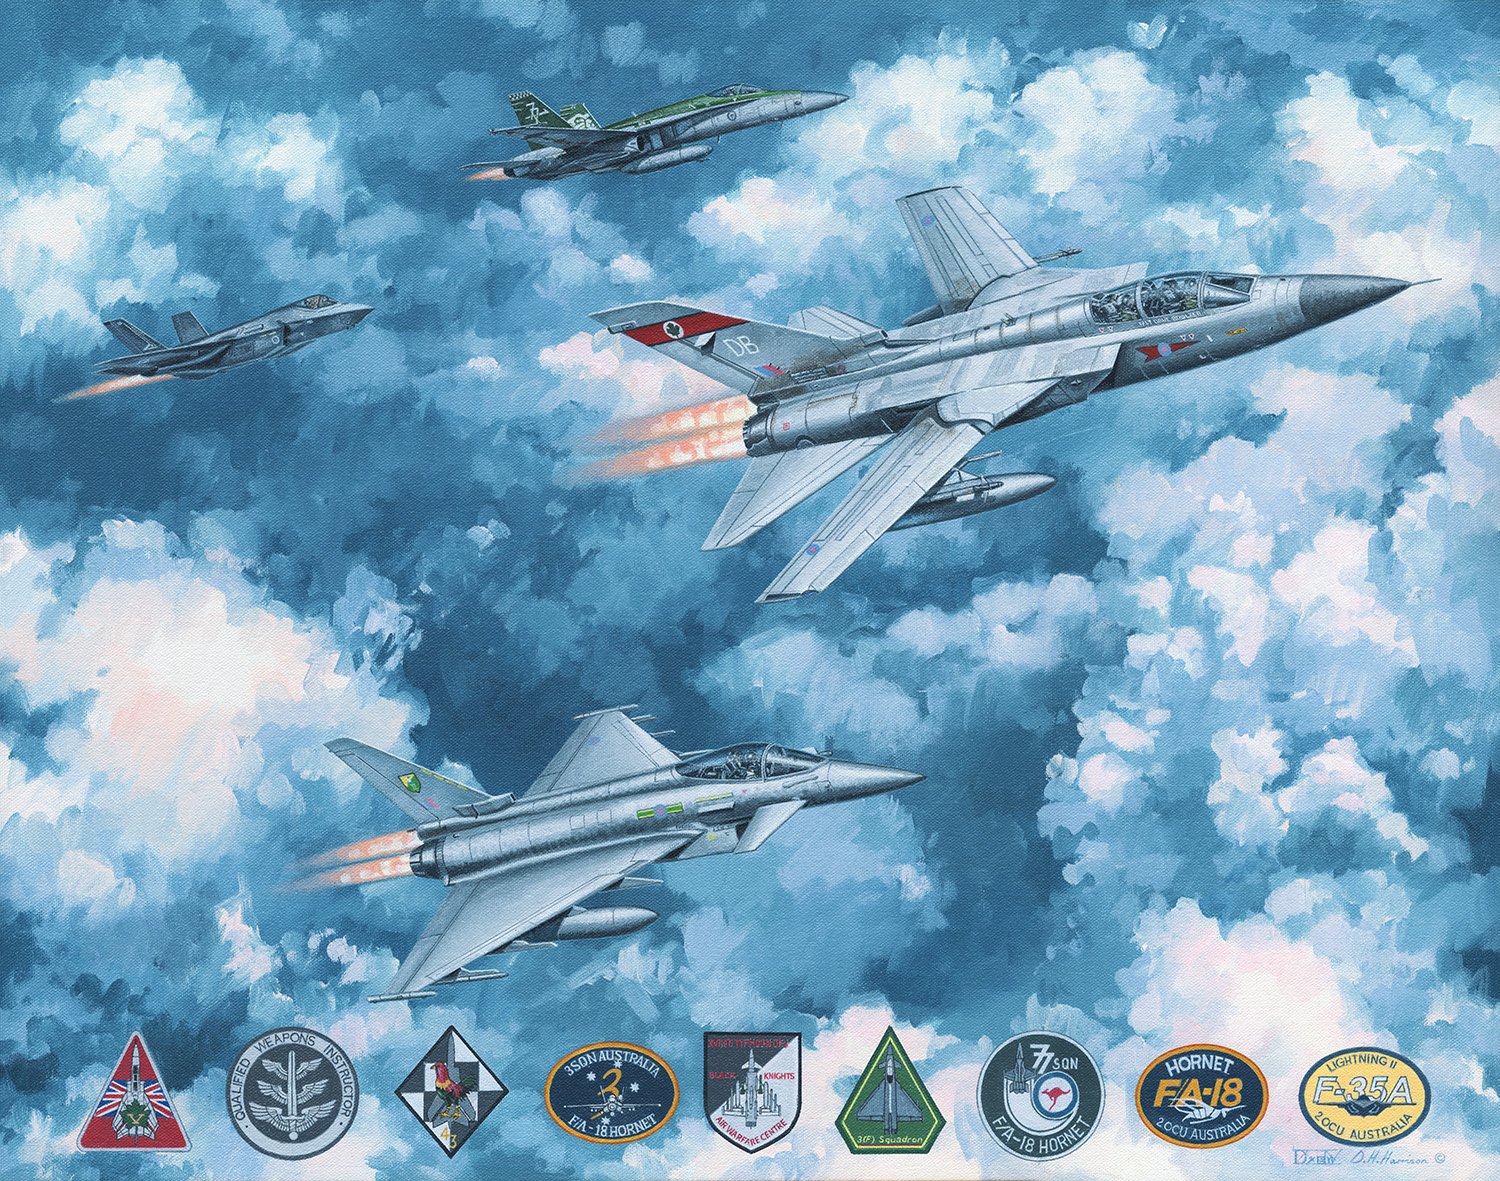
Bowlzer's Flight
(H) 54cm x (W) 70cm
(H) 21.26” x (W) 27.6”
Acrylic on Canvas
Commissioned as a gift for a serving ex-RAF and current RAAF pilot. Includes aircraft flown during various tours - Tornado F.3/ 5 SQN RAF, Eurofighter Typhoon II/ 3 SQN RAF, F/A-18 Hornet/ 77 SQN RAAF and F-35A Lightning II/ 2 OCU RAAF. Badges at base of work are 5 SQN RAF, Qualified Weapons Instructor, 43 SQN RAF, 3 SQN RAAF, 17 SQN RAF, 3 SQN RAF, 77 SQN RAAF, 2 OCU RAAF for Hornet and F-35A.
Why not consider your very own personalised commission? Click on link for details.
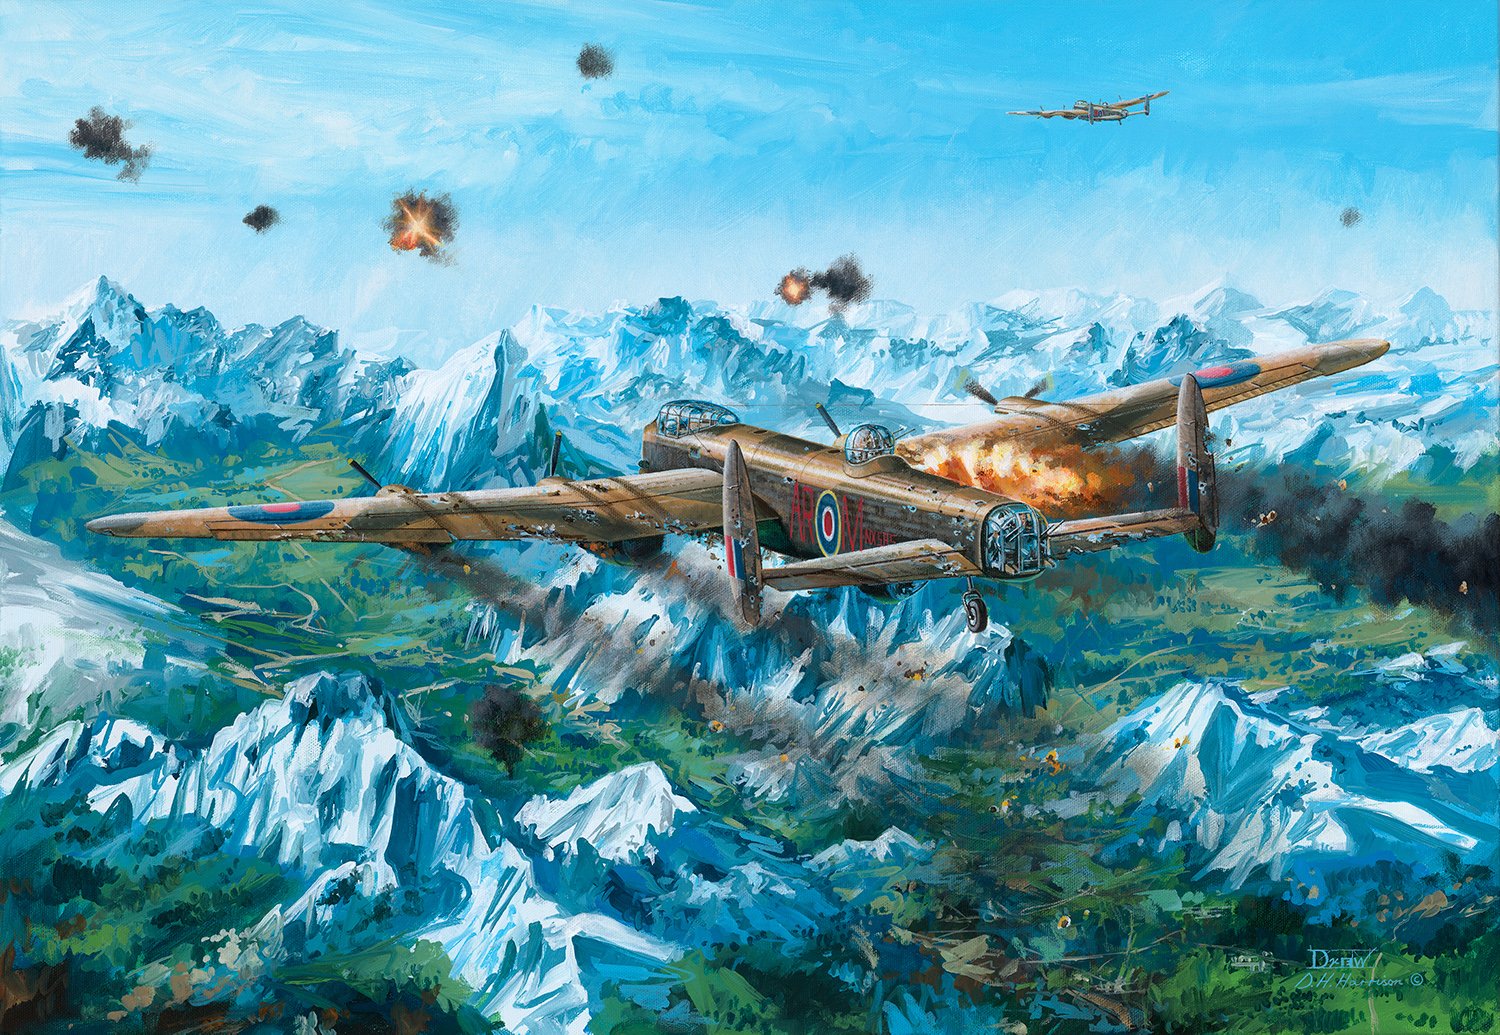
Berchtesgaden Anzac Day 1945
(H) 45cm x (W) 65cm
(H) 17.7" x (W) 25.6"
Acrylic on Canvas
SOLD (Commission)
Available as a Limited Edition Giclee print from the Store.
25th April 1945 Lancaster bombers of 460 Squadron RAAF were part of an RAF daylight operation targeting The Eagle’s Nest complex, near Berchtesgaden, Bavaria. While crossing the Alps, F/O Harry Payne, the pilot of AR-M, M for Mike, had positioned the Lancaster to the edge of the bomber stream to avoid buffeting. Almost immediately after bombing the SS Barracks at Obersalzberg, ‘M’ was hit by flak which peppered the fuselage, ignited fires and successively disabled all except the outer starboard engine. Heading for the allied lines Payne gave the order to abandon aircraft via the forward escape hatch. Dan Lynch (Bomb Aimer), Rick Thorpe RAF (Flight Engineer), Colin Fraser (Navigator), Bill Stanley (Wireless Operator), and Jack Bennett (Mid Upper Gunner) successfully bailed out. However, while moving forward, rear gunner, F/Sgt Hugh Connochie, inadvertently snagged his parachute ripcord and it deployed inside the aircraft. Payne therefore opted for a controlled glide and managed to descend the burning aircraft from 10,000 feet to a successful crash landing south of Salzburg. All crew survived and were interned as prisoners of war for the remainder of WWII. Lancaster AR-M, NX585, was one of two aircraft lost to anti-aircraft fire during the mission and the last combat loss of 460 Squadron RAAF.
Seek, Strike and Return
(H) 45cm x (W) 60cm
(H) 17.7" x (W) 23.6"
Acrylic on Canvas
SOLD (Commission)
Available as part of the Iconic Aviation Collection as a Limited Edition Medallion, prints and other merchandise commemorating 100 Years of the Royal Australian Air Force.
Never has there been a more controversial aircraft in RAAF service as the General Dynamics F-111. The ubiquitous and highly capable strike bomber attained several achievements in Australian service before retirement in December 2010. During nearly 37 years of duty it was affectionately known as ‘The Pig’ and operated by 82 Wing out of Amberley, Queensland. A8-130 (6 Squadron) and A8-147 (1 Squadron) were F-111C models shown here late in life fully ‘bombed up’ over the Northern Australian coastline.

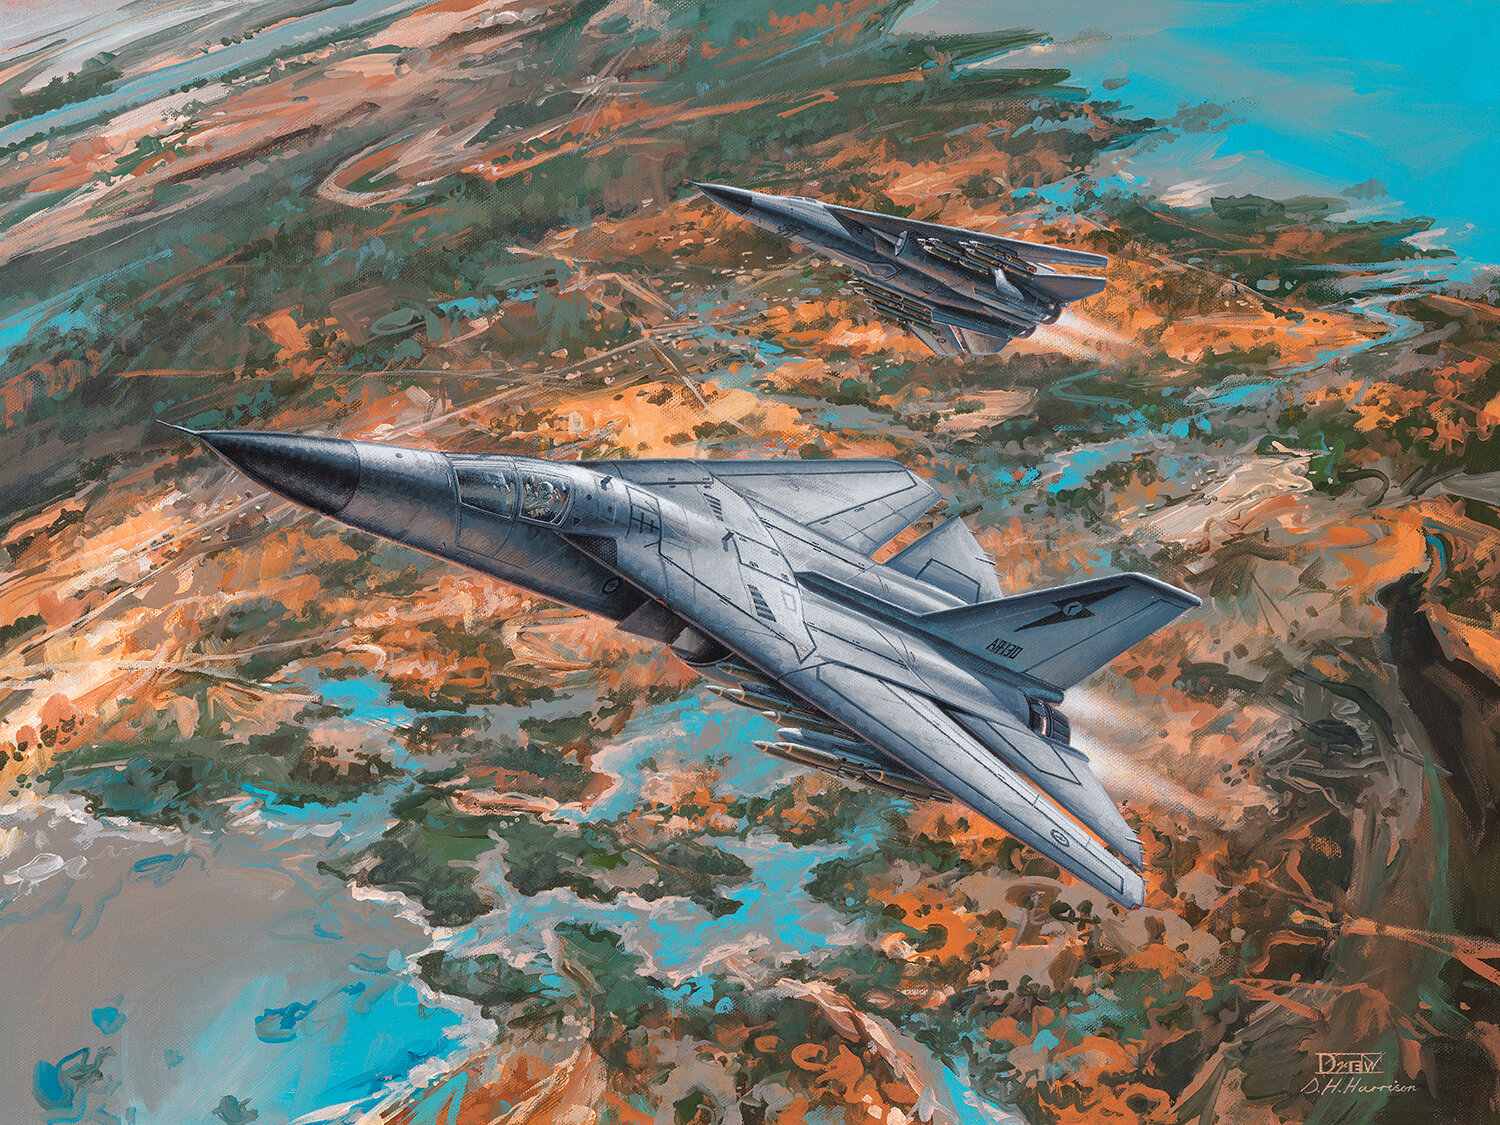
Skies of Fire
(H) 45cm x (W) 65cm
(H) 17.7” x (W) 25.6”
Acrylic on Canvas
SOLD
More original artwork available in the Store.
Published as a cover image for a CHECK YOUR 6! Air Combat and Campaign Rules book Fighting the Phoenix.
READ MORE at Skirmish Campaigns
The Kharg Island oil and loading facilities in the Persian Gulf were a constant focus of air attacks throughout the Iran-Iraq war. During a mission in early February 1988, Republic of Iraq Su-22M-4Ks delivered their strike packages over the target area and were met with a barrage of anti-aircraft fire. Intercepting the force were formidable F-14A Tomcats of the Islamic Republic of Iran Air Force (IRIAF). Although one of the world’s leading long-range fighters, Iraqi pilots had developed counter tactics throughout the conflict. In a tense combat Mirage F-1EQs proved to be a versatile and nimble, close-combat adversary to the big Grumman cats.
Why not consider your very own personalised commission? Click on link for details.
First and Foremost
(H) 45cm x (W) 60cm
(H) 17.7" x (W) 23.6"
Acrylic on Canvas
SOLD (Commission)
Available as part of the Iconic Aviation Collection as a Limited Edition Medallion, prints and other merchandise commemorating 100 Years of the Royal Australian Air Force.
Few aircraft have achieved the same legendary status as the Lockheed C-130 Hercules. Over sixty years the RAAF’s C-130 fleet has operated many roles including tactical along with humanitarian and disaster relief. C-130H, A97-011 was one of the airframes delivered in 1978 and by the late 2000s it was deployed to the Middle East Area of Operations (MEAO), including Afghanistan, as part of 37 Squadron RAAF. During that time the unit lived up to its motto of ‘Foremost’.
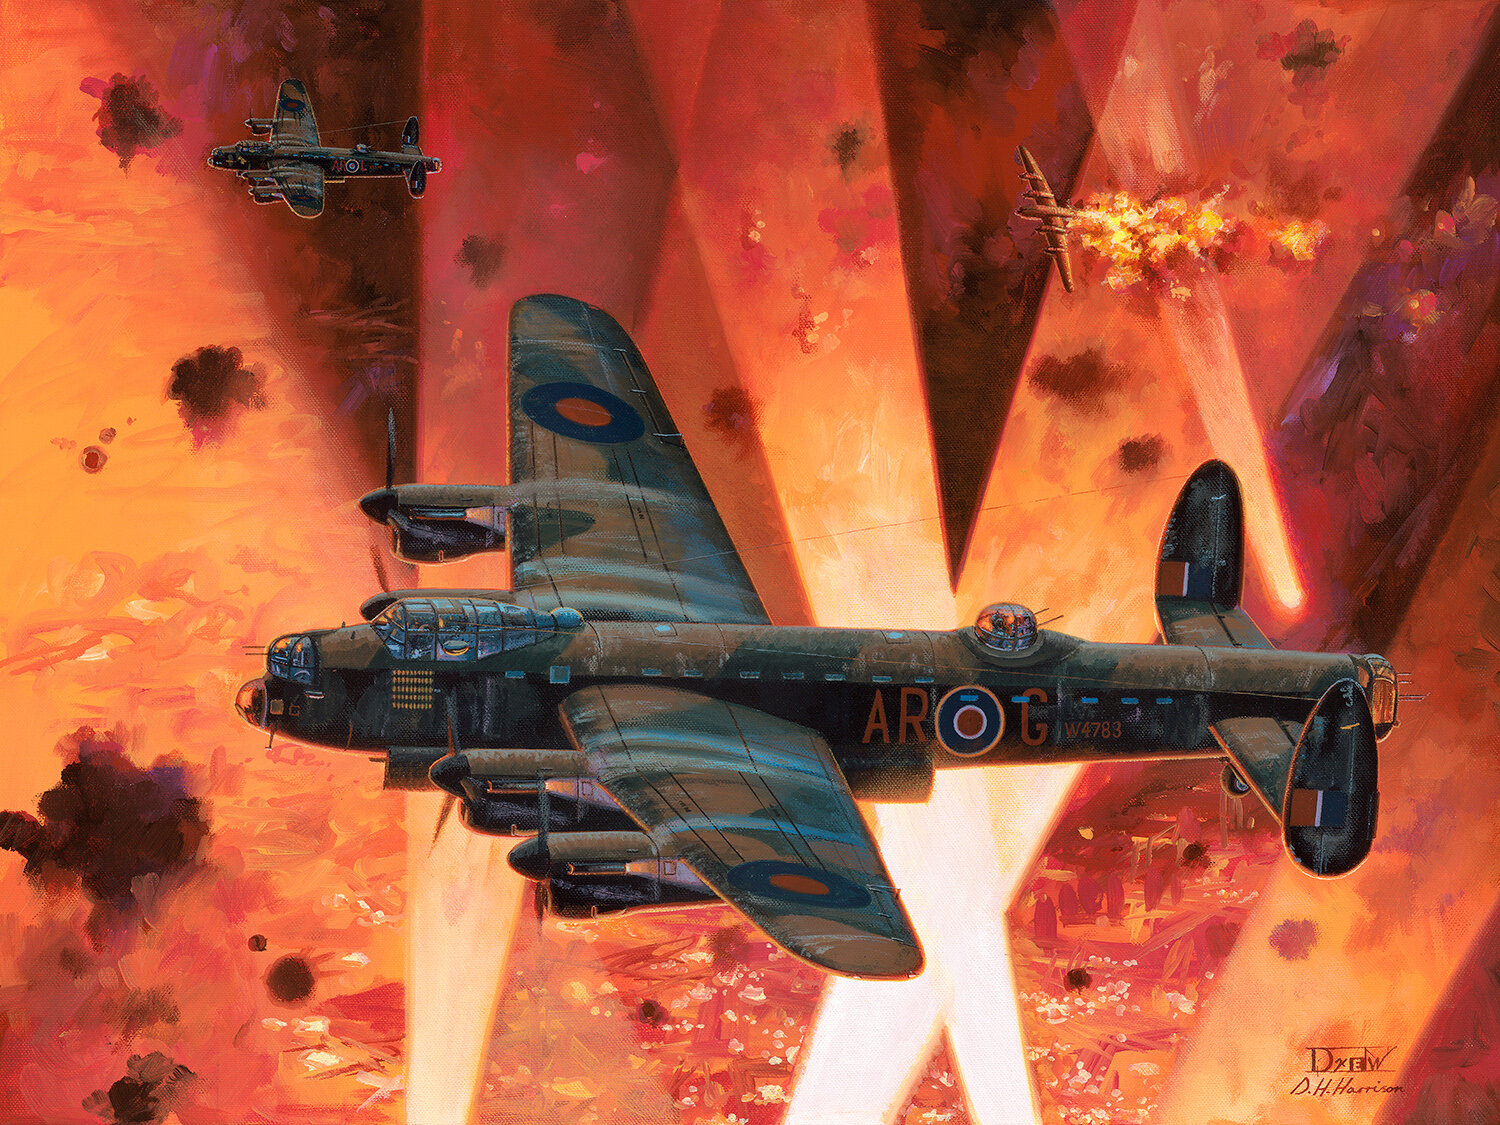
Into the Cauldron
(H) 45cm x (W) 60cm
(H) 17.7" x (W) 23.6"
Acrylic on Canvas
SOLD (Commission)
Available as part of the Iconic Aviation Collection as a Limited Edition Medallion, prints and other merchandise commemorating 100 Years of the Royal Australian Air Force.
On the night of 3/4 September 1943 RAF bombers targeted the German capital Berlin. The Australian manned 460 Squadron RAAF committed a near maximum effort of twenty four aircraft including Avro Lancaster Mk.I, W4783, AR-G or ‘G’ for George piloted by F/Sgt Harold ‘Cherry’ Carter and crew. It would eventually complete ninety operations during WWII and attained the second highest mission tally of all Lancasters. Remarkably it survived and is now exhibited at the Australian War Memorial, Canberra.
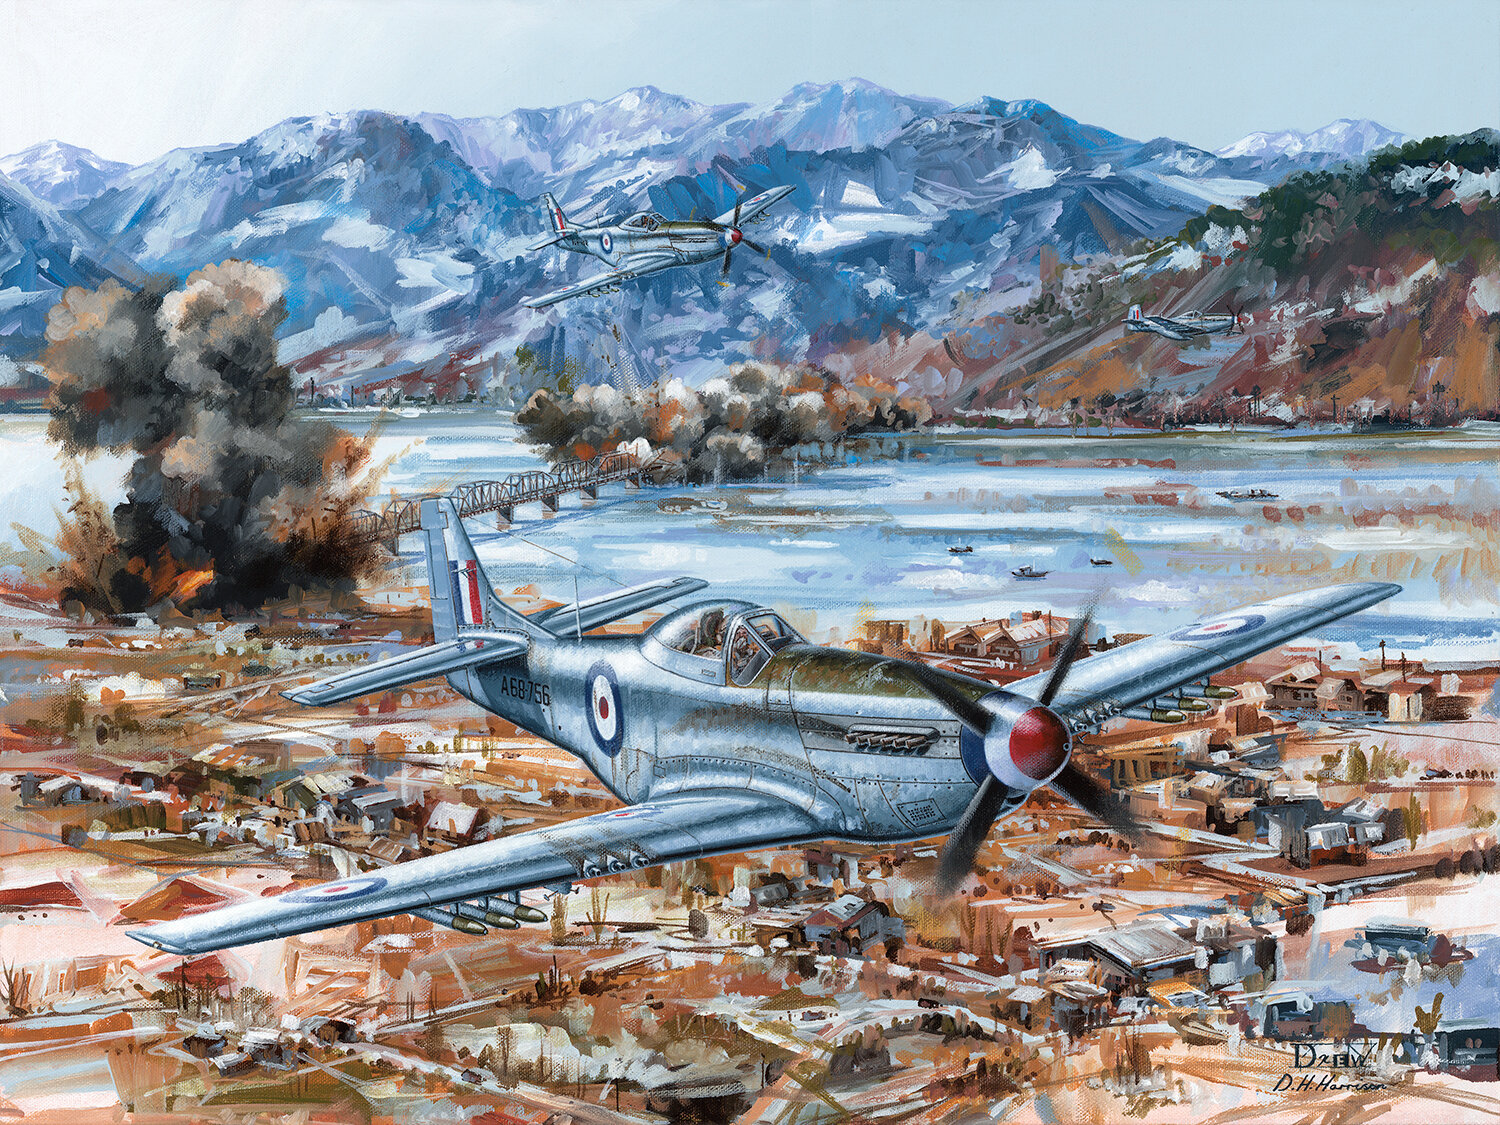
Cutting the Lines
(H) 45cm x (W) 60cm
(H) 17.7" x (W) 23.6"
Acrylic on Canvas
SOLD (Commission)
Available as part of the Iconic Aviation Collection as a Limited Edition Medallion, prints and other merchandise commemorating 100 Years of the Royal Australian Air Force.
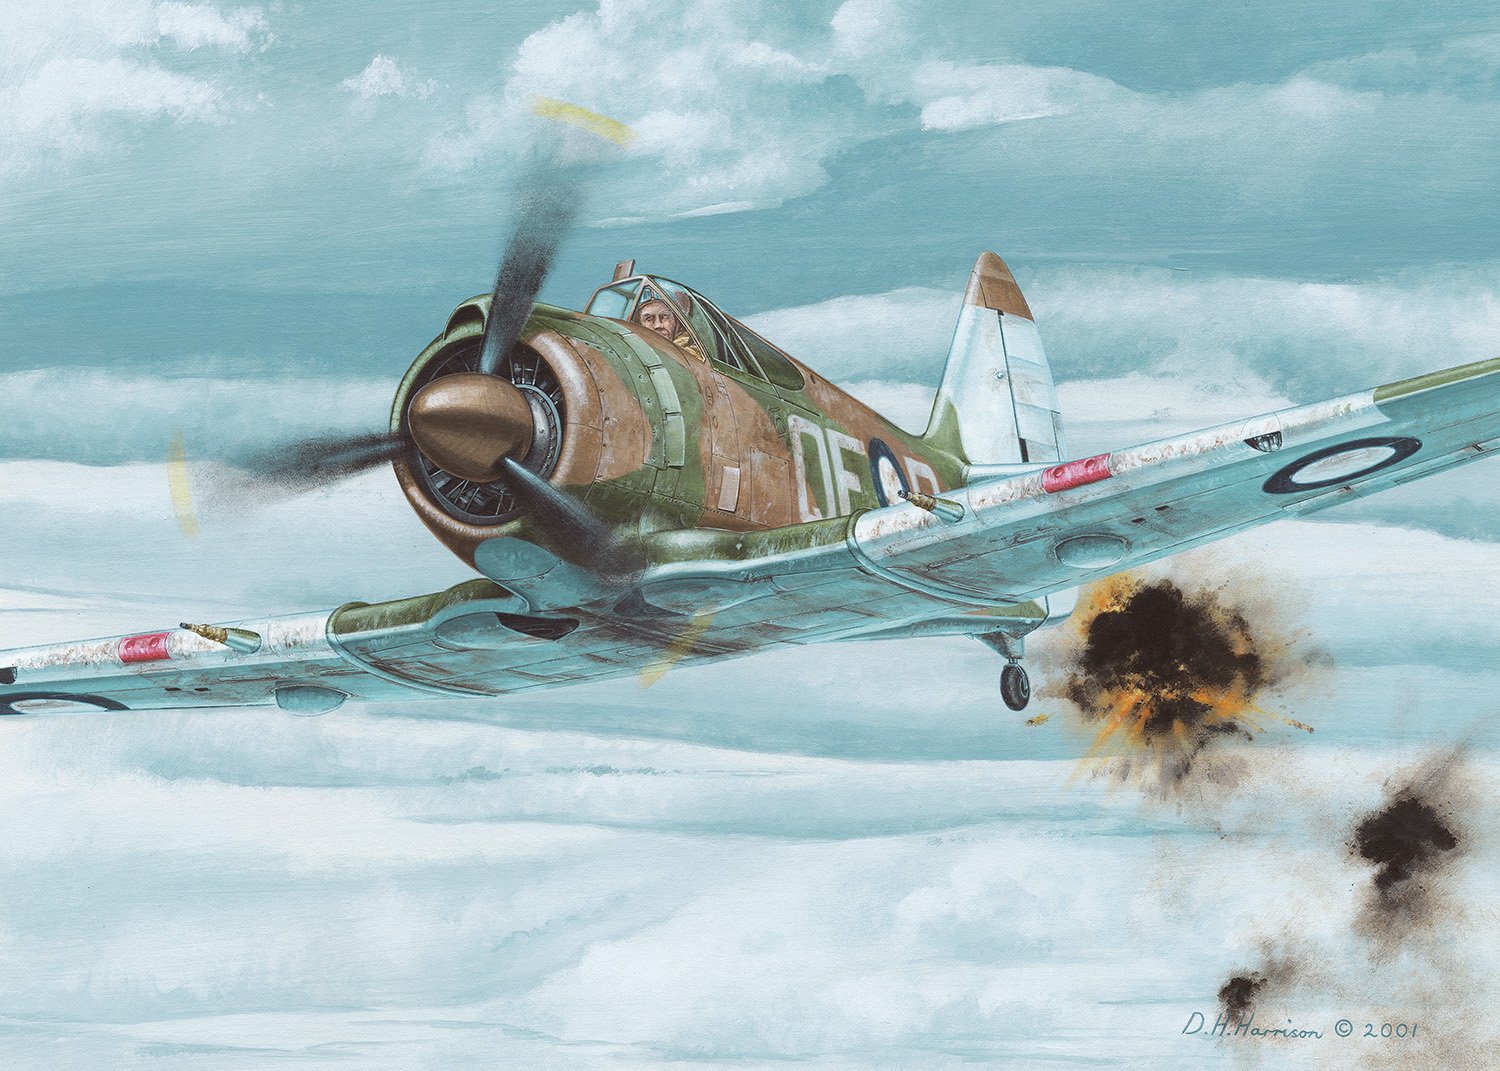
77 Squadron RAAF was one of the first allied units committed to the Korean War in 1950. During December their commander, S/Ldr Richard ‘Dick’ Cresswell DFC, had learnt through debriefings that a rail bridge near Sonchon was bombed by B-29s on three separate occasions and all had failed in their task. On 17th December he volunteered four Mustangs to target the bridge, including F/Lt Des Murphy in P-51D, A68-756. Destruction was attained solely with bombs. This was one of hundreds of routine operations flown by the unit during the opening stages of the conflict.
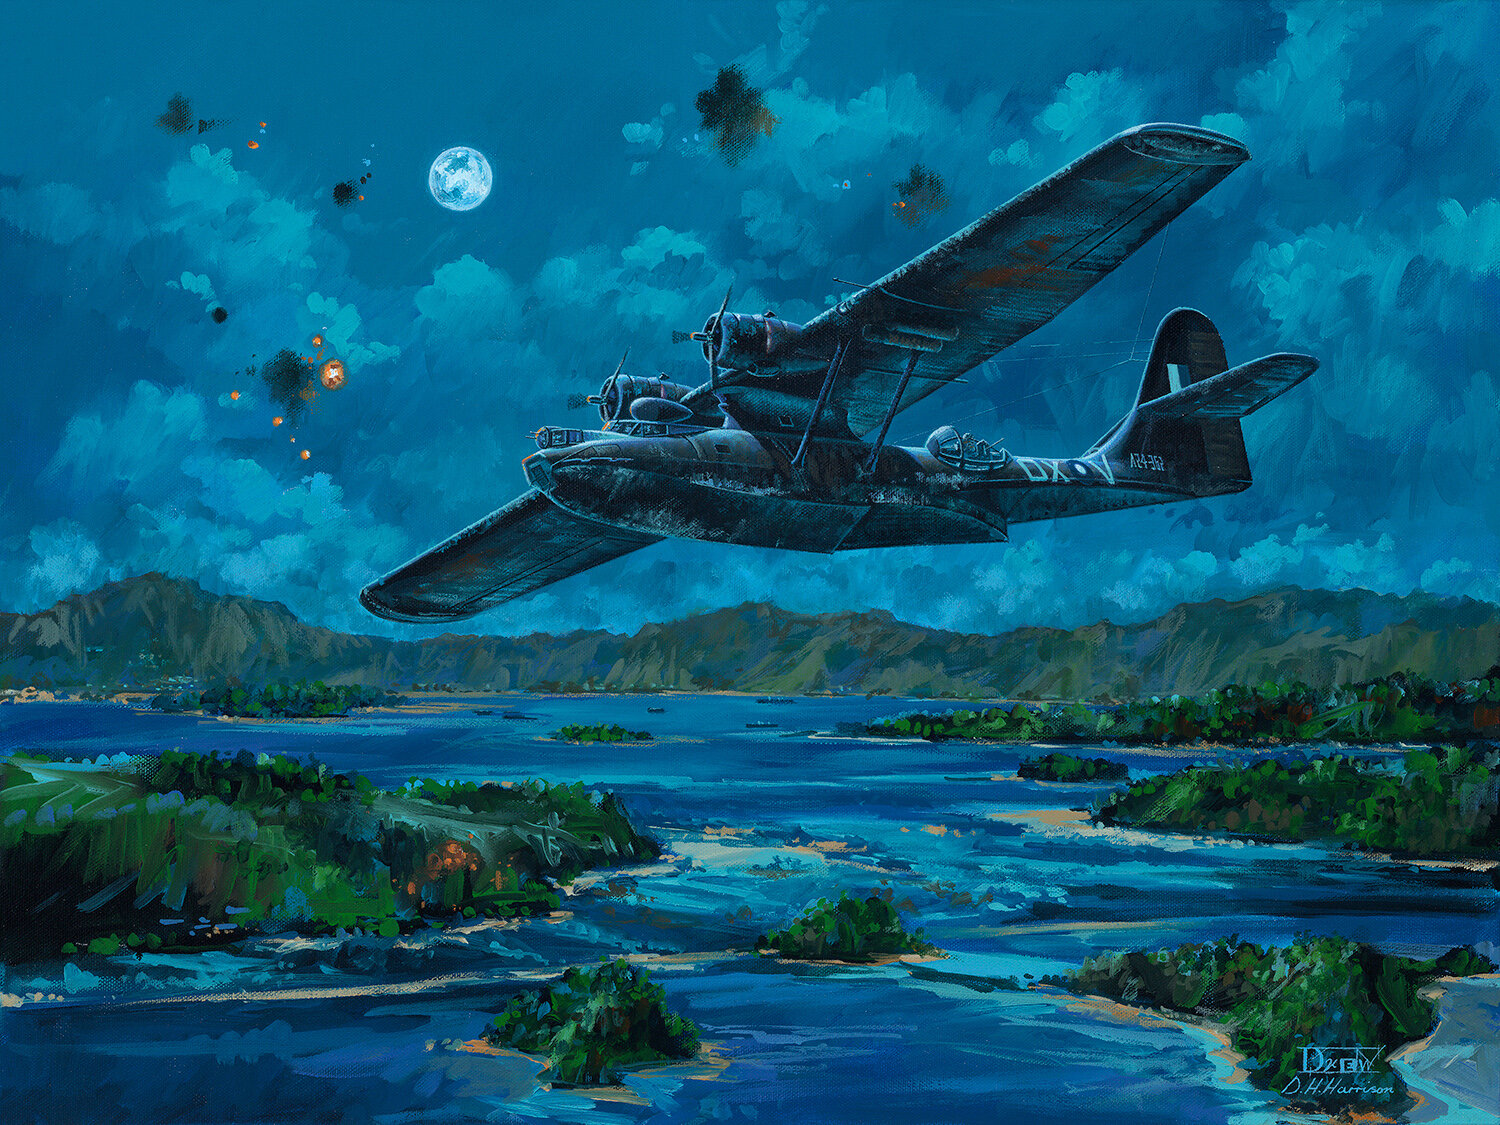
Black Cat in the Shadows
(H) 45cm x (W) 60cm
(H) 17.7" x (W) 23.6"
Acrylic on Canvas
SOLD (Commission)
Available as part of the Iconic Aviation Collection as a Limited Edition Medallion, prints and other merchandise commemorating 100 Years of the Royal Australian Air Force.
43 Squadron RAAF was established as a Maritime Patrol unit equipped with the Catalina in early 1943. These flying boats were painted all black and known as ‘Black Cats’. By 1945 the squadron continued flying many types of operations including harassment against targets of opportunity across the South West Pacific. On the 21st July 1945 F/Lt John Paine and crew, in a late model Catalina PB2B-2, A24-362, OX-V, searched for targets of opportunity in the Sawu Sea and generally harassed enemy installations.
Cobra Sabres
(H) 45cm x (W) 60cm
(H) 17.7" x (W) 23.6"
Acrylic on Canvas
SOLD (Commission)
Available as part of the Iconic Aviation Collection as a Limited Edition Medallion, prints and other merchandise commemorating 100 Years of the Royal Australian Air Force.
In 1962 members of the Southeast Asia Treaty Organization (SEATO) sent a holding force to Thailand in response to a threat from across the Laotian border. Australia’s contribution was 79 Squadron RAAF with Australian built CAC Sabres. While based at Ubon a stylised green cobra was briefly adopted as a tail marking on several of the jets including CA-27 Sabre Mk.32, A94-988. Despite 79 Squadron never committing to combat the unit contributed greatly to Thailand’s security.
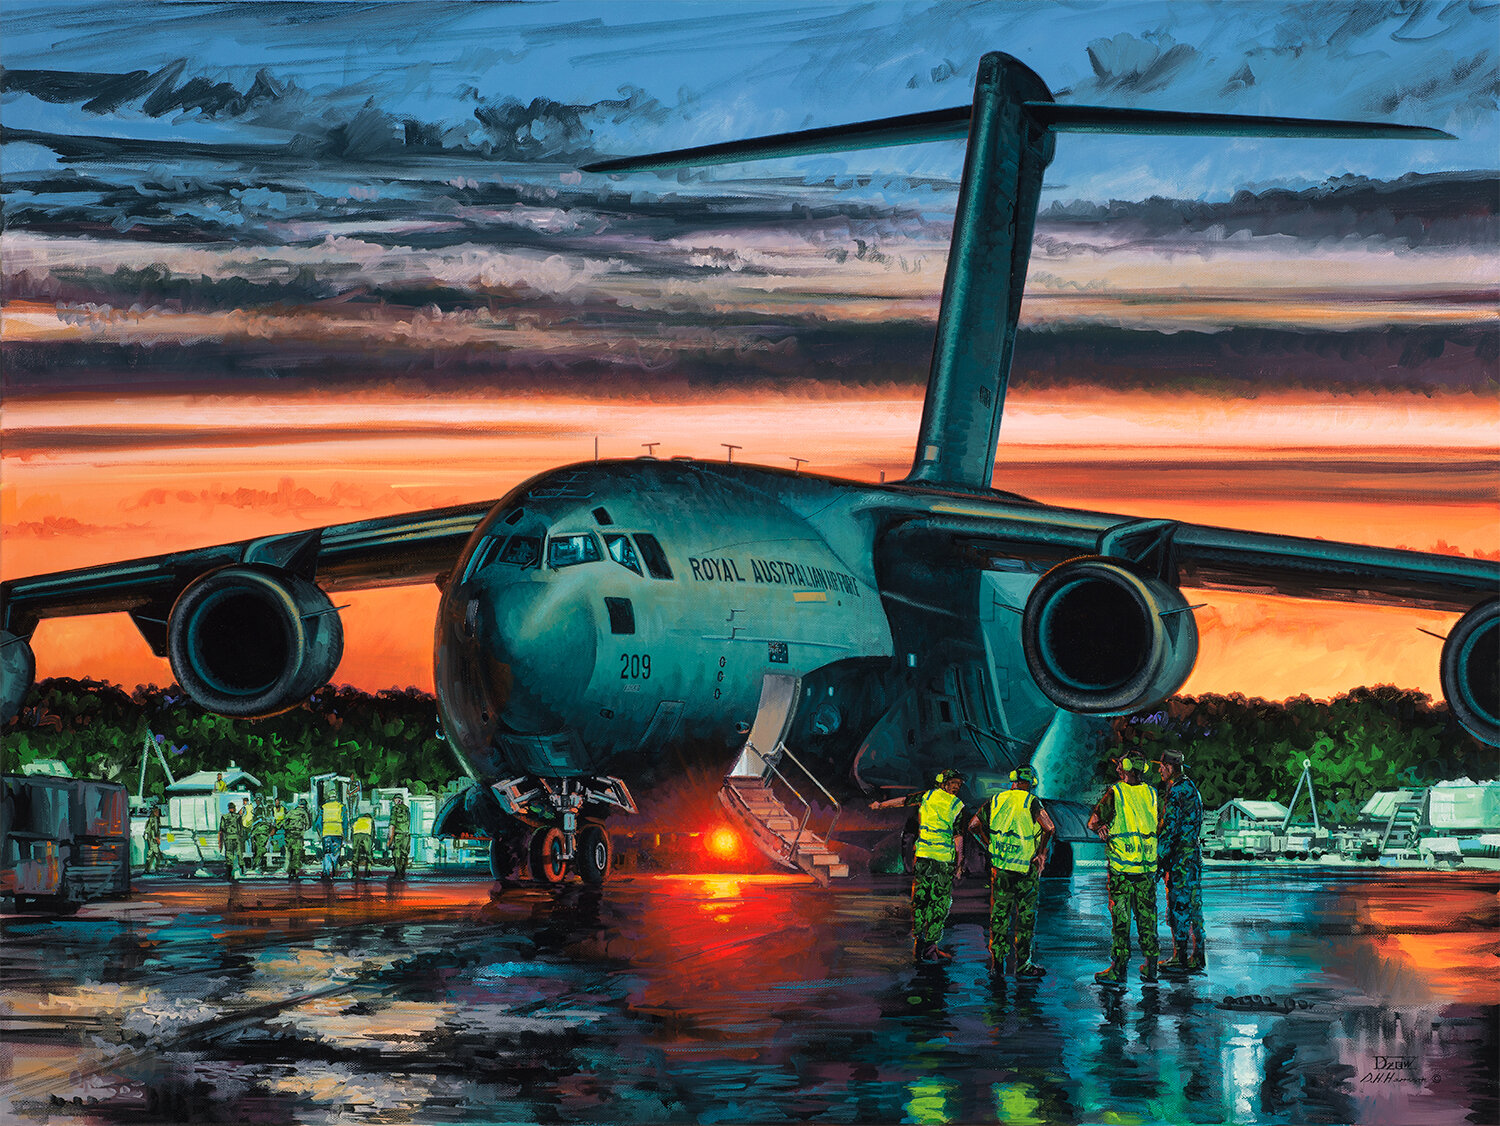
Global Outreach
(H) 76cm x (W) 101cm
(H) 30" x (W) 40"
Acrylic on Canvas
Available as a Limited Edition Giclee print from the Store.
Also available as a Limited Edition Medallion commemorating 100 Years of the Royal Australian Air Force.
2nd Prize - 2016 Royal Australian Air Force Heritage Awards
In the permanent collection of the RAAF
The impressive Boeing C-17A Globemaster III was entered into Royal Australian Air Force service during 2006. Since then the massive transport aircraft have supplemented the C-130 Hercules fleet. Globemasters have greatly extended the RAAF’s strategic airlift capabilities providing the versatility to rapidly deploy vehicles, troops and supplies anywhere in the world. In 2016, 36 Squadron’s C-17s at Amberley are regularly on operations and include support for humanitarian and disaster relief missions. In these latter roles Globemasters have provided an unrivalled outreach to supply Australian Aid during missions such as Operation Philippines Assist – the response to Typhoon Haiyan.
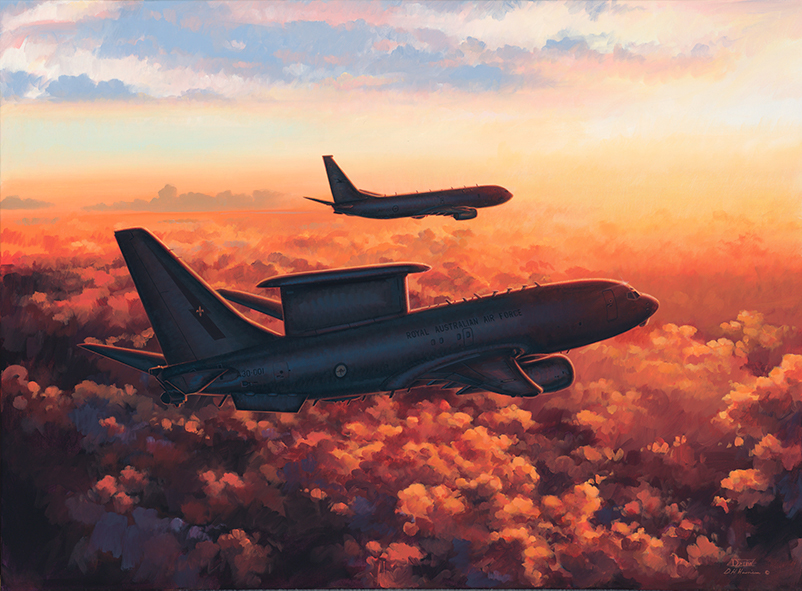
New Horizons
(H) 76cm x (W) 101cm
(H) 30" x (W) 40"
Acrylic on Canvas
Available as a Limited Edition Giclee print from the Store.
Original Canvas artwork available in the Store.
The Royal Australian Air Force entered a new technological era with introduction of the E-7A Wedgetail and P-8A Poseidon into regular service. Both aircraft represent a significant upgrade in advanced mission capabilities for the RAAF. The Wedgetails operated by the reinstated 2 Squadron RAAF have seen active service providing battlespace management during deployment with coalition forces for Operation OKRA in Iraq and Syria. At RAAF Base Edinburgh the long serving AP-3C Orions of 92 Wing have been replaced by the Poseidon and operated by 11 Squadron RAAF. This highly advanced aircraft has also been deployed on operations providing maritime and overland intelligence, surveillance and reconnaissance. The P-8A also complements the unmanned Triton in patrolling Australia’s coastline into the future.
Why not consider your very own personalised commission? Click on link for details.
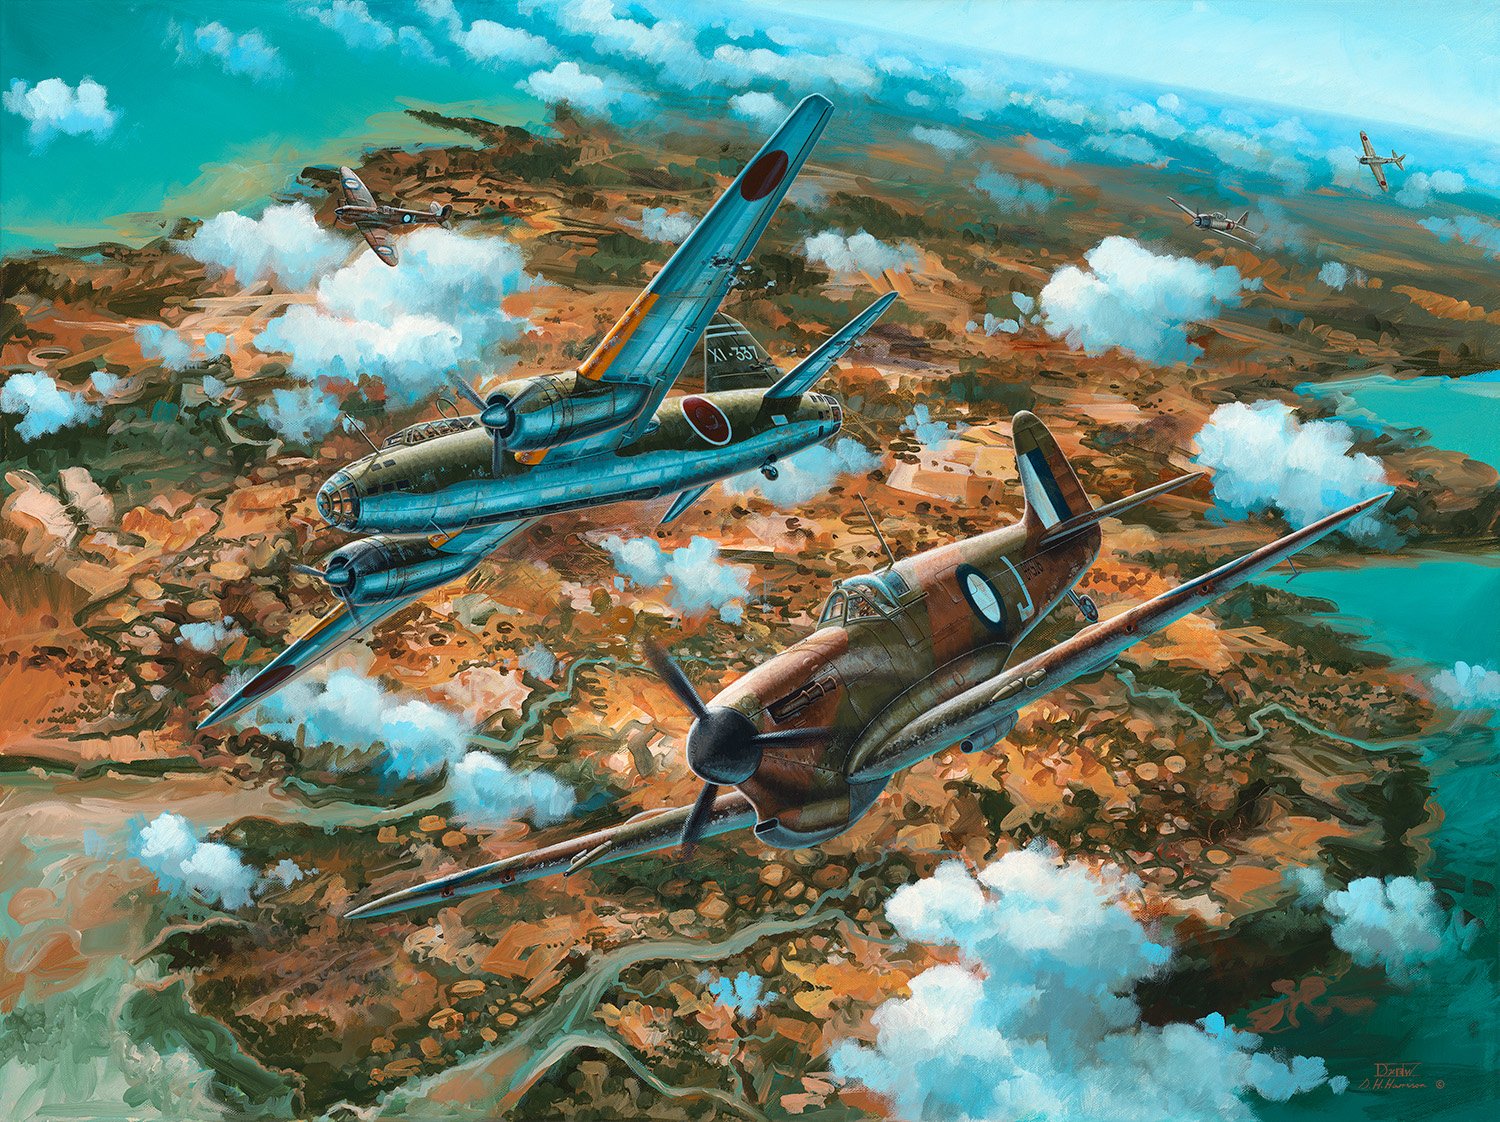
The Northern Approaches
(H) 76cm x (W) 101cm
(H) 30" x (W) 40"
Acrylic on Canvas
SOLD
Available as a Limited Edition puzzle from Puzzle Road.
CLICK HERE TO SHOP JIGSAW PUZZLE
2018 marked 75 years since the sustained Japanese air raids on Darwin and environs during WWII. Following the initial surprise attack on 19th February 1942 the Imperial Japanese Navy and Army forces waged a continued campaign against Australia’s northern coastline. By late 1942 the prime minister’s request for Spitfires had been answered and No.1 Spitfire Wing was formed under the leadership of combat veteran and leading ace Group Captain Caldwell. Comprising 54 Sqn RAF, 452 (Aus) Sqn RAF and 457 (Aus) Sqn RAF and a mix of Australian and British aircrew, the wing headed north in early 1943. On the 15th March the Spitfire pilots were severely tested when a large enemy force was plotted enroute to Darwin. In the ensuing combats two highly experienced pilots (Goldsmith and Hall) of 452 Squadron managed to cut through the fighter escort to tackle a G4M Betty off the northern coastline.
Southern Tails Strike
(H) 45cm x (W) 65cm
(H) 17.7" x (W) 25.5"
Acrylic on Canvas
SOLD (Commission)
Mustangs of 3 Squadron RAAF, led by S/Ldr Nash in CV-P, bomb the marshalling yards at Bjelovar, in the former Yugoslavia on 2nd December, 1944.
See also “Nowhere to Hide” for another painting of 3 Squadron RAAF Mustangs in Italy.
Cold Lines
(H) 60cm x (W) 90cm
(H) 23.6" x (W) 35.4"
Acrylic on Canvas
Original Canvas artwork available in the Store.
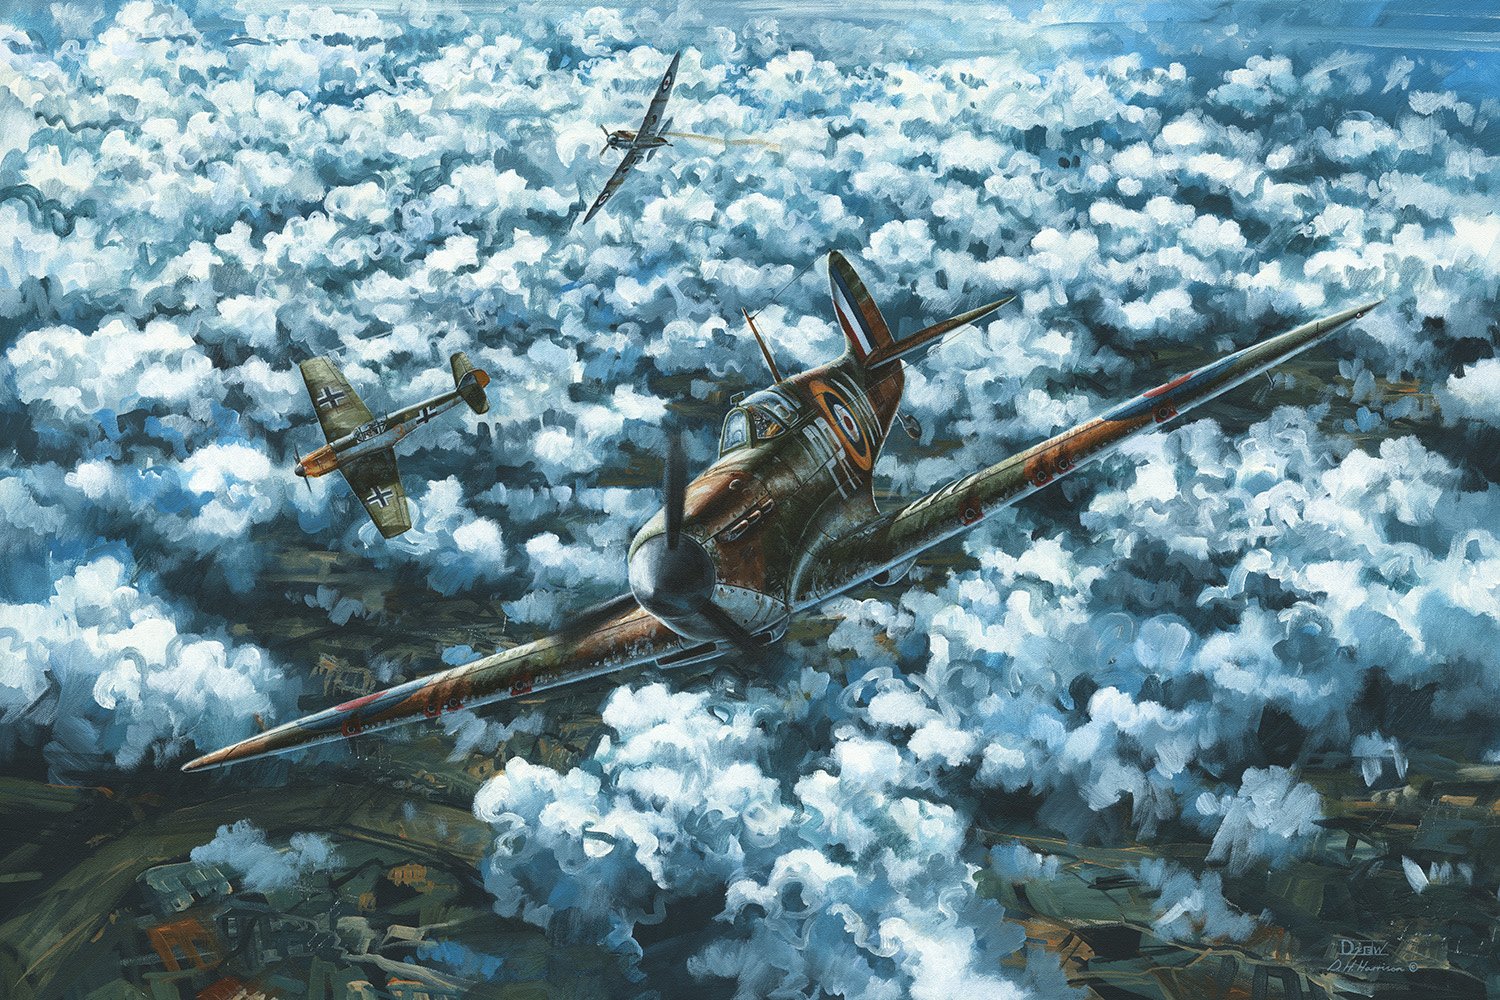
John Curchin was an Australian who flew with the Royal Air Force during the Battle of Britain. Having been assigned to 609 ‘West Riding’ Squadron just after the Dunkirk withdrawal, Curchin soon became a respected member of the unit and eventual flight leader and DFC recipient. As the Luftwaffe intensified their attacks during the English Summer of 1940 the Australian was regularly in combat flying Spitfires. Curchin also became a leading ace during this period. In this companion painting to Defending the Capital, Curchin and his wingman have been momentarily caught off guard by a diving Messerschmitt. The Spitfire and Bf109 were evenly matched so the outcome of this particular encounter could go either way. Scenes like this were a daily occurrence for the pilots who defended London during 1940.
Why not consider your very own personalised commission? Click on link for details.
Defending the Capital
(H) 60cm x (W) 90cm
(H) 23.6” x (W) 35.4”
Acrylic on Canvas
Original Canvas artwork available in the Store.
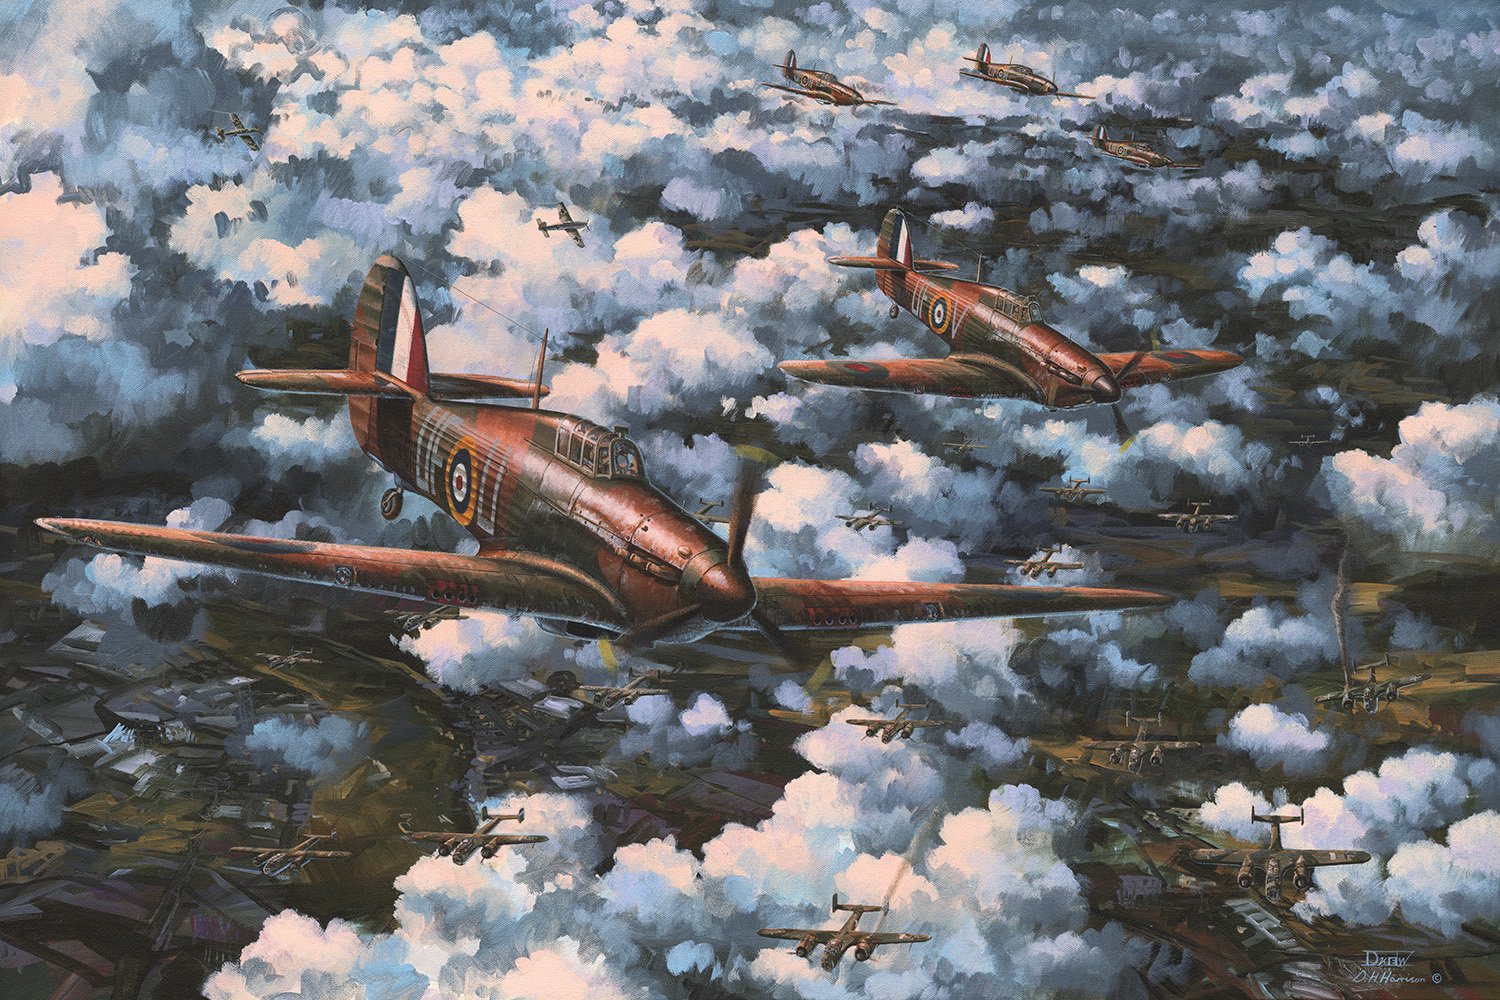
During August 1940 the Battle of Britain continued to rage. The German Luftwaffe gradually began to shift their bombing focus towards the British airfields before later launching full out attacks against the capital London. The ubiquitous Hurricane and Spitfire, flown by pilots from several nations, bore the brunt of combat. 601 ‘County of London’ Squadron was a pre-war Auxillary squadron that earned the nickname ‘millionaires squadron’ due to the number of affluent pilots among the ranks. By WWII the unit was far more cosmopolitan! In early August 1940 Sydney born Howard Mayers had joined the squadron. He was soon thrown into action along with the daily routine of sleep deprivation, stress and extremely dangerous missions. In this depiction, Mayers, along with other pilots of 601 Squadron, are about to launch an attack against Do17 bombers over the Thames Estuary. Mayers was one of the leading Australian fighter pilots during the Battle of Britain and an ace. He survived the battles of 1940 and was later sent to the Middle East to command a squadron and then a Wing. Ultimately, Mayers was decorated with a DSO, DFC and Bar and Mentioned in Despatches although, sadly, did not survive the war.
Why not consider your very own personalised commission? Click on link for details.
Beyond the 38th Parallel
(H) 76cm x (W) 101cm
(H) 30" x (W) 40"
Acrylic on Canvas
SOLD
Available as a Limited Edition Giclee print from the Store.
Also as a Limited Edition puzzle from Puzzle Road .
CLICK HERE TO SHOP JIGSAW PUZZLE
Finalist - 2014 Royal Australian Air Force Heritage Awards
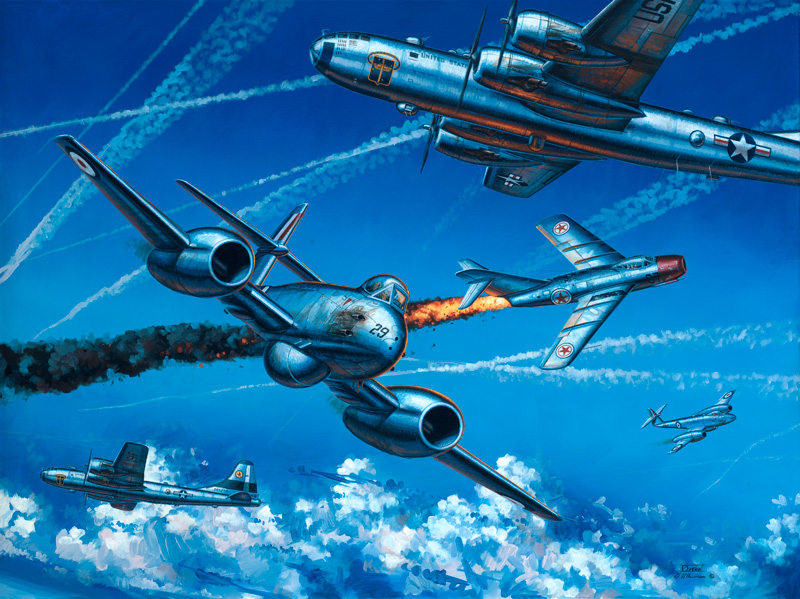
In June 1950 North Korea invaded the South and the United Nations Security Council was forced to respond. 77 Squadron RAAF was stationed in Japan at this time, as part of the British Commonwealth Occupational Force, and became one of the first United Nations units to enter combat. Initially armed with the piston engine F-51 Mustang the decision to re-equip 77 Squadron with modern jets had long been considered a priority and this finally occurred in July 1951. The Australian unit returned to Korea under the aggressive leadership of WWII veteran S/Ldr ‘Dick’ Cresswell and armed with the Gloster Meteor F.8. On 27th October 1951 77 Squadron were tasked with escorting B-29s of the 19th Bomb Group to targets at Sinanju in North Korea. During the return leg several enemy MiG-15s were seen at higher altitude before diving towards the formation. The Australians doggedly stuck to their task and only broke formation when the bombers came under immediate attack. In the heat of jet combat it was quite often impossible to note results of an attack. F/O Les Reading believed to have damaged a MiG with cannon fire and it appears likely B-29s gunners may have landed destructive blows against other aircraft.
Pressure Point
(H) 76cm x (W) 101cm
(H) 30" x (W) 40"
Acrylic on Canvas
Available as Limited Edition Giclee print from the Store.
Also available as a Limited Edition Medallion commemorating 100 Years of the Royal Australian Air Force.
2nd Prize - 2012 Royal Australian Air Force Heritage Awards
In the permanent collection of the RAAF
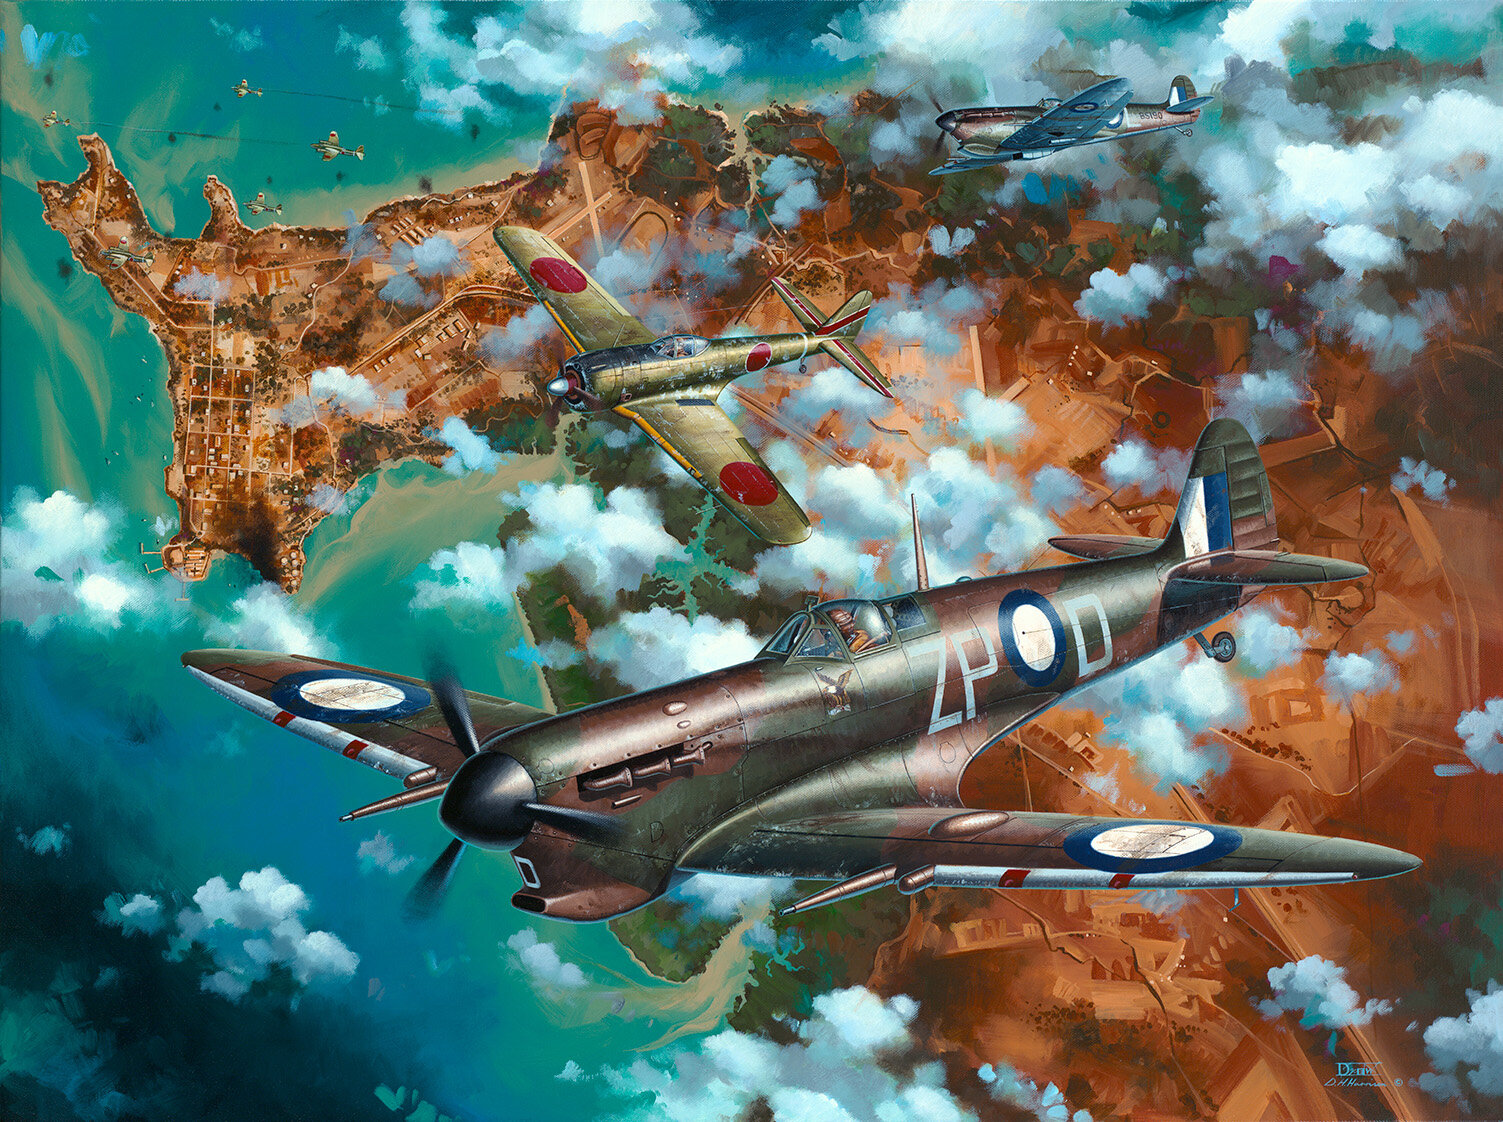
On 20th June 1943 bombers and fighters of the IJAAF bombed Darwin. 452 (Aus) Sqn RAF and 54 Sqn RAF intercepted NE of the harbour while 457 (Aus) Sqn RAF were sent to investigate another plot further north. By the time 457 Sqn re-engaged, Ki-49 ‘Helen’ bombers of the 61st Sentai were almost directly over the township. F/Lt P.H. Watson DFC led the three sections of 457 Sqn Spitfires into a dangerous and difficult head on attack. White flight repeated the manoeuvre, however, John ‘Smithy’ Smithson (White 3 - ZP-L, BS190), leading the second section of William ‘Jack’ Halse (White 4 - ZP-D, BS178), noted the difficulty of their position and readjusted for a more favourable quarter attack. Smithson fired at one of the bombers in a dive, then pulled up behind the enemy force with Halse sticking to his leader’s tail. White 3 managed to get a bead on one of the escorting fighters, a Ki-43 ‘Oscar’ of the 59th Sentai, and opened fire with cannon to claim the enemy destroyed. Another ‘Oscar’ had latched onto Halse in ZP-D. Both the Australians were now separately engaged and forced to fight their way out.

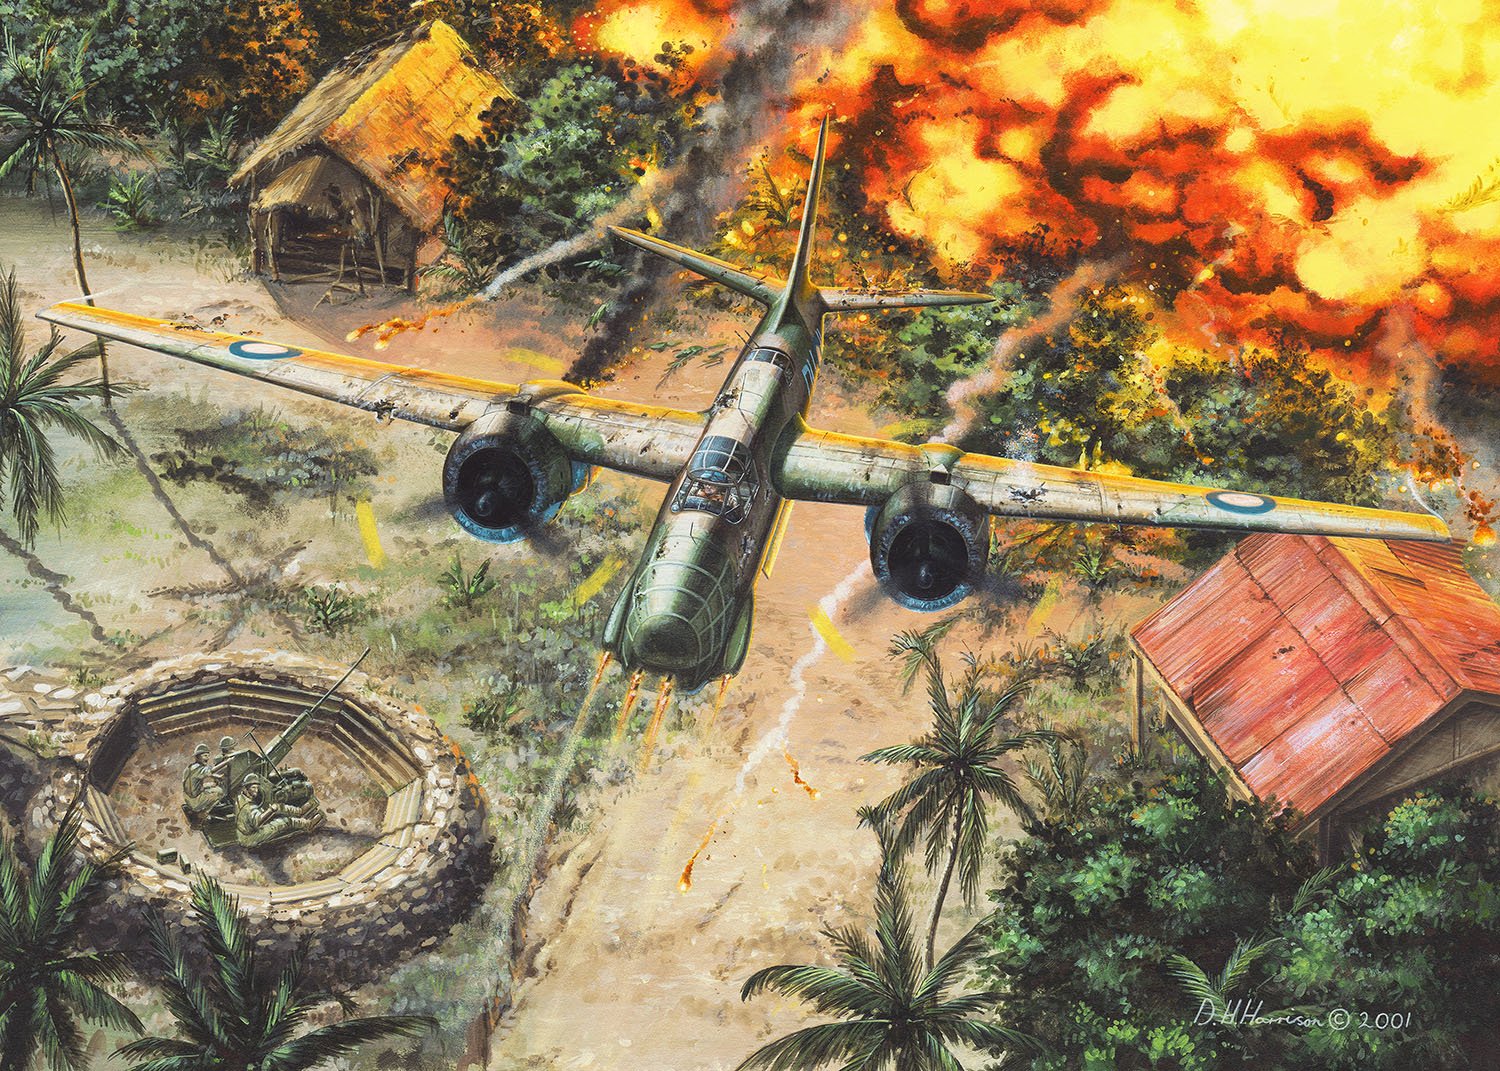
Night Spectres
(H) 63.5cm x (W) 101.5cm
(H) 25” x (W) 40”
Acrylic on Canvas
Highly Commended - 2005 Royal Australian Air Force Heritage Awards
Available as a Limited Edition Giclee print from the Store.
Framed original available in the Store.
Available as a Limited Edition Medallion commemorating 100 Years of the Royal Australian Air Force.
2 Squadron (RAAF) was again in action during the Vietnam War, having seen continued service throughout both World Wars and the Malayan Emergency. Australia had deployed several helicopter squadrons and support units to South East Asia, however, 2 Sqn was the sole RAAF-fixed wing strike capability in South Vietnam. The unit deployed with Canberra bombers in 1967 and was immediately involved on bombing operations. During four years of service the unit was regarded as one of the pre-eminent bomber squadrons. Superb accuracy was achieved on day and night time missions and the dedicated ground crews provided an enviably high rate of aircraft serviceability. Night Spectres depicts Canberra bombers of 2 Squadron (RAAF) striking targets during the early phases of the Vietnam conflict.
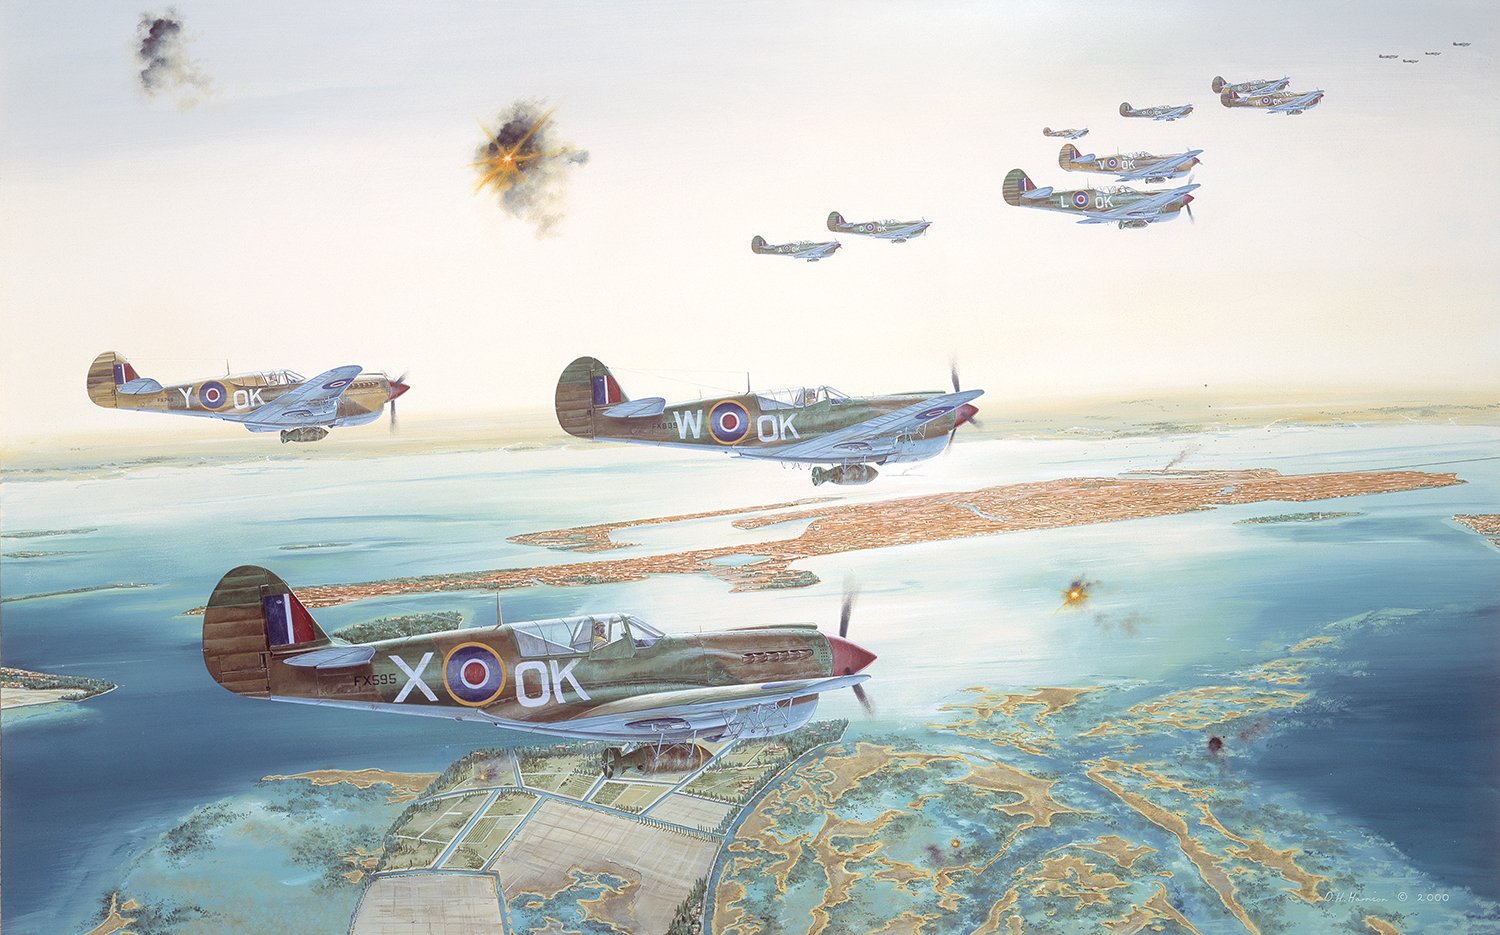
Battle for Australia (Air Raid No.55, June 20th, 1943)
(H) 92cm x (W) 122cm
(H) 36” x (W) 48”
Acrylic on Canvas
Original available in the Store.
Available as a Limited Edition Giclee print from the Store.
Also as a Limited Edition puzzle from Puzzle Road .
CLICK HERE TO SHOP JIGSAW PUZZLE
Used as a cover image for a CHECK YOUR 6! Air Combat and Campaign Rules book Under Southern Skies
READ MORE at Skirmish Campaigns
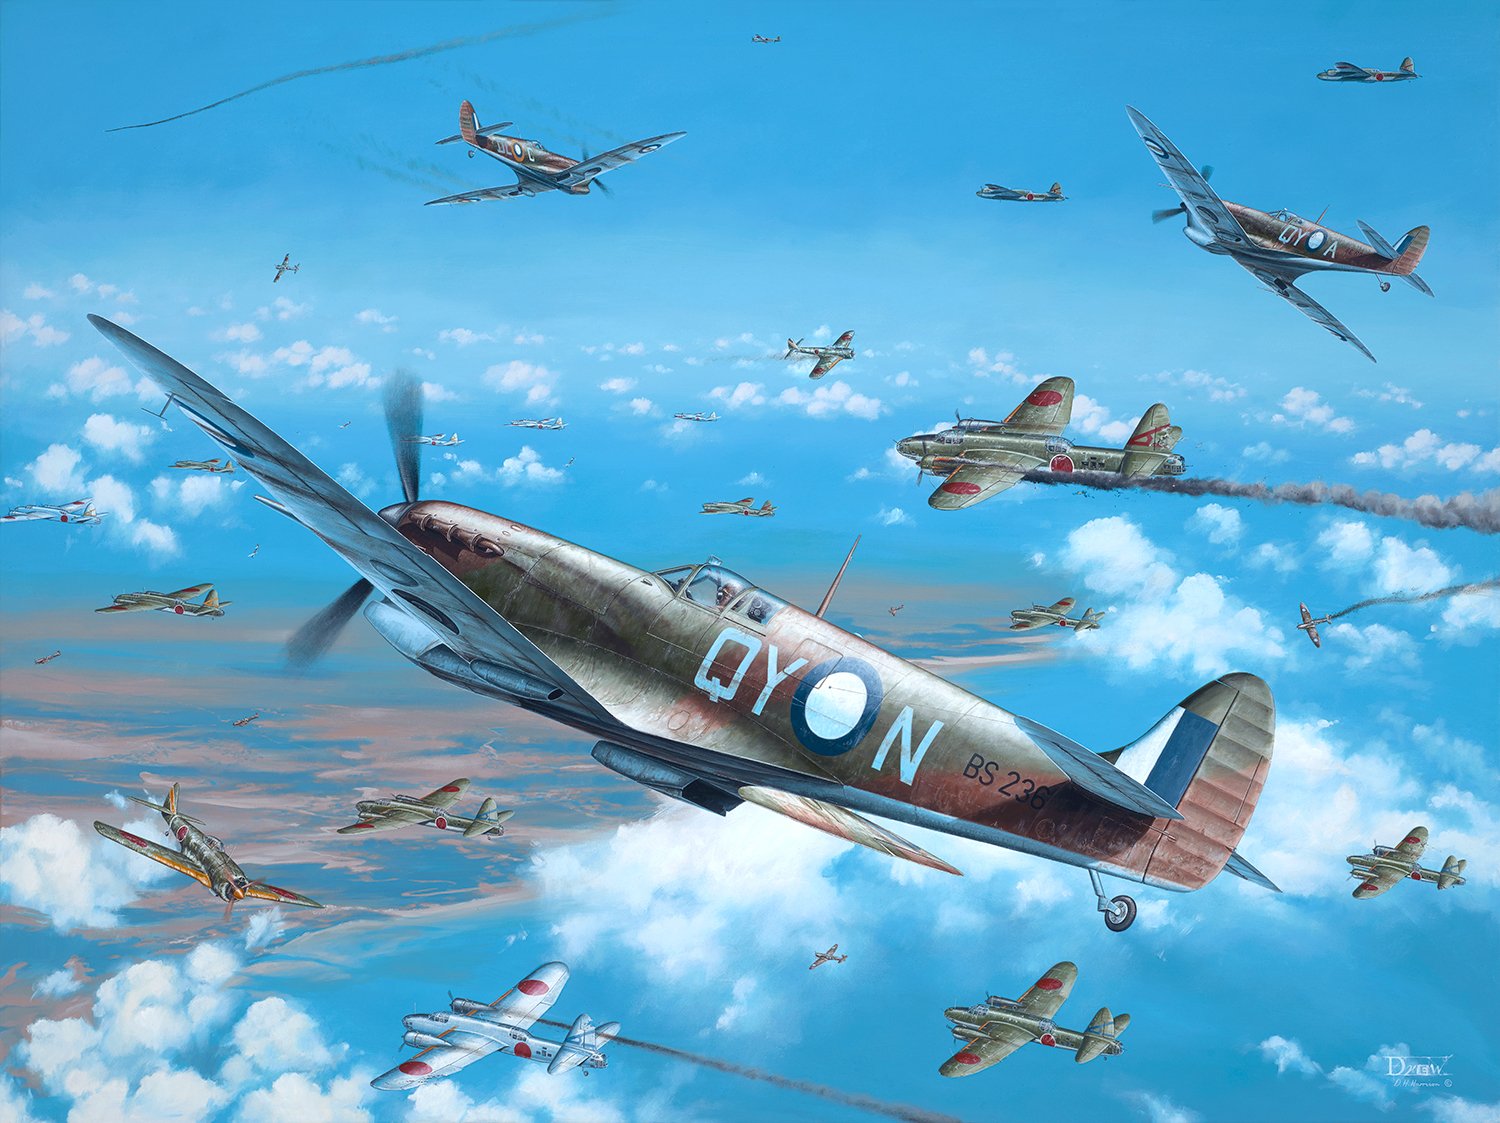
On June 20th, 1943, the Imperial Japanese Army Air Force mounted one of the largest air raids against Northern Australia. Spitfires intercepted a force of Ki-49 ‘Helen’ bombers of the 61st Sentai and Ki-43 ‘Oscar’ fighters of the 59th Sentai as they crossed the northern coastline. In the initial attack 452 Squadron (RAAF) and 54 Squadron (RAF) tore into the attackers claiming several aircraft. The third Spitfire unit, 457 Squadron (RAAF), joined the fray over Darwin. Australian Malta veteran, F/O John Bisley claimed destruction of a bomber while piloting Spitfire Mk.Vc, QY-N, BS236. Several other Australian combat veterans saw action on this day including Clive Caldwell, Granville Mawer, Ron MacDonald and John Smithson. The pilot of Spitfire Mk.Vc, QY-A, EE607 was P/O Willie ‘Bill’ Nichterlein who lost his life during the same mission.
Why not consider your very own personalised commission? Click on link for details.

Keeper of the Flame
(H) 58cm x (W) 88cm
(H) 22.84” x (W) 34.65”
Acrylic on Canvas Board
Available as a Limited Edition Giclee print from the Store.
Framed Original available in the Store.
People’s Choice - 2002 Royal Australian Air Force Heritage Awards
Keeper of the Flame portrays the second of two dazzling ‘dump and burns’ performed at the Sydney 2000 Olympic Games as a part of the Closing Ceremony. The 6 Squadron (RAAF) F-111G (A8-271), crewed by F/Lt Andrew Buttsworth and F/O Brad Machan, swooped over Sydney Harbour in a spectacular display that kick started one of the greatest fireworks displays of all time. This unusual non-military deployment of the F-111 strike aircraft was intended to signify the Olympic flame being ‘plucked’ from Sydney. It would then ‘re-ignite’ at the Athens Games in 2004. The mission was surprisingly fraught with danger. Bogong Moths were thick in numbers around the Sydney skyline and there was a substantial risk these insects could be ingested into the F-111’s intakes!
Seek, Strike and Return also includes the legendary F-111. Also see Fire and Fury: F-111 Pig .
Escape from Rabat
(H) 30cm x (W) 42cm
(H) 11.81” x (W) 16.54”
Acrylic on Illustration Board
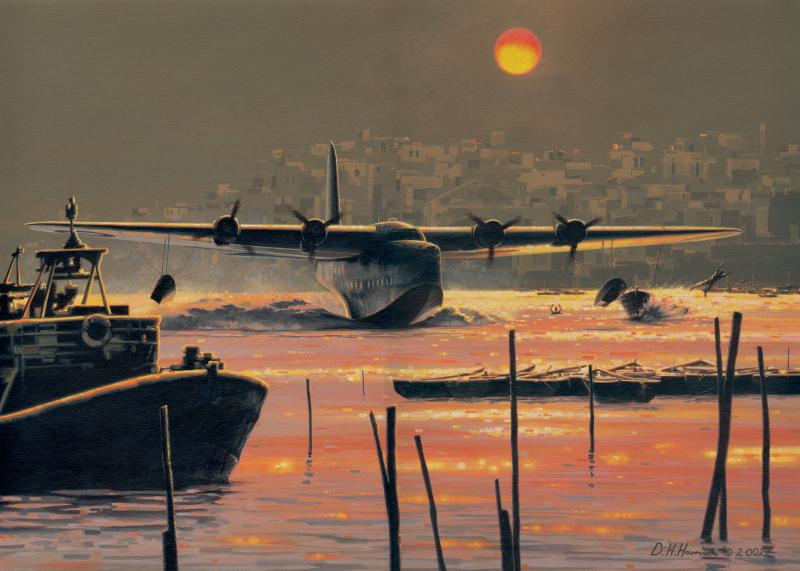
To sway the opinions of Moroccan French Nationals towards the Allied cause, a diplomatic mission of negotiations was planned in 1940. An official party was despatched to the harbour port of Rabat in a 10 Squadron (RAAF) Sunderland flying boat, captained by Richard Kingsland. After negotiating the tight and crowded Bou Regreg estuary the officials were escorted to the negotiations. Kingsland and his crew remained on board the Sunderland, uneasy with the situation. Soon after, a radio message was received cancelling the mission and ordering an immediate escape. Kingsland and his co-pilot headed to shore and managed to rescue the diplomatic party during the early hours of the morning. In a pursuit by police boats down the narrow confines of the estuary, Kingsland weaved his Sunderland around the many fishing boats. Although clearing most obstacles, the giant aircraft’s port wing float clipped a fishing vessel before powering towards the open sea. The resulting damage would lead to an equally dramatic turn of events back at Gibraltar involving a makeshift platform made from a mattress and rescue launch.
Exercise Kangaroo II: Mirage vs Tomcat
(H) 76cm x (W) 101cm
(H) 30" x (W) 40"
Acrylic on Canvas
Available as Limited Edition Giclee print from the Store.
Also available as a Limited Edition Medallion commemorating 100 Years of the Royal Australian Air Force.
2nd Prize - 2008 Royal Australian Air Force Heritage Awards
In the permanent collection of the RAAF
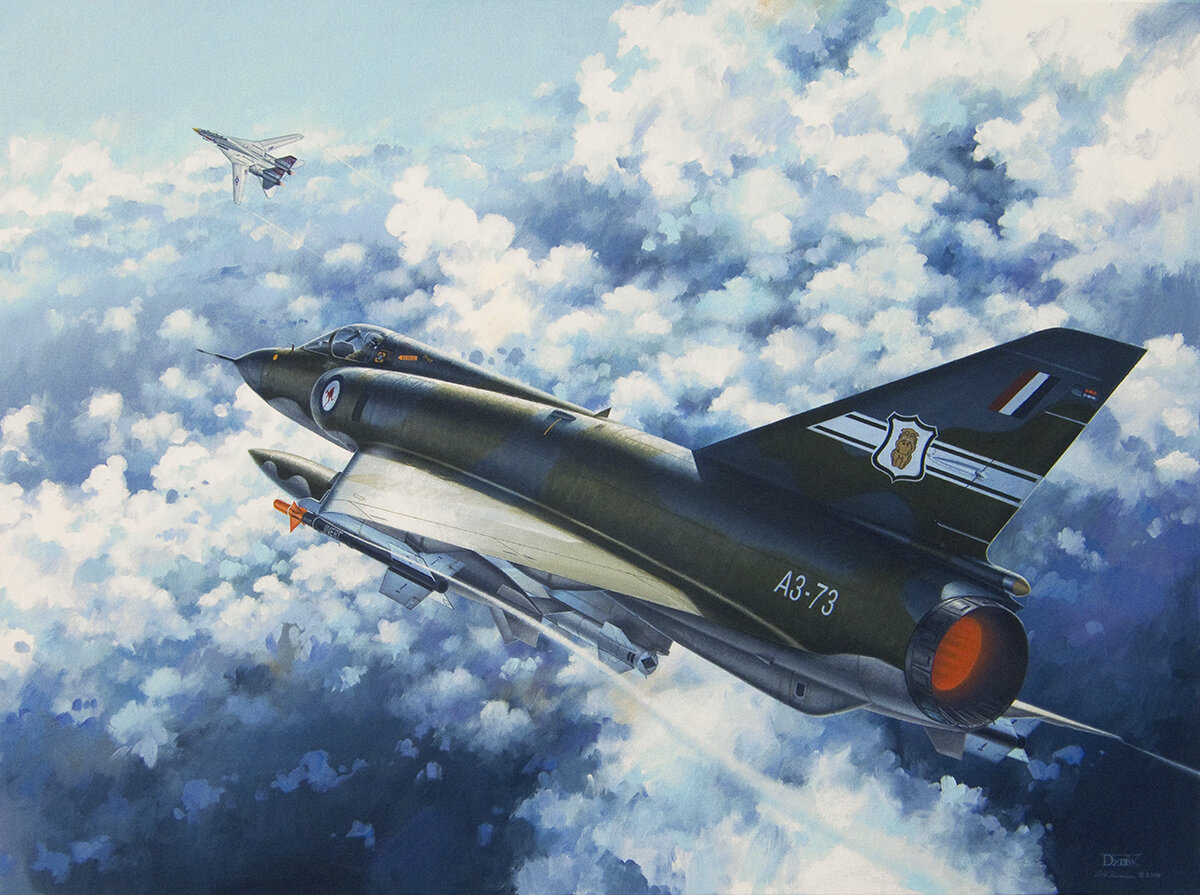
During October of 1976 the United States Navy (USN) and Royal Australian Navy (RAN) along with the Royal Australian Air Force (RAAF) gathered for Exercise Kangaroo II. During the war games, Dassault Mirage III fighters of 77 Sqn RAAF were pitted against F-14 Tomcats in dissimilar aircraft combat tactics. 77 Sqn’s adversary was the USN’s VF-1 ‘Wolfpack’. This squadron wielded a new frontline strike weapon - the formidable Grumman F-14 Tomcat. Embarked upon USS Enterprise it was VF-1’s first deployment with the F-14. Although an outstanding long-range interceptor the American fighter was no match for the agile Mirage at close quarters. Pilots of 77 Sqn recorded several gun-camera ‘kills’ against their larger more modern combatants. An outstanding achievement for a fighter that was entering the twilight years of RAAF service.
Flaming Cigar
(H) 30cm x (W) 42cm
(H) 11.81” x (W) 16.54”
Acrylic on Illustration Board
On the morning of February 19th, 1942, a large force of Japanese aircraft attacked the vital port of Darwin in Northern Australia. Purely by chance a small force of American fighters had returned to Darwin due to deteriorating weather conditions further north. Although fighting valiantly, the P-40s were overwhelmed by the large number of enemy aircraft. Air raids over Darwin continued on a regular basis as the USAAF units were gradually bolstered by increased numbers of fighters. During this period 77 Squadron (RAAF) began training to eventually replace the American units and form part of the Northern defence. By August the Squadron under the command of Squadron Leader Cresswell had moved north for a five month period. On the night of November 2nd, 1942, Cresswell was on patrol northwest of Darwin when he was vectored by radar controllers onto a heading. The three enemy Mitsubishi G4M ‘Betty’ bombers were easily discernable against the moonlit clouds as he closed on the formation and fired. One of the aircraft split from the formation and Cresswell pursued the attacker managing to target the starboard side with tracer bullets. The Betty’s engine burst into flames and descended earthwards before crashing on impact. This was the first night claim by an Australian pilot over native soil.
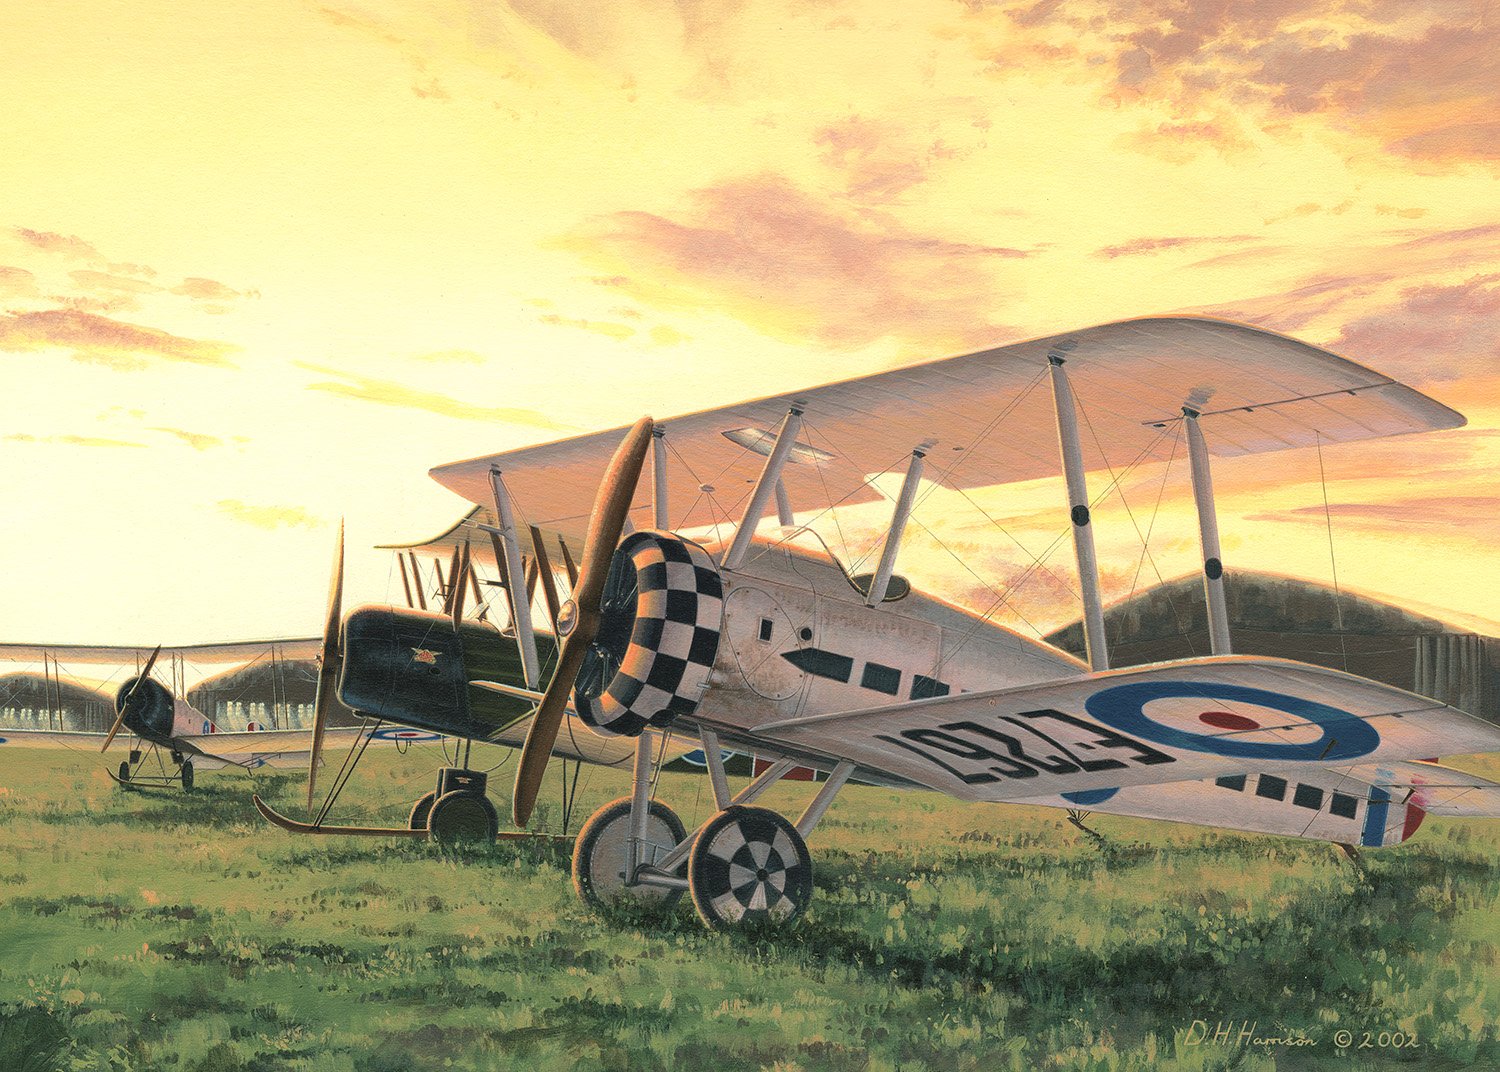
Leighterton 1918
(H) 30cm x (W) 42cm
(H) 11.81” x (W) 16.54”
Acrylic on Illustration Board
Available as a Limited Edition puzzle from Puzzle Road.
CLICK HERE TO SHOP JIGSAW PUZZLE
Melbourne born Capt Arthur ‘Harry’ H. Cobby DSO, DFC and Two Bars, MiD, was the Australian Flying Corp’s (AFC) leading fighter pilot during the First World War. He proved to be a talented and aggressive pilot while flying Sopwith Camel scouts with 4 Squadron AFC over the Western Front. Throughout 1918 Cobby increased his score of enemy aircraft brought down to well over 25 making him the highest scoring AFC ace. As an experienced combat pilot, he was posted to 8 Squadron AFC at Leighterton, England, during September of 1918 for training duties. Most pilot training involved flying the reliable Avro 504K, although Cobby had his Sopwith Camel, E7267, marked in personalised black and white ‘chessboard’ pattern. At the end of the First World War Capt ‘Harry’ Cobby DSO, DFC and Two Bars, MiD, returned to Australia and joined the newly formed RAAF, eventually retiring in 1946 with rank of Air Commodore and additional commendations of CBE and GM.
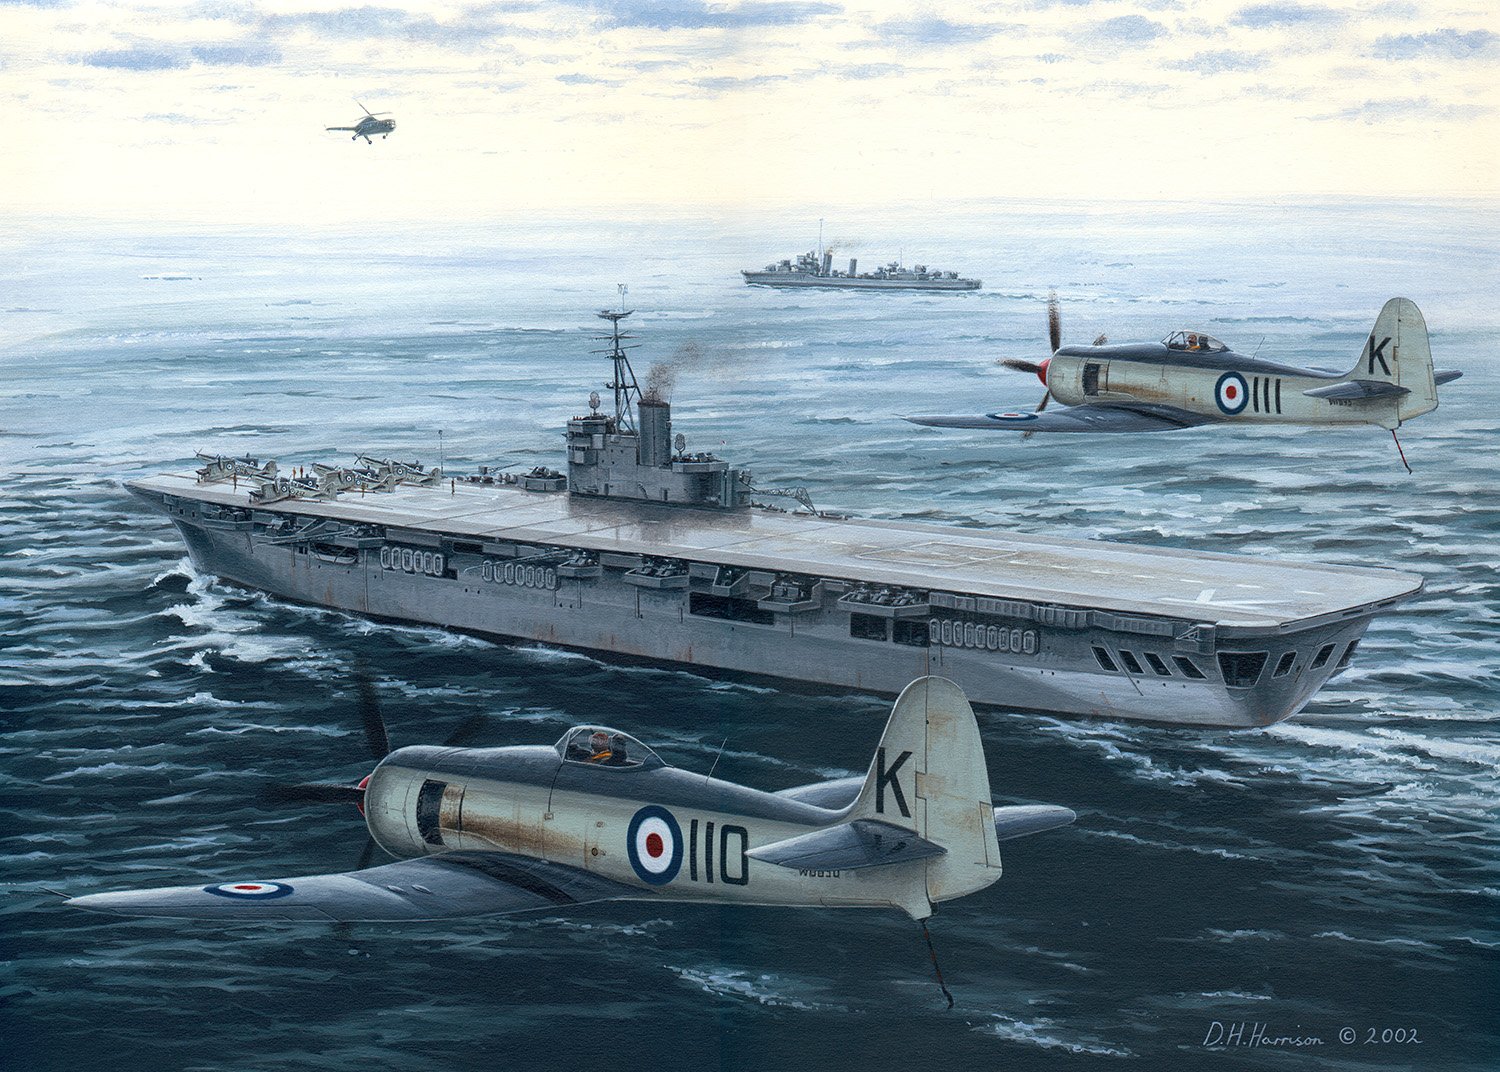
Patrolling the Peace: Korean Waters, 1954
(H) 30cm x (W) 42cm
(H) 11.81” x (W) 16.54”
Acrylic on Illustration Board
Available as a Limited Edition puzzle from Puzzle Road.
CLICK HERE TO SHOP JIGSAW PUZZLE
The Korean War was a proving ground for the relatively infant RAN Fleet Air Arm. During the three-year period of hostilities Australia’s first dedicated aircraft carrier, HMAS Sydney, provided Sea Furies and Fireflies for combat operations over enemy territory, ranging from troop suppression to bridge busting. With the cessation of hostilities in mid 1953 the RAN remained in the region to provide peace keeping duties. The following year an uneasy truce remained when former RAAF, WWII fighter pilot, Lt/Cdr Arthur ‘Nat’ J. Gould was deployed with 805 Squadron RAN to maintain the peace. Gould was an experienced WWII combat pilot who had flown with the RAF in Russia and defended Australia’s Northern frontier from the Japanese threat. He had been lured to the Fleet Air Arm in 1945 and by the onset of the Korean War was looking to once again be in action. However, his tour became one of protecting the peace which included numerous patrols along the west coast of Korea.
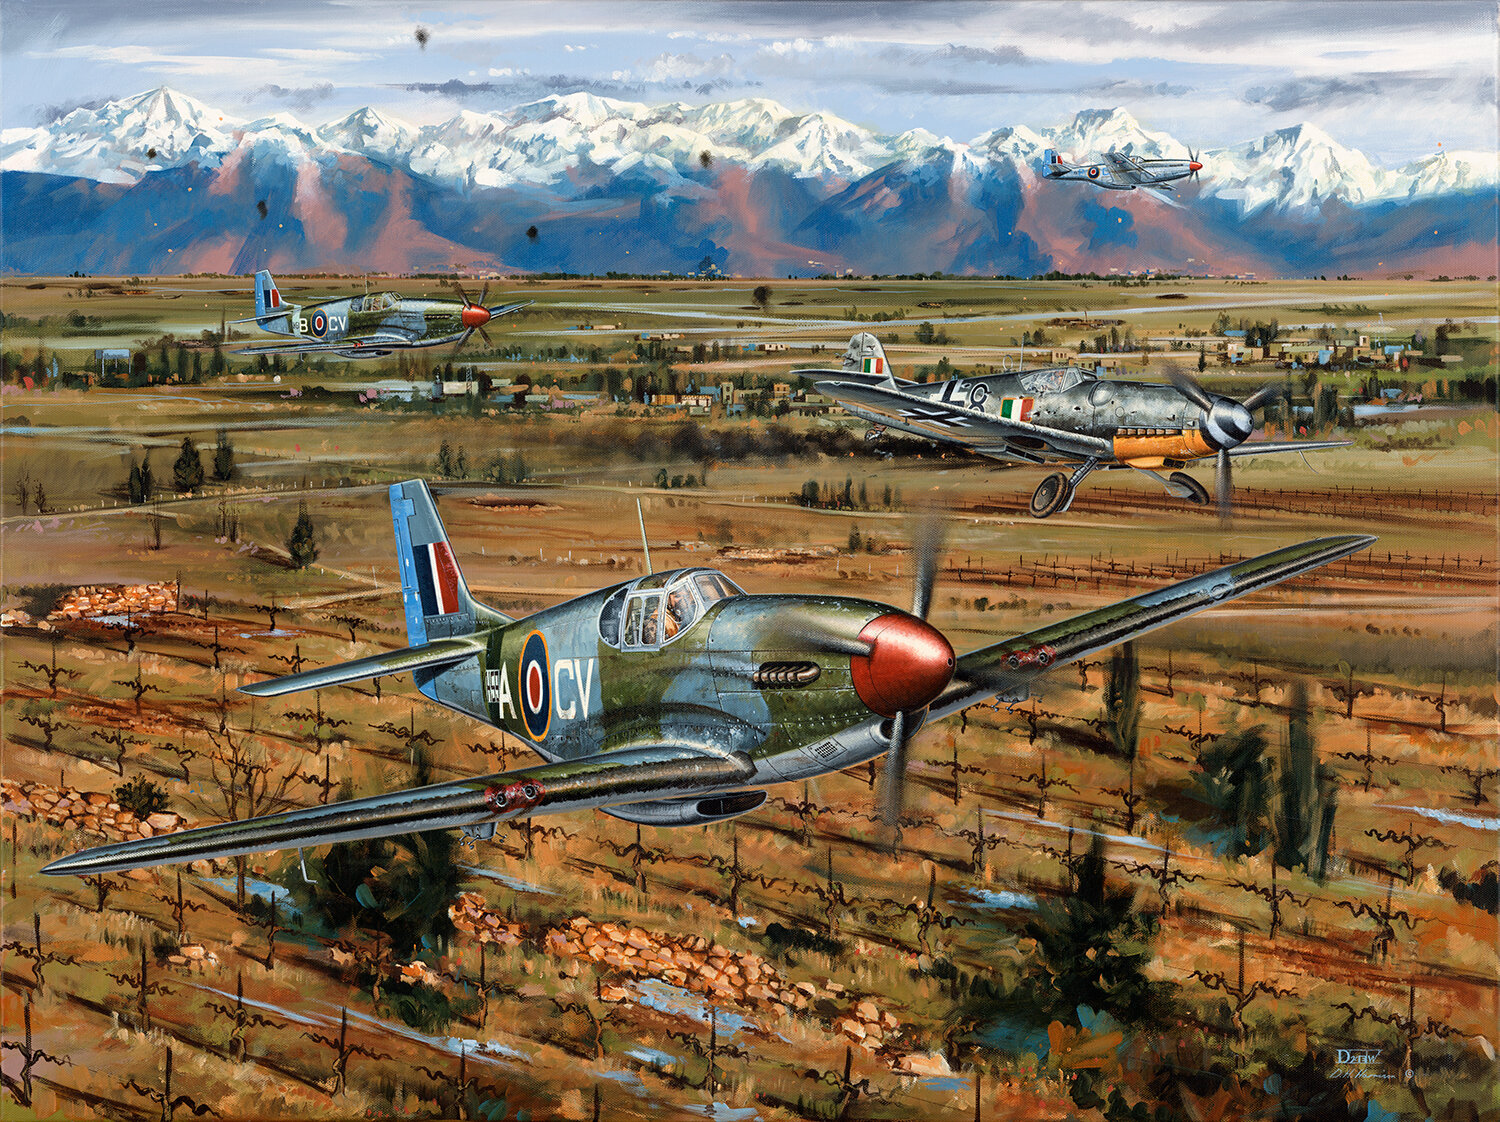
Nowhere to Hide
(H) 76cm x (W) 101cm
(H) 30" x (W) 40"
Acrylic on Canvas
Available as Limited Edition Giclee print from Store.
Also as a Limited Edition puzzle from Puzzle Road.
CLICK HERE TO SHOP JIGSAW PUZZLE
2nd Prize - 2010 Royal Australian Air Force Heritage Awards
In the permanent collection of the RAAF
On Boxing Day, 26th December 1944, 3 Sqn RAAF were involved in their last fighter versus fighter combat of the conflict. S/Ldr Murray Nash, led an afternoon mission when the Australian Mustangs were bounced by Messerschmitt Bf 109 fighters of the Aeronautica Nazionale Repubblicana (ANR). Tenente Keller succeeded in knocking W/O Jack Quinn’s lagging aircraft from the formation forcing him to bail out. Taking the initiative, Nash led his formation south of Aviano air base in an attempt to trap any returning enemy fighters. Within moments, a single Bf109G-14, ‘Black 8’ piloted by Sotto Tenente Felice Squassoni, was seen to approach. Nash positioned his charges above and behind the fighter before beginning the attack. The Mustangs pursued Squassoni at high speed across the airfield boundary. Nash (CV-N/KH716), F/O William Andrews (CV-A/KH593) and F/O Vincent Thomas (CV-B/KH615) all succeeded in hitting the enemy plane causing Squassoni to crash his 109. He survived, albeit shaken, and was able to extricate himself from the wreck.
See also “Southern Tails Strike” for another painting of 3 Squadron RAAF Mustangs in Italy.
Just Another Day at the Office
(H) 30cm x (W) 42cm
(H) 11.81” x (W) 16.54”
Acrylic on Illustration Board
Available as a Limited Edition puzzle from Puzzle Road.
CLICK HERE TO SHOP JIGSAW PUZZLE
22 SQN RAAF was the first RAAF frontline operator of the Douglas Boston light bomber. Used in the ground attack role these durable aircraft were modified in the field with an additional four 0.5-inch machine guns in the nose for strafing. During March of 1943, 22 SQN RAAF regularly flew attack missions in the Salamaua area of the Pacific. By flying at extremely low level the crews became increasingly familiar with the terrain and the Japanese gunners situated around the region.
F/Lt William ‘Bill’ E. Newton was a tenacious Australian pilot famed for wearing a cricketer’s cap on operations and respected for his almost suicidal attacks on enemy targets. On 16th March, 1943, 22 SQN’s target was the supply dumps on Salamaua Isthmus, which were directly in line with the anti-aircraft batteries. Newton attacked ‘straight down the line’ flying a gauntlet of fierce enemy fire. His Boston Mk.III, DU-H/A28-7, received direct hits in the fuel tanks and main wing spars, however, the crew survived this mission.
Only two days later 22 SQN repeated their attacks where Newton’s aircraft was shot down. His Navigator Sgt Basil G. Eastwood was killed. The gunner F/Sgt John Lyon swam ashore with his captain, however, both were captured and subsequently executed. For his attacks on Salamaua, F/Lt ‘Bill’ Newton was posthumously awarded a Victoria Cross.
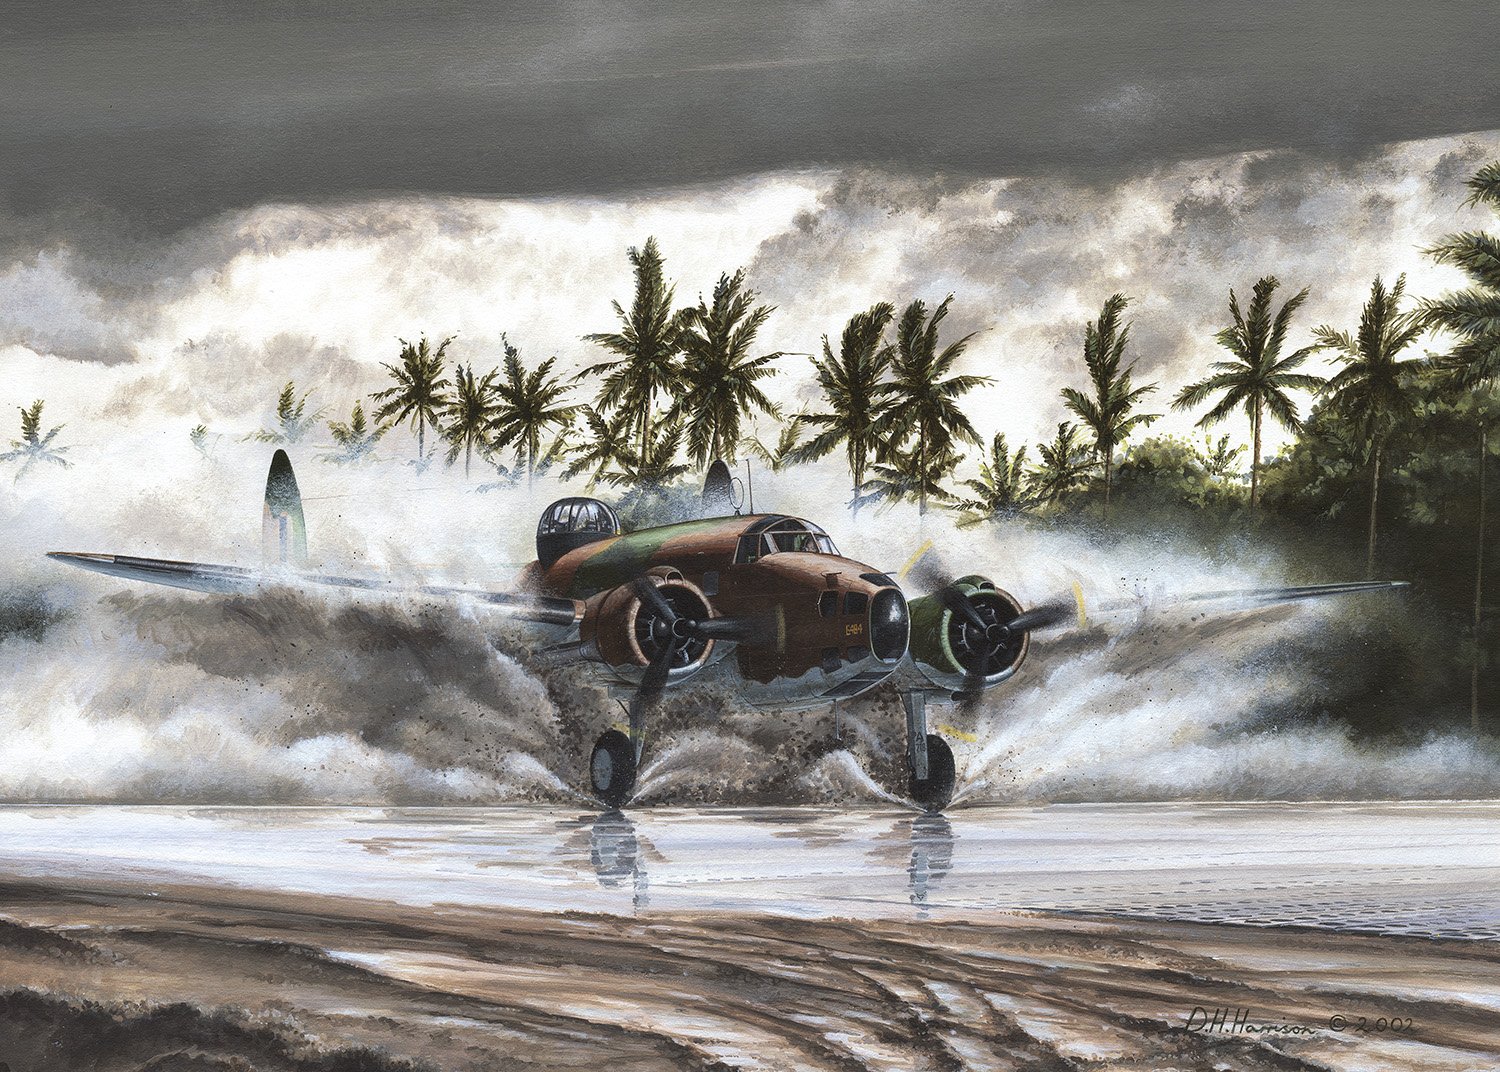
Slush
(H) 30cm x (W) 42cm
(H) 11.81” x (W) 16.54”
Acrylic on Illustration Board
A detachment of four Hudson bombers of 6 SQN RAAF were sent to Milne Bay from nearby Horn Island in August of 1942. The crews were to provide bomber support and general reconnaissance to the beleaguered Australian and American forces. Although seemingly a tropical paradise, the personnel at Milne Bay faced atrocious weather and the ever-present dangers of disease such as malaria and dysentery. After torrential rains the steel planking airstrips would sink into the thick black mud. Aircraft landing or taking off did so through rivers of watery, muddy slush often damaging or clogging aircraft components such as flaps. However, the war went on. When Japanese ground forces landed on the night of August 25/26th the Hudsons were kept busy strafing enemy barges, stores and troops in support of RAAF Kittyhawks of 75 and 76 SQNs. The twin engined bombers ably supported the allied ground forces during the entire Milne Bay campaign. 6 SQN Hudsons sighted the cruiser, Tenryu, and destroyer, Arashi, that led to the first combined fighter/bomber/torpedo strike by the RAAF against the Japanese.
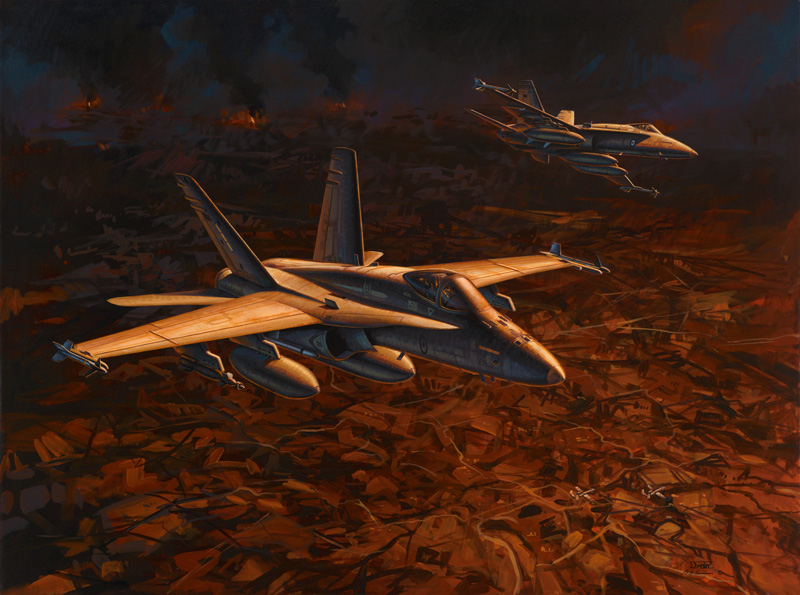
Operation Falconer
(H) 76cm x (W) 101cm
(H) 30" x (W) 40"
Acrylic on Canvas
Available as Limited Edition Print from the Store.
Also available as a Limited Edition Medallion commemorating 100 Years of the Royal Australian Air Force.
1st Prize - 2014 Royal Australian Air Force Heritage Awards
In the permanent collection of the RAAF
In 2003 the Iraqi Regime under Saddam Hussein failed to comply with United Nation’s diplomatic efforts and the Coalition led Operation Iraqi Freedom was launched in response on 19/20th March. A commitment by the Australian Defence Force was initiated under Operation Falconer. The mutli-role capability of the F/A/-18 Hornet was fully tested between 20th March and 2nd May 2003 when the Australian fighter force flew numerous missions ranging from strike and close air support to defensive operations. On 1st April 2003 S/Ldr Glen Beck and his wingman, F/O John Haly, flew a typical strike against Iraqi armour on the roads of South Eastern Iraq. Following marking of targets by USAF A-10s the two Hornets successfully dropped their laser guided GBU-12 bombs before exiting the combat zone. Although most of the deployed aircraft were drawn from 75 Squadron RAAF the Hornets wore a variety of markings reflecting the crews from 3, 75 and 77 Squadrons RAAF.
Click to go back to the Fine Art Index
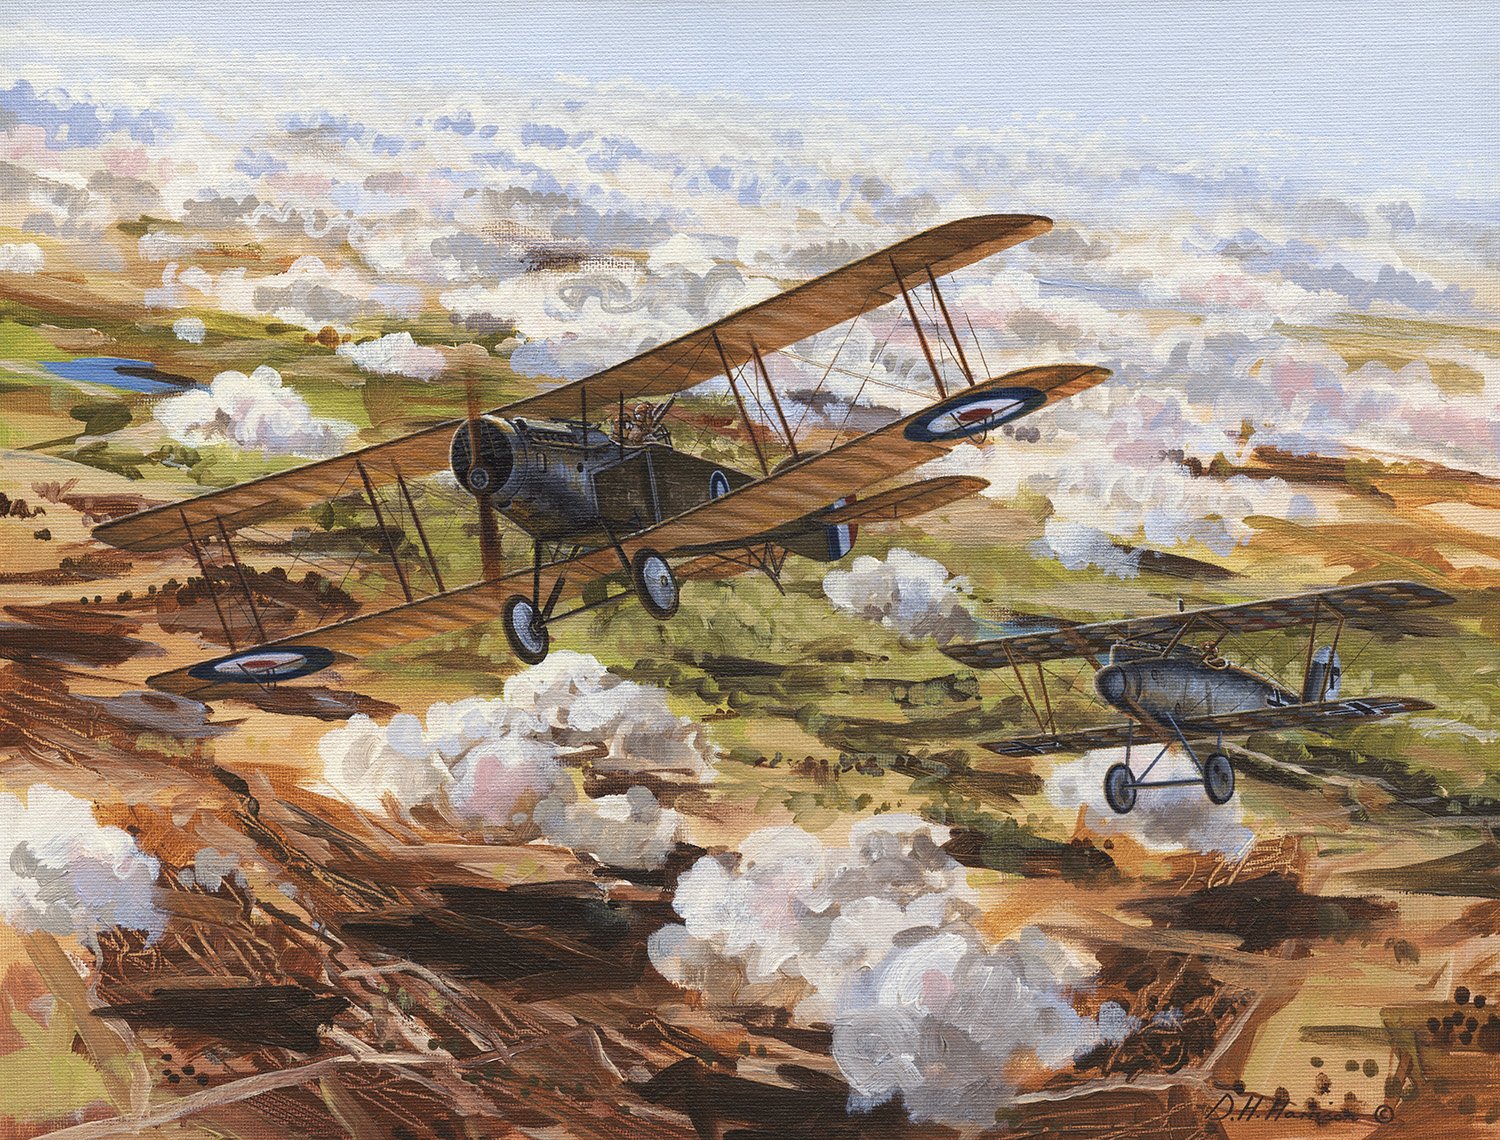
On the Frontier
(H) 30.5cm x (W) 40.7cm
(H) 12" x (W) 16"
Acrylic on Canvas Board
Framed Original available in the Store.
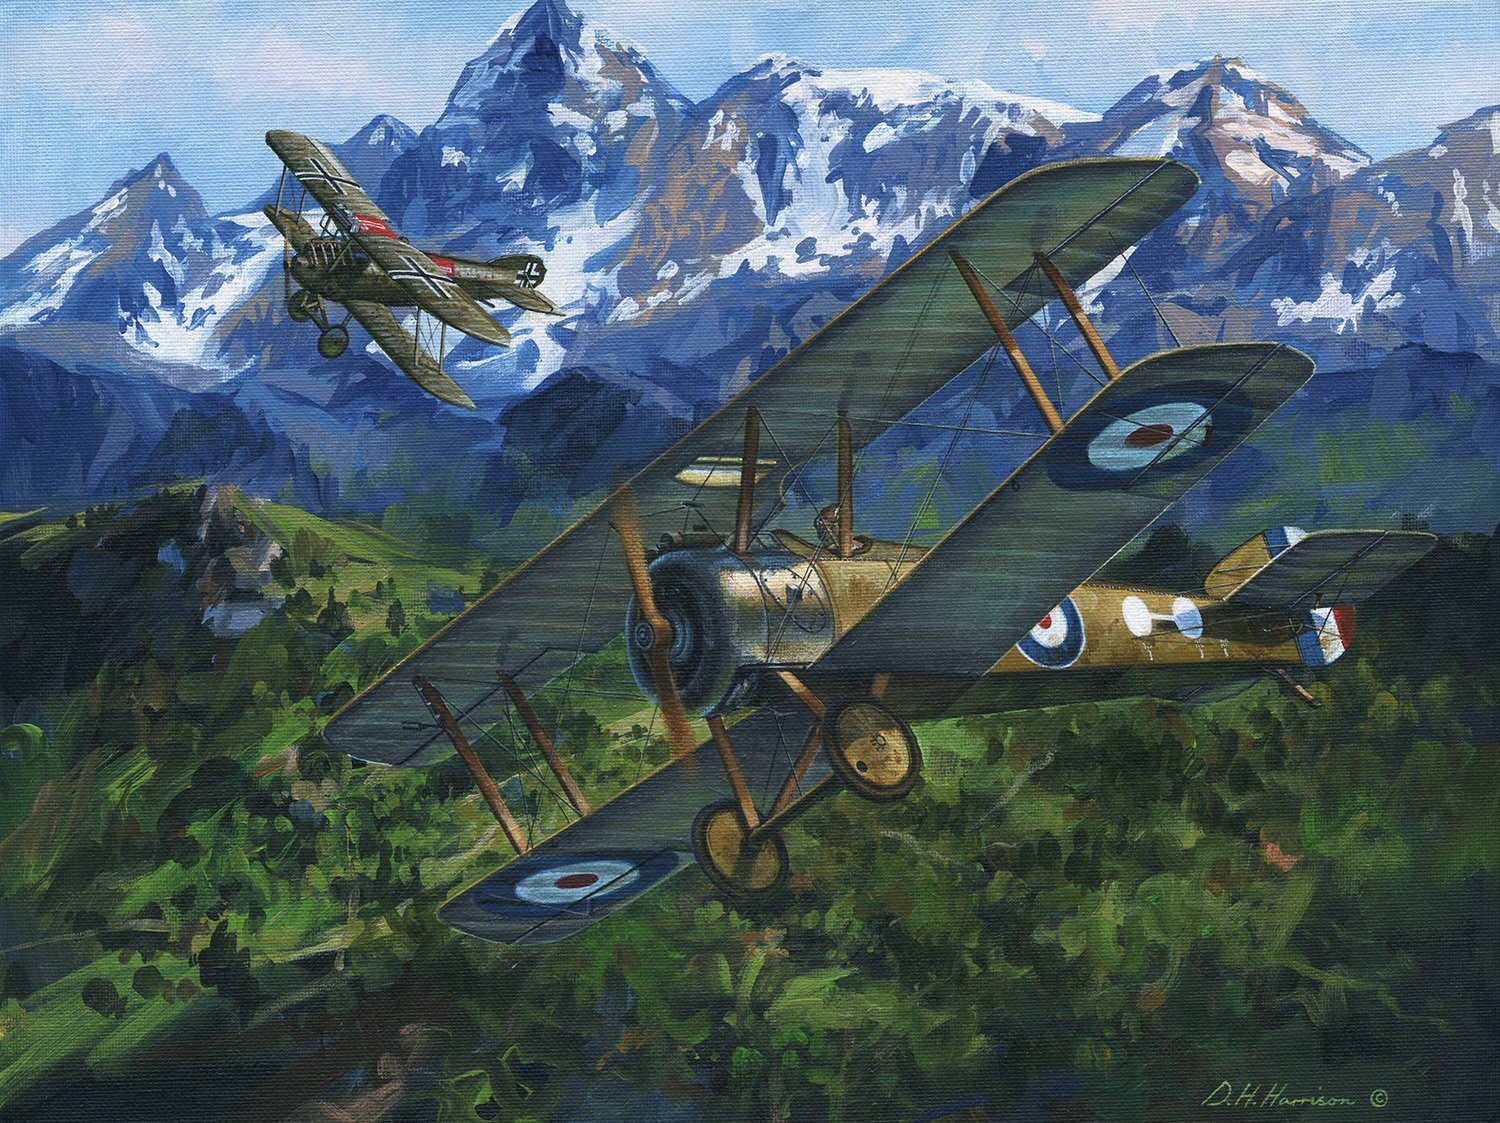
Adelaide born pilot George Peters in Bristol F2b of 1 Squadron AFC gets caught in a deadly duel with a Pfalz D.III of the Imperial Air Service over Palestine, 1918.
1 Squadron AFC was the first complete unit of the Australian Flying Corps when formed at Point Cook in 1916. On deployment it was initially labelled 67 (Australian) Squadron RFC before once again regaining the title 1 Squadron in early 1918. During that time it transitioned from a collection of obsolete aircraft to re-equip with the much improved Bristol F2b Fighter. 1 Squadron was far removed from the skies of the Western Front and operated in support of T E Lawrence in the Middle East. The unit saw several future notable aircrew pass through the ranks including Ross Smith. Another Adelaide born pilot, George Peters also flew with 1 Sqn AFC during 1918. When War commenced he had enlisted in the AIF and served as an engineer before moving to the Flying Corps. Peters, often flying with his regular observer Lt Traill were credited with seven victories between April and September 1918 and earned a Distinguished Flying Cross for an action on 24th August when engaging a superior number of enemy aircraft.
See also “The Forgotten Battlefront” for another painting of 1 SQN AFC over Palestine during WWI.
Why not consider your very own personalised commission? Click on link for details.
Alpine Duel
(H) 30.5cm x (W) 40.7cm
(H) 12" x (W) 16"
Acrylic on Canvas Board
Framed Original available in the Store.
Available as a Limited Edition puzzle from Puzzle Road.
CLICK HERE TO SHOP JIGSAW PUZZLE
Capt. Cedric ‘Spike’ Howell combats a Phönix D.IIa of Flik 3J, Austro-Hungarian Air Service over the Italian Alps circa 1918.
Cedric Howell was born in Adelaide, 1896, and was a draughtsman before the outbreak of the First World War. Like so many WWI pilots he first served as an infantryman, including action at Gallipoli and later as a sniper in France. He enlisted in the Royal Flying Corps during late 1916 and went on to gain his wings by mid 1917. Howell was posted to 45 Squadron RFC by the end of the same year and flew his initial patrols over France in Sopwith Camel scout planes. When the unit moved to Italy, Howell’s previous experience as an expert marksman began to show and the Australian became one of the leading fighter aces in theatre. Awards of a Distinguished Service Order, Military Cross and Distinguished Flying Cross added to his impressive tally of enemy aircraft brought down in combat.
Why not consider your very own personalised commission? Click on link for details.
Patrolling the Trenches
(H) 30.5cm x (W) 40.7cm
(H) 12" x (W) 16"
Acrylic on Canvas Board
Framed original available in the Store
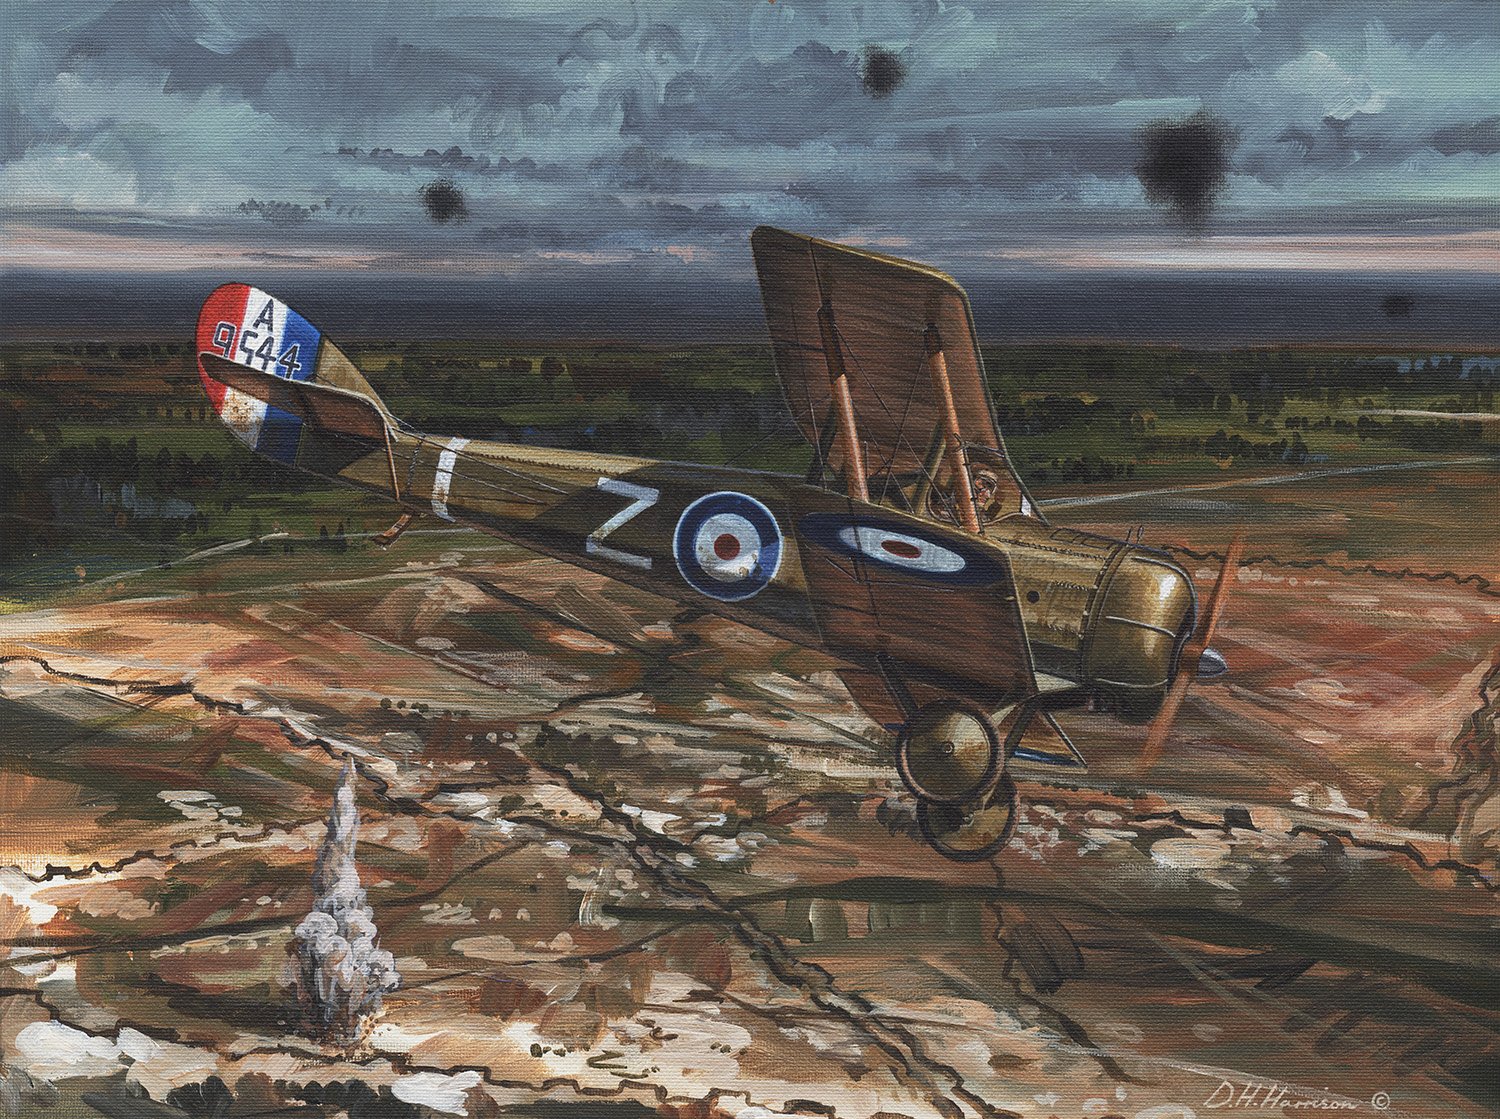
Bob McKenzie of 68 (Australian) Squadron RFC patrols a trenchline over the Western Front in his Airco DH.5, late 1917.
Chemist, Robert McKenzie was born in Adelaide, 1895. At the outbreak of war he joined the Australian Army Medical Corps and later transferred to the Flying Corps in December 1916. The Australian joined 68 (Australian) Squadron RFC at Harlaxton, England, then flying the ungainly Airco DH.5 Scout biplane. McKenzie deployed with the unit to Baizieux in France where the first patrols were flown during October 1917 and the Cambrai offensive in November. He achieved a single combat victory while flying the DH.5, when, on 1st December, an Albatros D.V was forced down NW of Villers-Guislan. He remained with the unit when retitled 2 Squadron AFC (Australian Flying Corps) and re-equipped with the SE5a Scout. McKenzie ended the war with six confirmed victories and the award of Military Cross.
Why not consider your very own personalised commission? Click on link for details.
COMMISSION INFORMATION
Last Light
(H) 30.5cm x (W) 40.7cm
(H) 12" x (W) 16"
Framed original available in the Store
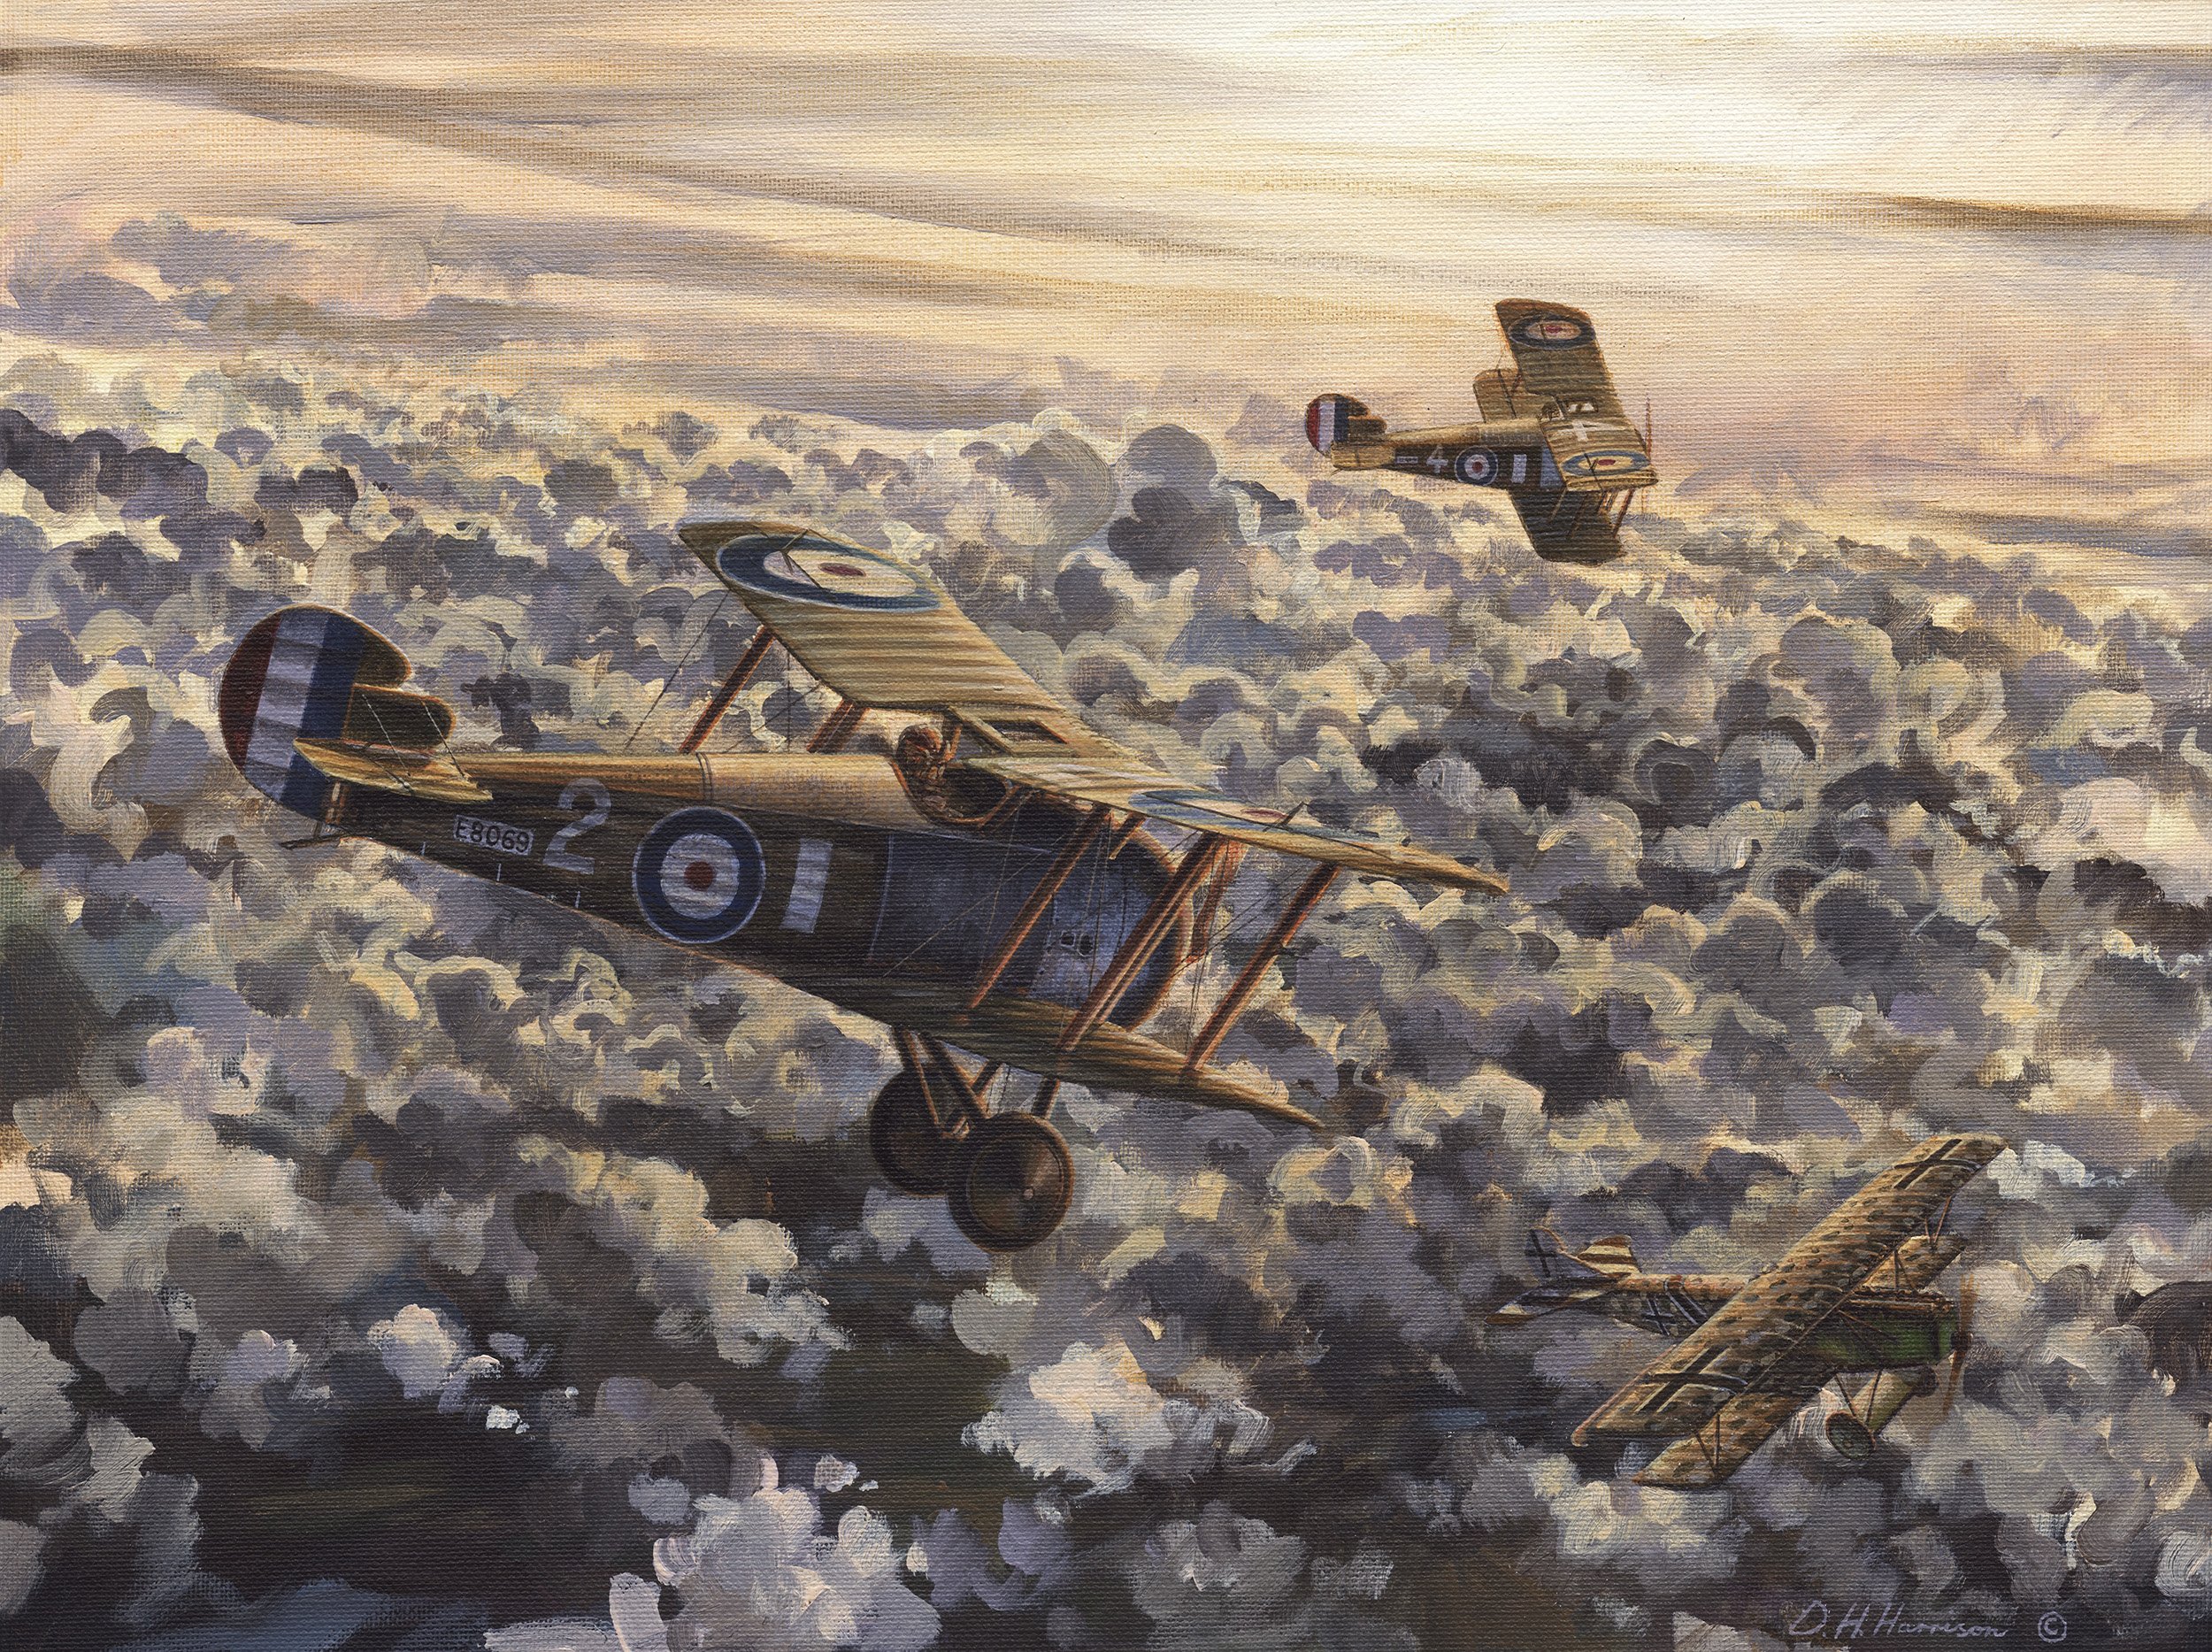
Sopwith Snipes of 4 Squadron AFC piloted by Thomas Baker and his wingman stalk a Fokker D.VII during the final hours of daylight during late 1918.
Born in 1897 at Smithfield, Tom Baker worked as a bank clerk prior to WWI. He joined the AIF in 1915 and served with distinction as a member of the 6th Field Artillery Brigade on the Western Front. Baker transferred to the Australian Flying Corps in late 1917 having already received a Military Medal and Bar for actions on the front. As a pilot with 4 Squadron AFC the Australian continued to display exceptional bravery and skill while flying numerous patrols and ground attack missions, firstly in Sopwith Camels and then Sopwith Snipe fighters. The Snipe was one of the premiere allied fighter aircraft of WWI and the Australian manned 4 Squadron became one of the first and only units to take it into action. By November 1918 Baker had been appointed a flight commander and was credited with destroying seven enemy machines with a further four deemed out of control. Many of his victories were achieved against the equally superb Fokker D.VII German biplane. Ultimately Baker became the victim of the very same foe when shot down and killed along with two other pilots during a large dogfight on 4th November 1918, only one week before the end of WWI.
Why not consider your very own personalised commission? Click on link for details.
Screaming Vengeance
(H) 30cm x (W) 42cm
(H) 11.81” x (W) 16.54”
Acrylic on Illustration Board
Available as a Limited Edition puzzle from Puzzle Road.
CLICK HERE TO SHOP JIGSAW PUZZLE
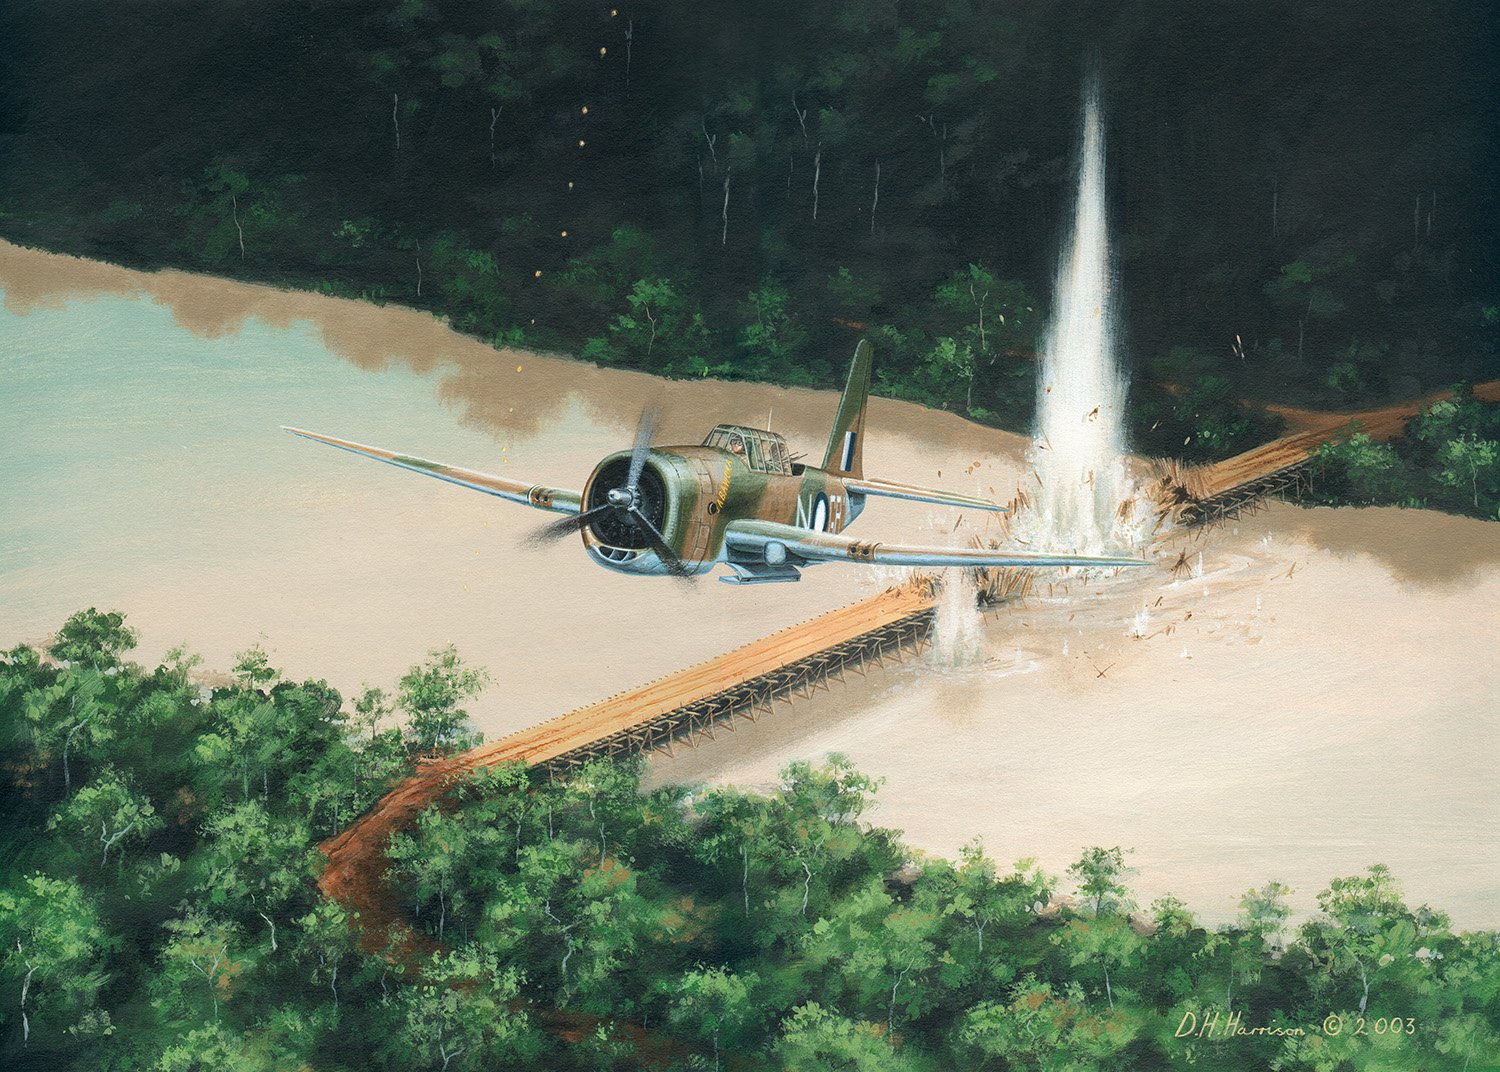
24 Squadron RAAF was one of five Australian Air Force Squadrons armed with the American Vultee Vengeance dive-bomber. Although not as widely known as the German Stuka it was available to the RAAF in numbers and pressed into service in the South-West Pacific during 1943. F/O Geoffrey L. Stevenson joined 24 Squadron in early 1943 and soon earned a reputation for determined attacks. The squadron often dive-bombed bridges to sever supply lines along the Markham Valley in Papua New Guinea. Although lightly protected, the wooden or bamboo structures were easily repaired and would usually be back in operation overnight. By the end of his tour Stevenson had flown over twenty dive-bombing strikes against varied targets and awarded a DFC commending him on “courage and devotion to duty of the highest order”.
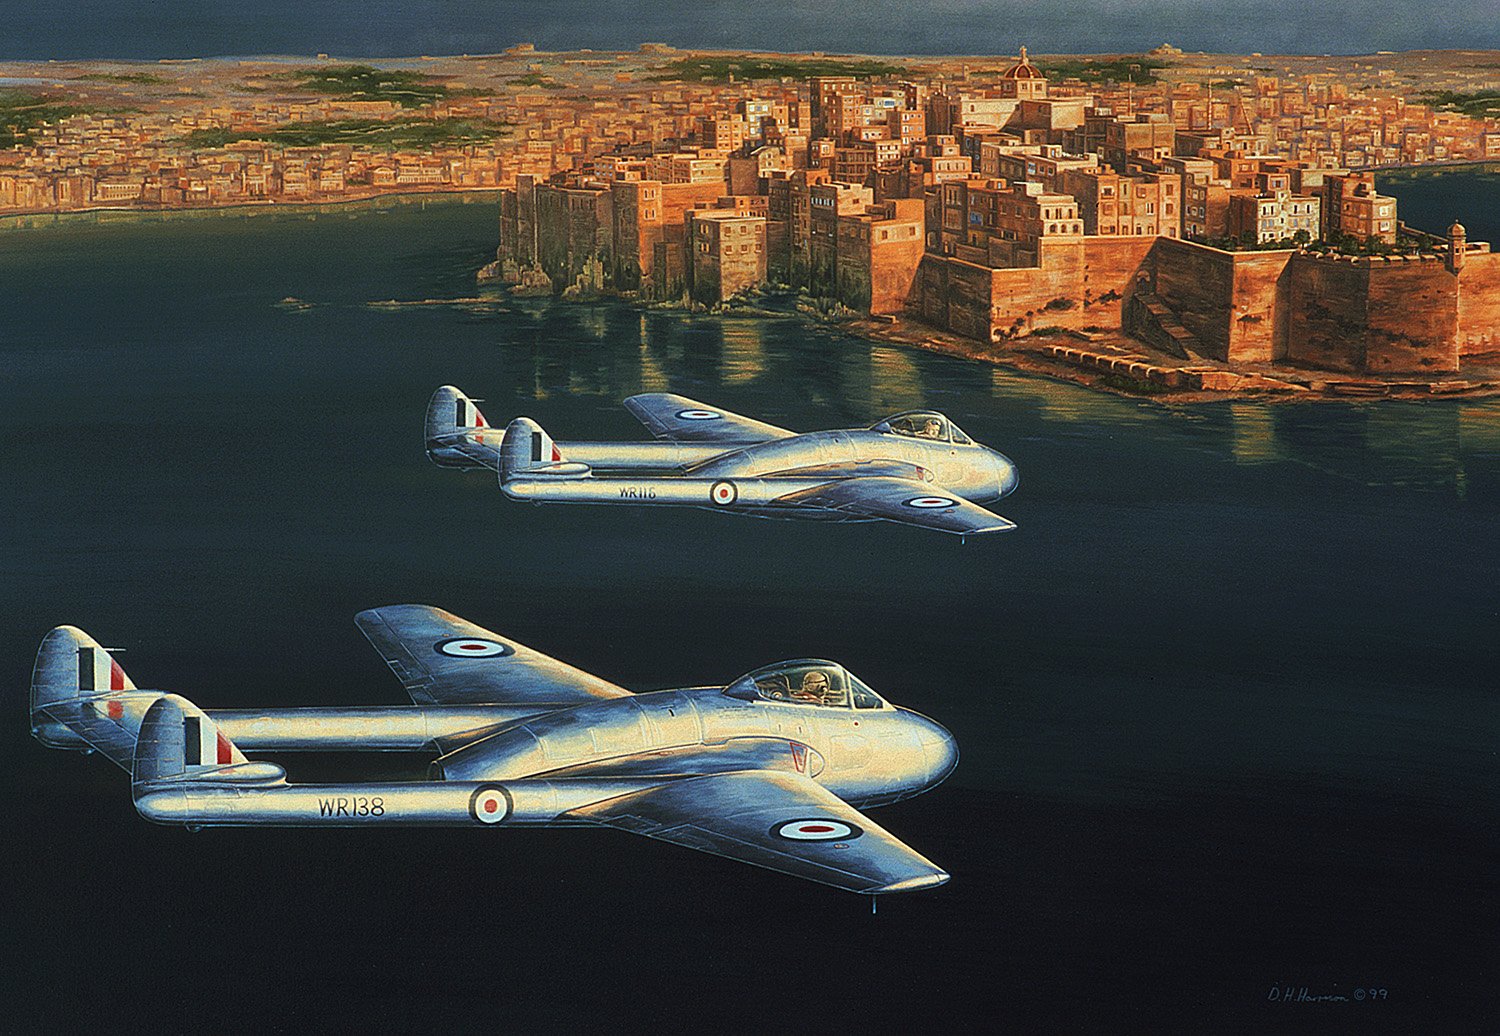
Malta: The Vampire Citadel
(H) 45cm x (W) 63.5cm
(H) 17.71” x (W) 25”
Acrylic on Illustration Board
2nd Prize – 1999 Royal Australian Air Force Heritage Awards
In the permanent collection of the RAAF
During 1949, 75 and 76 Squadrons RAAF were reformed under 78 (Fighter) Wing as the first Australian frontline units equipped with Australian built De Havilland Vampire jet fighters. By 1952 the squadrons were sent on deployment to the Middle East in support of Britain’s Middle East Air Force, United Nations and NATO. Hal Far, and later Ta’Qali aerodromes, Malta, became the Australian base of operations during a two-year peacetime deployment under command of wartime leader W/C Brian Eaton. While in the Mediterranean the RAAF squadrons were equipped with British FB.9 Vampires, including WR116 and WR138, and became involved in a long list of joint exercises with other nations, such as November Moon, 1953, and Shield One, 1954.
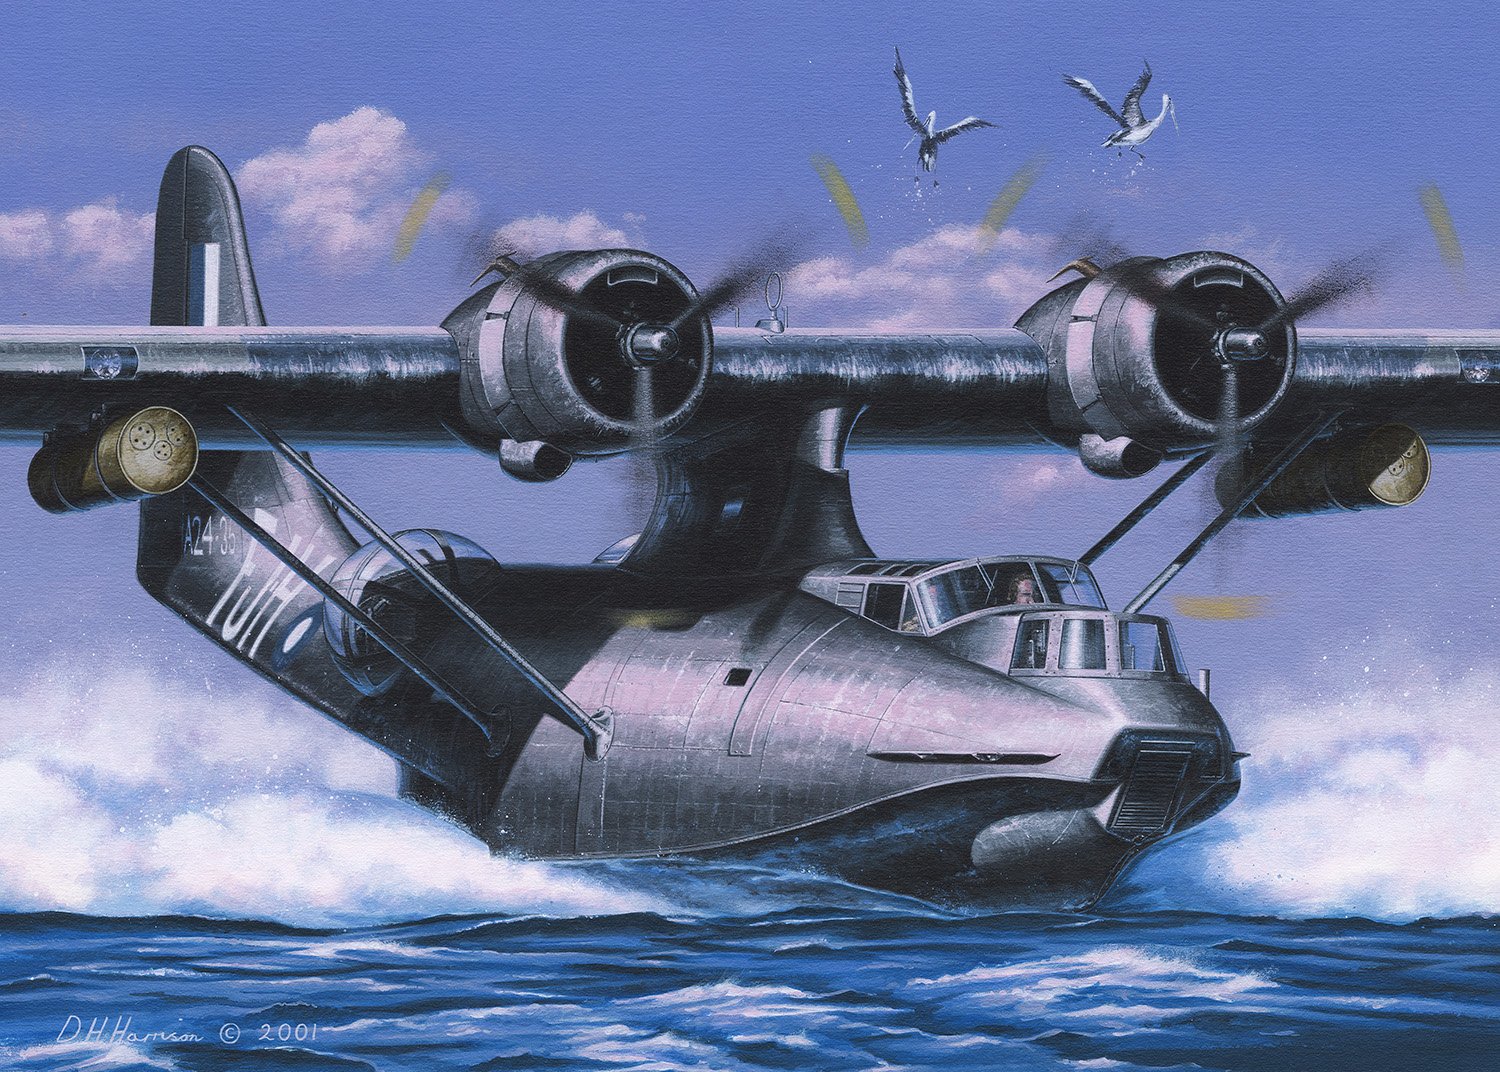
On the Step
(H) 30cm x (W) 42cm
(H) 11.81” x (W) 16.54”
Acrylic on Illustration Board
Also as a Limited Edition puzzle from Puzzle Road.
CLICK HERE TO SHOP JIGSAW PUZZLE
During the early days of the Pacific War RAAF PBY Catalinas were in some cases the only method of staging offensive operations. The major benefit of the ungainly Consolidated flying boats were their extreme range. 11 Squadron RAAF, with black painted PBYs known affectionately as ‘Black Cats’, would often fly mining missions across the wide expanse of ocean in the South-West Pacific. F/Lt Albert E. Minty was a pilot with 11 Squadron late in the war and flew regular operations out of Northern Australia including in PBY-5 Catalina, FJ-H/A24-35. The heavy sea mines were carried on under wing hardpoints and added enormously to the overall weight of the Catalinas. Take-off time could increase to two and half minutes as opposed to the usual thirty seconds and a single mission could last 25 hours over enemy held islands and territories. Dropping mines in crowded harbours at night also required precise navigation and pinpoint drops by the crews.
Operation Bowler
(H) 63.5cm x (W) 102cm
(H) 25” x (W) 40.15”
Acrylic on Canvas
Available as a Limited Edition print signed by the artist and former RAF F/O and 3rd Flight Leader for 450 Squadron during Operation Bowler, S/Ldr C.J. ‘Bush’ Barrey DFC, AFC, DFM (RAF retired).
SHOP LIMITED EDITION PRINT NOW
Also as a Limited Edition puzzle from Puzzle Road.
CLICK HERE TO SHOP JIGSAW PUZZLE
Operation Bowler was the codename for one of the most accurate and successful air raids of World War II. On March 21st, 1945, fighter bombers of 239 Wing RAF (Desert Air Force) attacked shipping in Venice Harbour, Italy. Australian Kittyhawks of 450 Squadron RAAF, “The Desert Harassers”, stage across the lagoons on approach to Venice as the German flak guns send explosive shells hurtling towards the aircraft. Many feet below 3 squadron RAAF Mustangs bomb and strafe while in the distance 250 Squadron RAF Kittyhawks have commenced diving. The aftermath revealed 6000 tonnes of shipping stricken in the narrow confines of Venice harbour. In a tribute to the dive-bombing accuracy of 239 Wing only a gasworks, tobacco factory and one private residence received minor damage for the loss of one Kittyhawk.
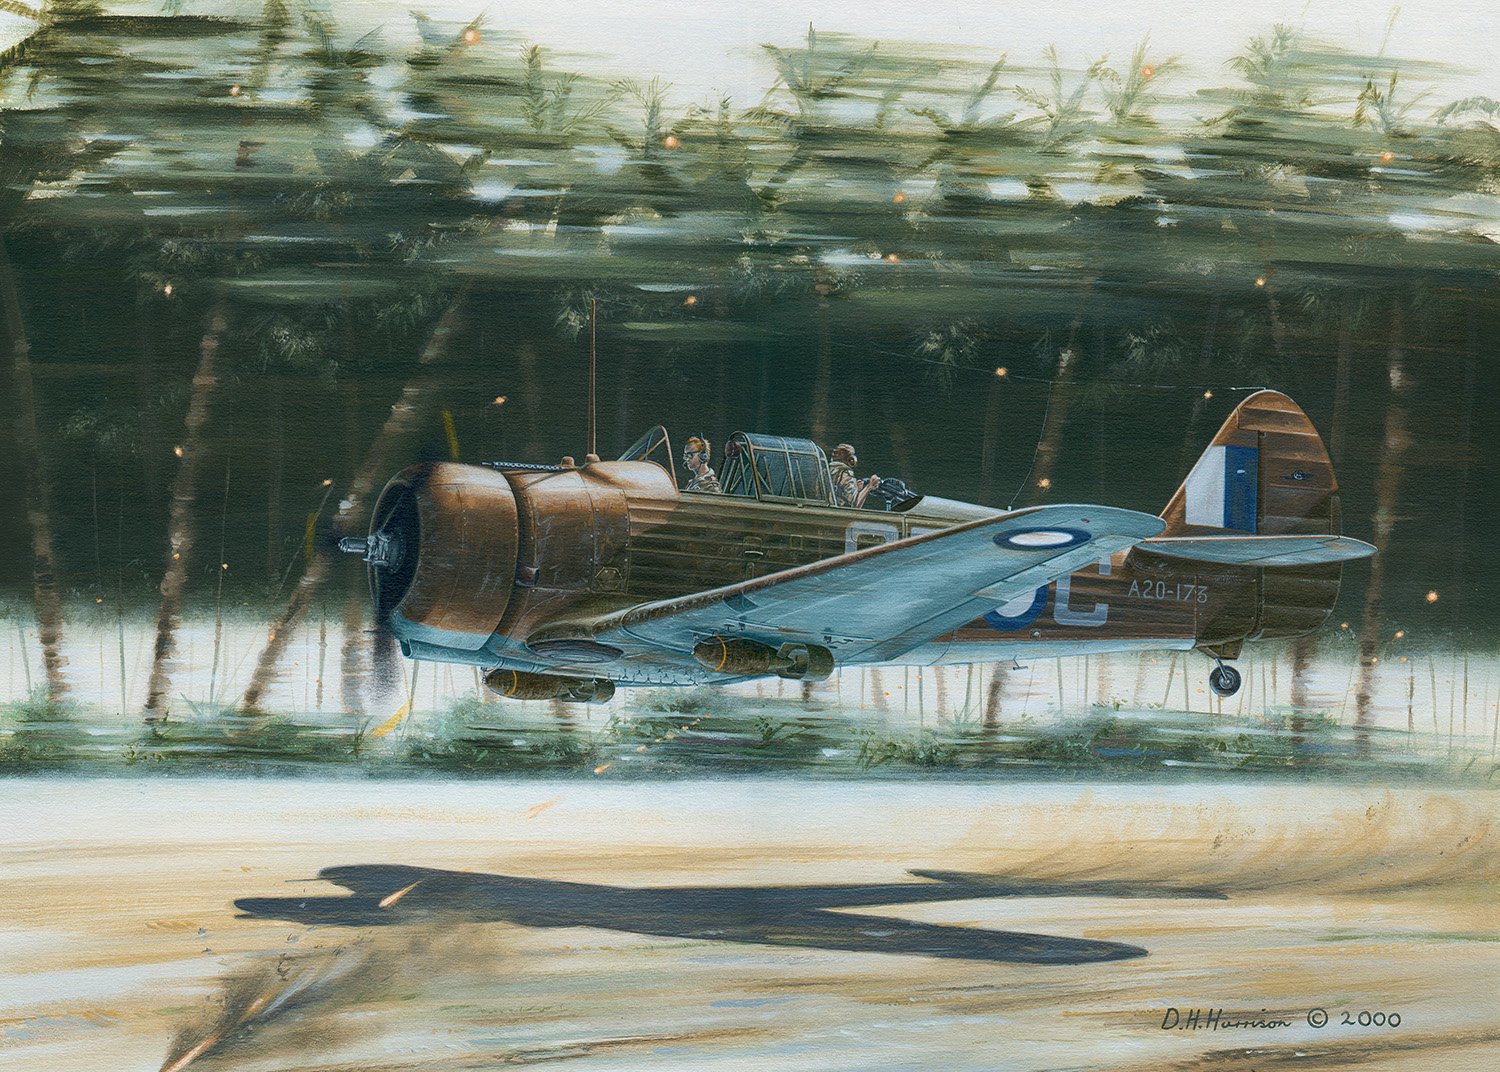
Devotion to Duty
(H) 30cm x (W) 42cm
(H) 11.81” x (W) 16.54”
Acrylic on Illustration Board
Available as a Limited Edition puzzle from Puzzle Road.
CLICK HERE TO SHOP JIGSAW PUZZLE
Australia’s first indigenously designed and built aircraft, the Commonwealth Aircraft Corporation (CAC) Wirraway, failed as a fighter although proved ideal when repurposed in the Tactical Reconnaissance role with 4 and 5 Squadrons RAAF. The former squadron supported Army units during the Buna-Sanananda campaigns of 1942, often flying their aircraft at low level to direct artillery fire, provide observation duties and supply drops. The pilot and observer team of F/O Elton M. Ifould and Sgt Alan E. Cole were briefed for a mission of aerial support and masking allied tank noises to the enemy on 18th December, 1942. Departing for Buna airstrip in CA-7 Wirraway, QE-C/A20-173, Ifould piloted towards the enemy gun emplacements at extremely low level and attempted to draw fire away from the tanks. With his life in the pilot’s hands, Cole continued to harass the enemy positions with machine gun fire. Both crew were decorated for their actions during support of American artillery including a US Silver Star for Ifould and Cole a DFM.
The Deadly Game
(H) 30cm x (W) 42cm
(H) 11.81” x (W) 16.54”
Acrylic on Illustration Board
Available as a Limited Edition puzzle from Puzzle Road.
CLICK HERE TO SHOP JIGSAW PUZZLE
The Australian designed and built Commonwealth Aircraft Corporation (CAC) Boomerang fighter was the second aircraft used by the RAAF’s Tactical Reconnaissance (Tac/R) units, 4 and 5 SQNs RAAF. Along with the Wirraway, the Boomerang was ideal for low level Army Co-operation including artillery spotting and target marking. Two fighters often worked in tandem with one providing top cover while the second performed the primary objective. On 15th September, 1943, F/O Ronald A. Dickson, DFC, of 4 SQN RAAF was scheduled for a reconnaissance mission over the Bumbu Road and Markham Point in Papua New Guinea in CA-13 Boomerang A46-111. Looking in his mirror while flying low over Lae airstrip he noticed deadly, black puffballs tracking his aircraft. While under direct fire from the ground forces, Dickson continued circling the airstrip to complete his mission. His display of skill and courage on this date, and in over sixty other missions, lead to his subsequent award of DFC.
81 Wing BCOF 1947
(H) 76cm x (W) 101cm
(H) 30" x (W) 40"
Acrylic on Canvas
Original Canvas artwork available in the Store.
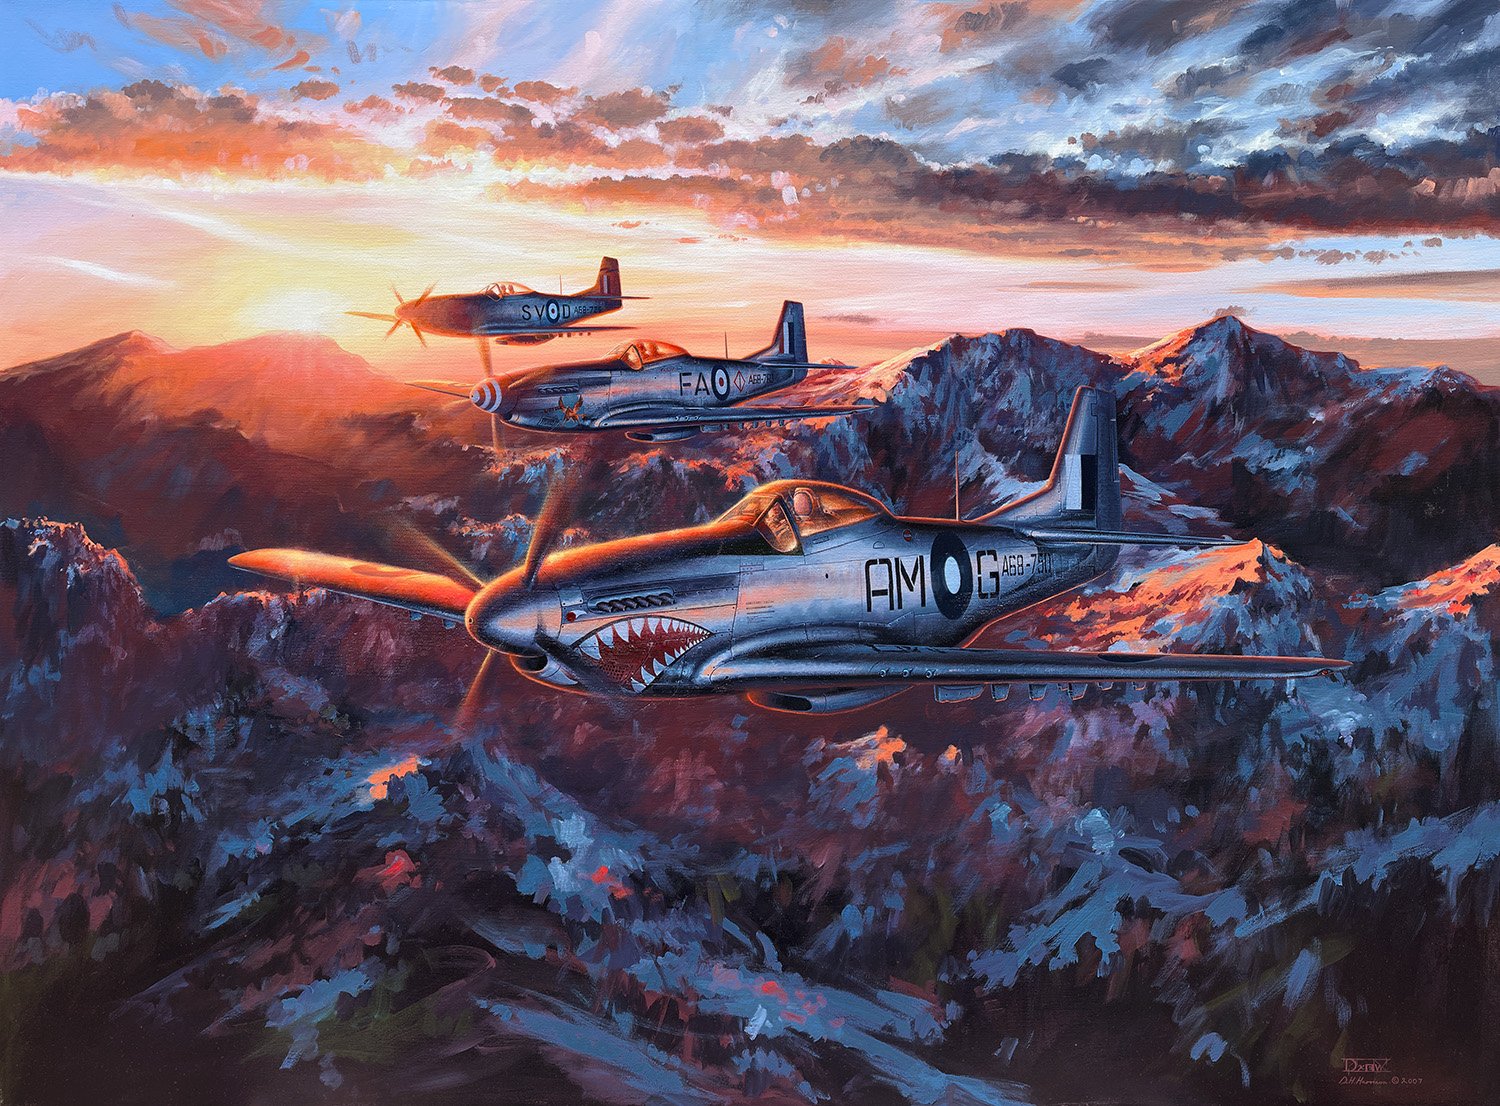
Mustang fighters of the British Commonwealth Occupational Forces patrol the Japanese mainland during the early post-WWII era. A select Australian fighter force was committed to the region from early 1946, forming 81(F) Wing (RAAF). This included 76, 77 and 82 Squadrons (RAAF). A representative machine is depicted for each of the squadrons including: P-51D: A68-750/AM-G – 77 SQN (RAAF) P-51D: A68-769/FA-◊ - 82 SQN (RAAF) P-51D: A68-725/SV-D – 76 SQN (RAAF). All three fighter squadrons had seen service during the latter stages of the Pacific War and were newly converted to the North American fighter. Many of the pilots were also combat veterans having seen action in Europe, Italy, North Africa, China, Burma, India and the Pacific. Although 76 and 82 SQNs departed Japan in 1948, 77 SQN remained. Within two years this unit was in action during the Korean War. One of the first United Nation forces to respond to the emergency.
Why not consider your very own personalised commission? Click on link for details.
COMMISSION INFORMATION
Combined Strike
(H) 64cm x (W) 102cm
(H) 25.19” x (W) 20.15”
Acrylic on Canvas
SOLD
Available as a Limited Edition Giclee print from the Store.
Donated by the late Kym Bonython AC, DFC, AFC to be included as part of the South Australian Aviation Museum collection.
Published in “Song of the Beauforts: No 100 Squadron RAAF and Beaufort Bomber Operations” by Colin M. King. This book is out of print, however, an online version can be accessed at link.
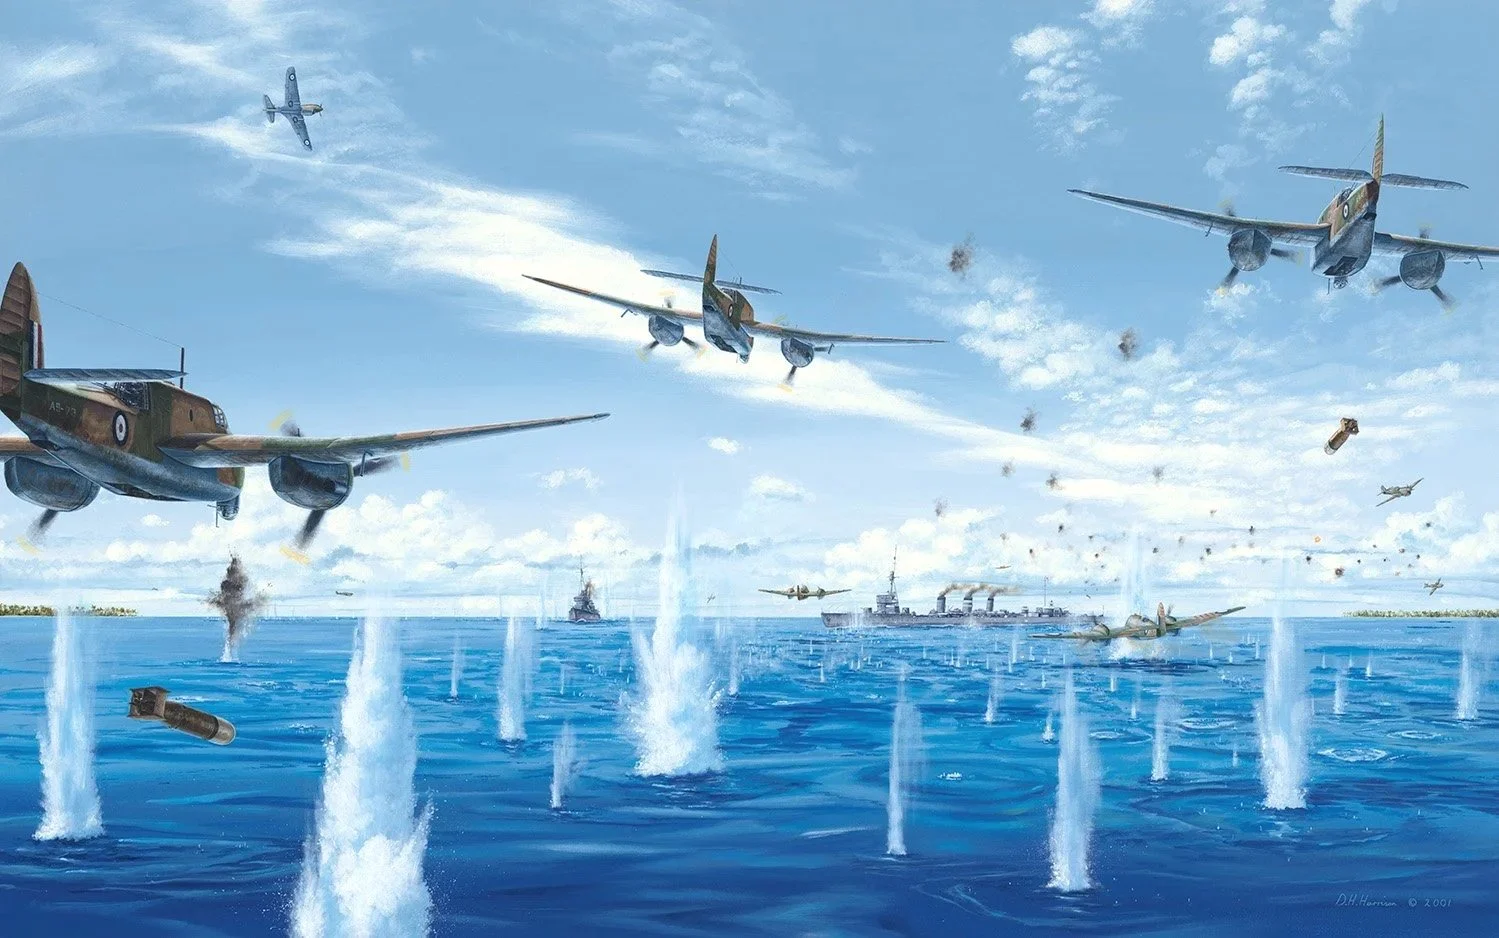
During the desperate defence of Milne Bay, Papua New Guinea, on 7th September, 1942, two Japanese vessels were sighted by Australian Hudson bombers in the Solomon Sea. After attacking the ships with bombs, the 6 SQN RAAF Hudsons relayed their position to allow for further harassment. An immediate response was organised resulting in the first co-ordinated fighter/bomber/torpedo attack by the RAAF against the Japanese. It was also the first operational mission for the newly arrived 100 SQN RAAF. Three Beauforts led by Kym Bonython (Bristol Beaufort Mk.VI, A9-75) targeted the Japanese Light Cruiser, Tenryu. In return the enemy gunners sent a hail of lead towards the attacking aircraft, resulting in a shower of sea water. Two Beaufighters of 30 SQN RAAF attempted to fly through the waterspouts to silence the guns and provide some form of cover for the force. Kittyhawks of 75 and 76 SQNs strafed during the entire operation, attempting to divert the attention of the second vessel, the Kagero Class Destroyer, Arashi. Although both ships suffered only light damage it was later discovered the American Mk.XIII torpedoes used by the Australians were faulty and had a tendency to change course during launch. The same weapons were used by USN submarines that reported similar findings with directional instability.
Why not consider your very own personalised commission? Click on link for details.
Untitled: Airbus Tiger with USMC Cobra
(H) 30.5cm x (W) 40.5cm
(H) 12” x (W) 16”
Acrylic on Canvas
SOLD (Commission)
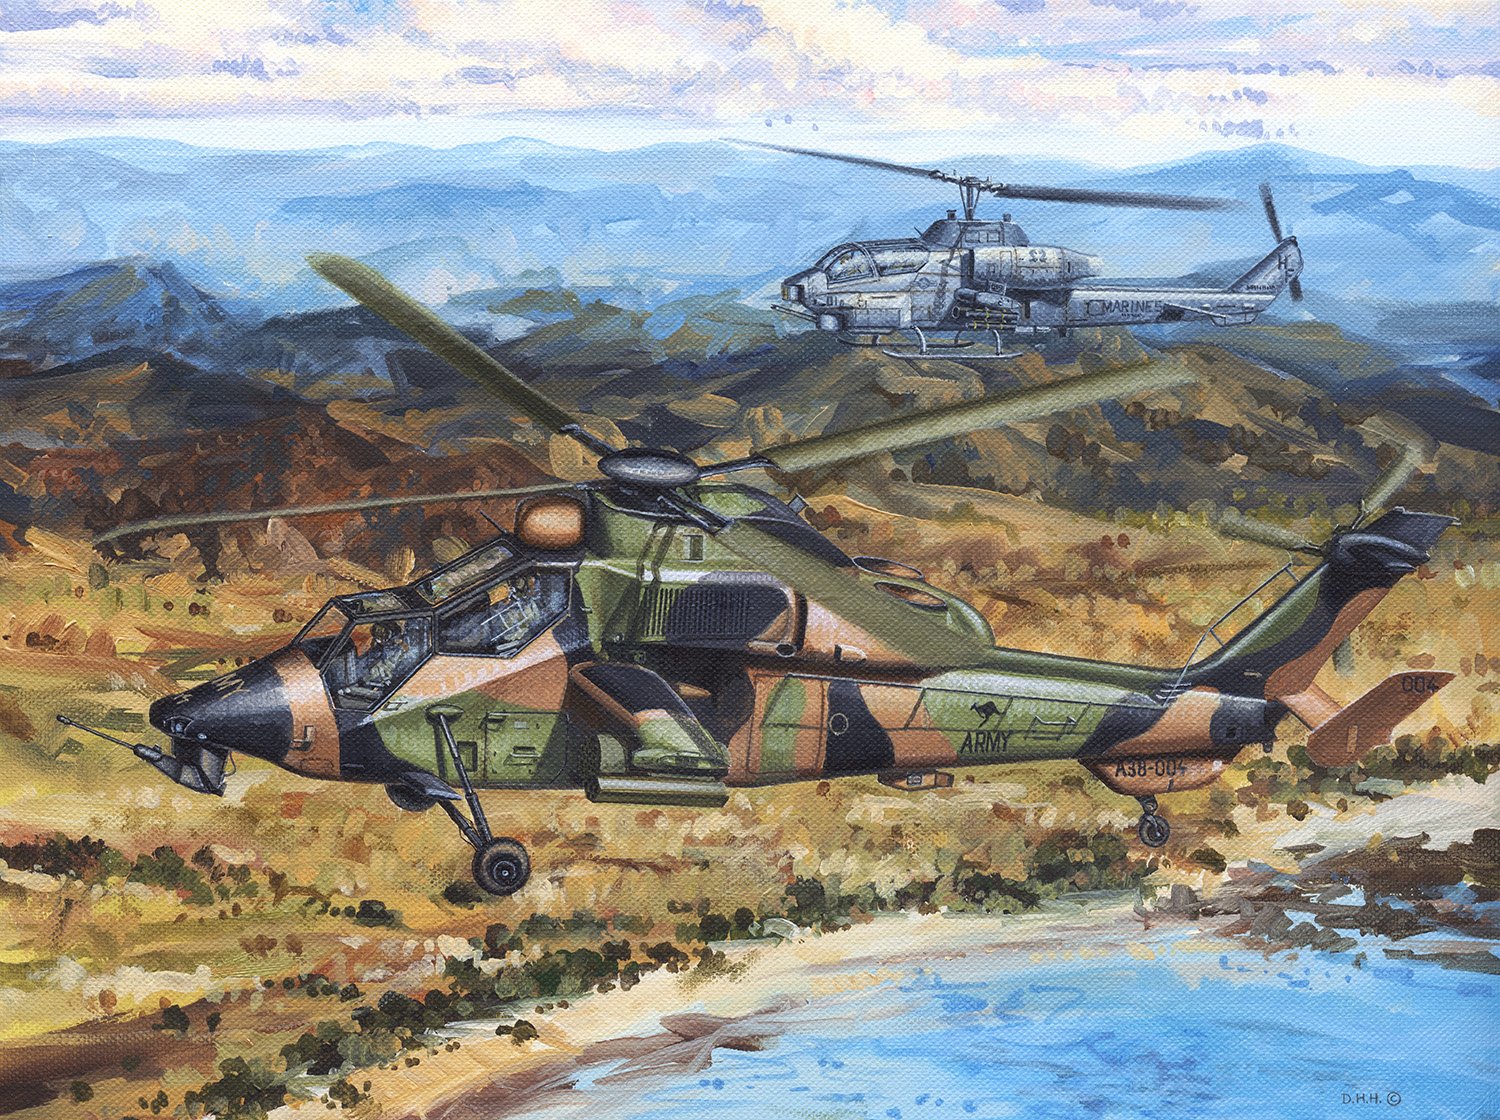
Imagined formation of AAAvn Airbus EC-665 Tiger (A38-004) with USMC AH-1W Cobra. Commissioned by USMC pilot as presentation to the 1st Aviation Regiment on completion of exchange duty.
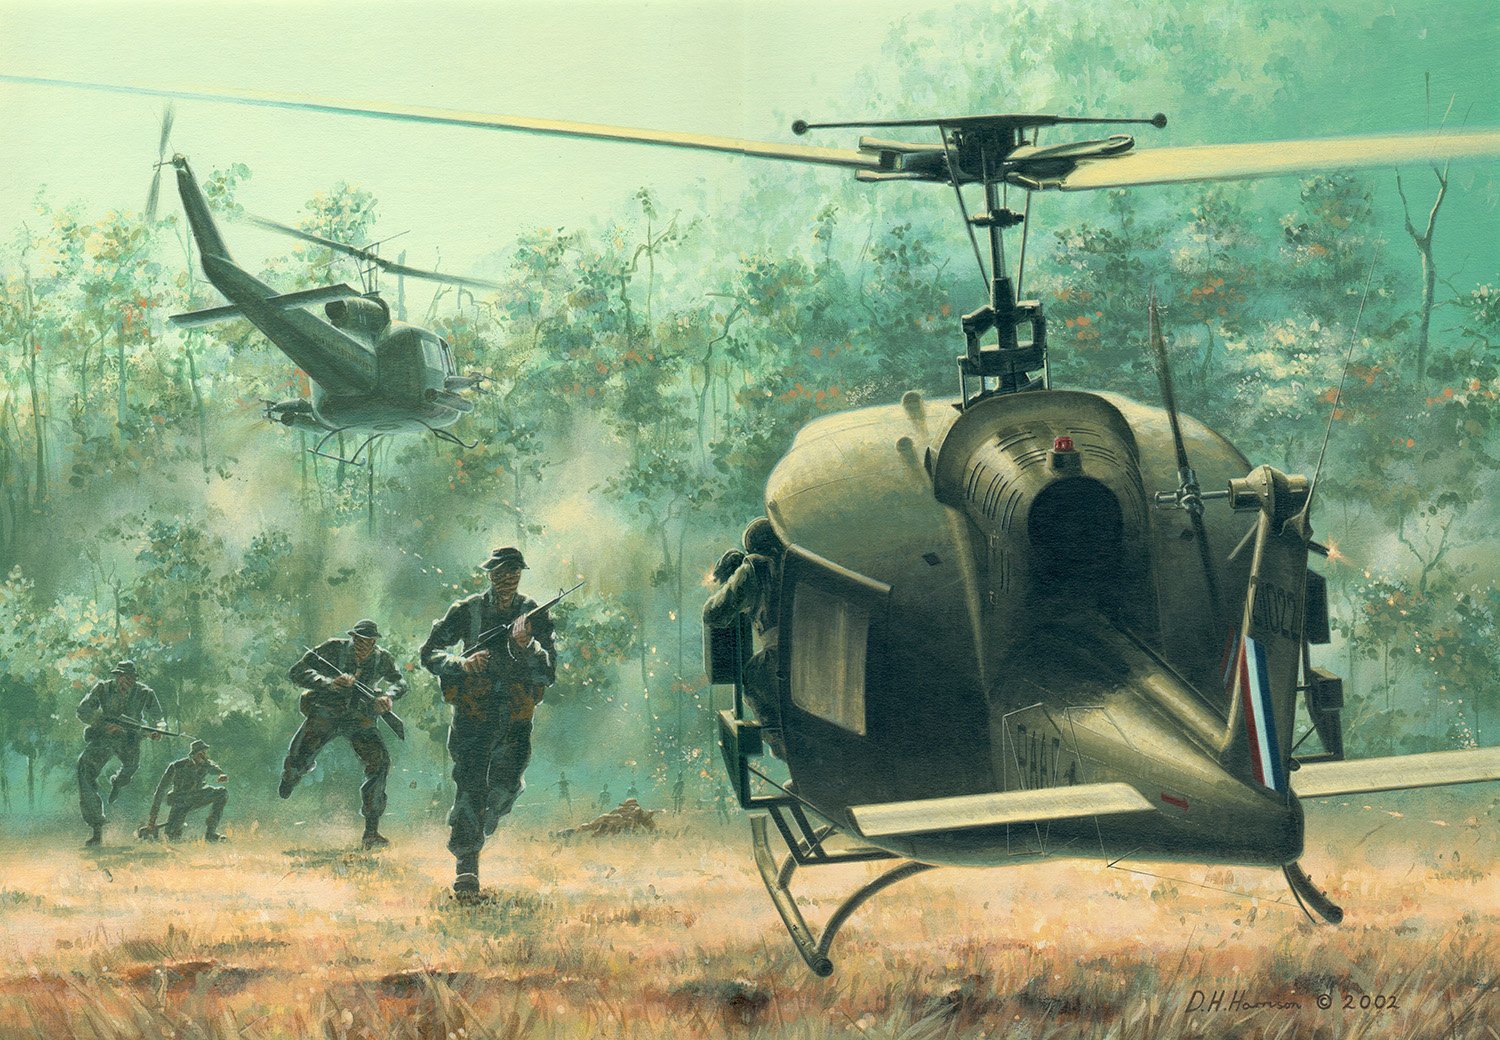
Hot LZ
(H) 30cm x (W) 42cm
(H) 11.81” x (W) 16.54”
Acrylic on Illustration Board
Available as a Limited Edition Medallion commemorating 100 Years of the Royal Australian Air Force.
On 10th August 1967 two 9 SQN RAAF UH-1B ‘Hueys’ were assigned to provide ‘insertion’ of an SAS long range reconnaissance patrol. Soon after delivery at the landing zone (LZ) the patrol commander radioed for an immediate retrieval. The small squad had come under intense gunfire from a large force of North Vietnamese Army troops. The helicopters were vectored to a nearby clearing in order to perform a ‘hot’ extraction, ie under enemy fire. Upon arrival the lead helicopter advised that the situation was worsening. Arriving in the second RAAF helicopter, P/O Michael ‘Mick’ Haxell and crew (P/O Byrnes, LAC McCreadie and LAC Malcolm) agreed to perform the retrieval. In the ensuing rescue the team were able to rescue the troops while Haxell also had to contend with very difficult flying conditions and the subsequently heavily loaded helicopter. For his combat actions and other flying duties with 9 SQN he would be awarded the DFC and later command the unit.
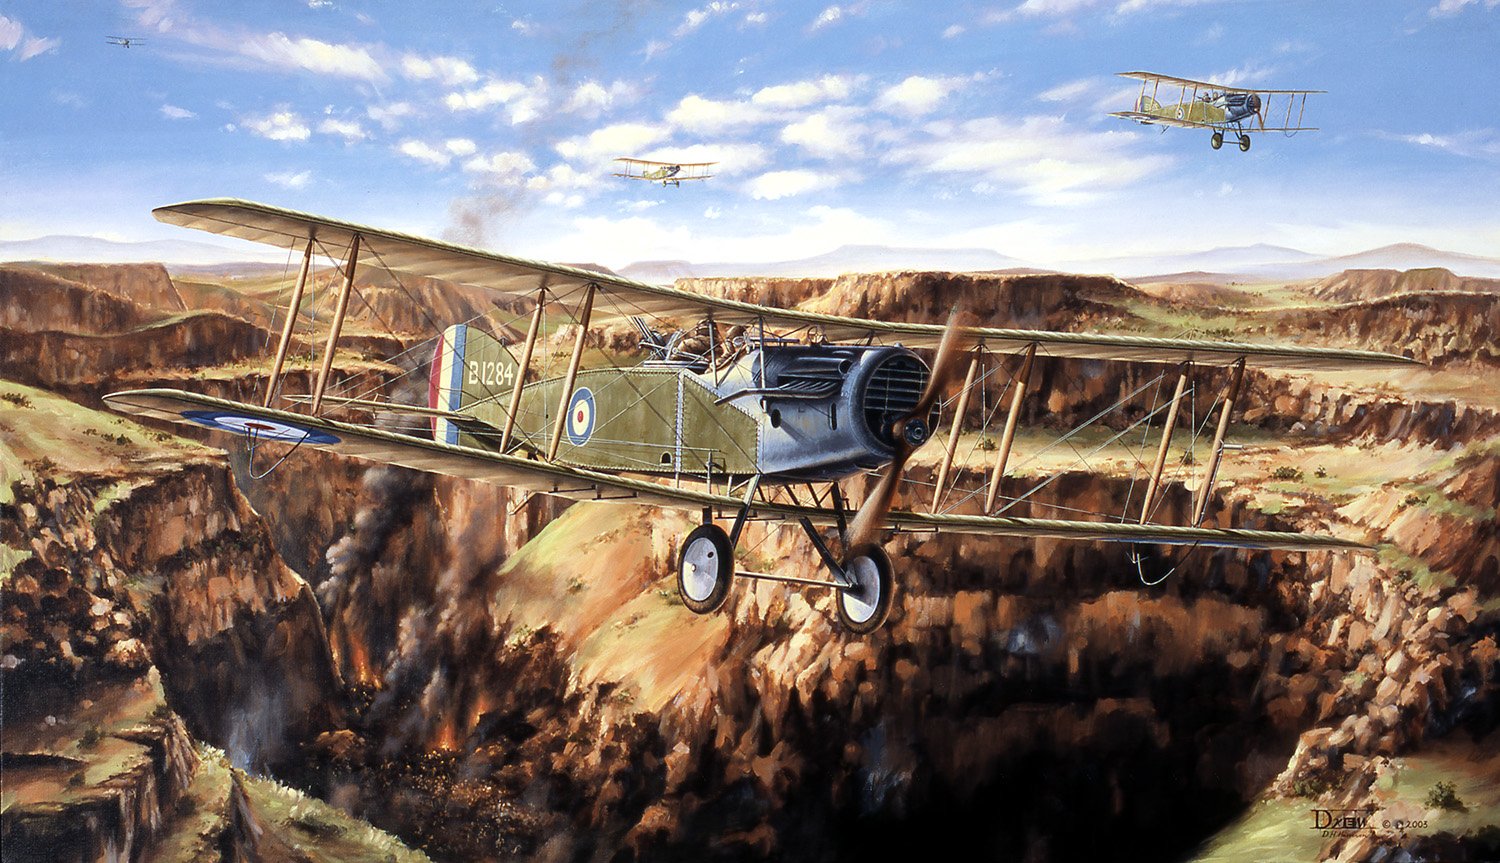
The Forgotten Battlefront
(H) 58cm x (W) 100cm
(H) 22.83" x (W) 39.37"
Acrylic on Canvas
SOLD
During World War I a fierce campaign was waged by Commonwealth squadrons against German and Turkish forces in the Middle East. Although numerically stronger than their foes, the allied squadrons were hard pressed with outdated machinery for most of the campaign. 1 SQN (AFC) was formed in January of 1916 at Point Cook, Australia. After arriving in Egypt the unit was known as 67 (Australian) SQN RFC and began flying operations in June of the same year. By 1918 it reverted to the original 1 SQN AFC title and re-equipped with the superb Bristol F2.b fighter. In Palestine a detachment from 1 SQN helped support the land forces led by the infamous T.E Lawrence (of Arabia). During The Battle of Armageddon, September 21st, 1918, at the Wadi el Far’a in Palestine, 1 SQN were tasked with routing remnants of the Turkish 7th Army. Included in the mission were the fighting team of Captain Allan Runciman Brown with Lieutenant Garfield Finlay as observer/gunner in ‘Brisft’ B1284. By war’s end this successful duo had attained the coveted ace status with at least five enemy aircraft claimed in combat.
See also “On the Frontier” for another painting of 1 SQN AFC over Palestine during WWI.
Why not consider your very own personalised commission? Click on link for details.

Spitfire Mk.I A Legend Rises
(H) 50cm x (W) 40cm
(H) 19.68” x (W) 15.74”
Acrylic on Canvas
During the Summer of 1940 the Royal Air Force fought for survival over the skies of England. Although often outnumbered by the German Luftwaffe, many Commonwealth pilots were fortunate to be flying the Supermarine Spitfire into battle. The elliptical winged fighter had only entered service a year earlier, however, it was during the Battle of Britain that the legend was forged.
A Legend Rises is a tribute to the Spitfire Mk.I as flown by pilots of the Royal Air Force during the early WWII period. The depicted subject AZ-Q, X4009 of 234 SQN RAF was piloted by Australian air ace ‘Pat’ Hughes DFC from New South Wales. He joined the RAF in 1937 and became Australia’s top scoring fighter pilot during the Battle before tragically being killed in combat on 7th September 1940.
His legacy remains in X4009. The wreck of this aircraft was recovered and is currently under restoration to airworthiness at The Hunter Fighter Collection in Scone, NSW, Australia.
Companion to this artwork is Hurricane Mk.I: Valiant to the End.
Interested in a similar painting for a favourite unit, squadron or aircraft? Check out the commissioning information and get in touch.

Hurricane Mk.I Valiant to the End
(H) 50cm x (W) 40cm
(H) 19.68” x (W) 15.74”
Acrylic on Canvas
During the Summer of 1940 the Royal Air Force fought for survival over the skies of England. The elliptical wing Spitfire is often associated with the Battle of Britain, although it was the Hawker Hurricane which flew in greater numbers. Introduced to service during the mid-1930s it was the Royal Air Force’s first monoplane fighter and used extensively throughout WWII across all fronts.
Valiant to the End is a tribute to the Hurricane Mk.I as flown by pilots of the Royal Air Force during 1940. The main subject, YB-E, P3673 was flown by Desmond Fopp of 17 SQN RAF. Fopp hailed from South Australia although was not an ace, commander or highly decorated pilot. During a combat on 3rd September he was forced to bail-out from this Hurricane and suffered burns to his body and loss of eyesight. He recovered and returned to flying later in 1940, also surviving the war.
Secondly is Hurricane GN-N, V7677 of ace William Henry ‘Bill’ Millington DFC. Bill was actually born in England although spent his youth in Australia from around age 10. He served with 79 SQN RAF and then 249 SQN RAF. Luck ran out on 30th October 1940 when he did not return from dogfights over the English Channel. Bill Millington has no known grave and was sadly the last Australian fatality of the Battle of Britain.
Companion to this artwork is Spitfire Mk.I: A Legend Rises.
Interested in a similar painting for a favourite unit, squadron or aircraft? Check out the commissioning information and get in touch.
Aviation
Welcome to the Aviation Art Gallery of contemporary and fine artist Drew Harrison.